Week 7 [Mar 4]
Coding exercise
- Complete the coding exercise for 3kLoC enhancement before the tutorial this week (refer to Week 6 Project tab) for details.
The Project List Page
- The Project List Page will be up this week.
If your photo or your UI mock-up does not appear in the page, you have not followed our instructions correctly. 'Close enough' is sometimes not 'good enough'. Please rectify before v1.1 deadline. In particular,
- Please follow our guidelines for your photo. If not, the photo will not serve its intended purpose (i.e., for others to identify you).
- Please limit the
Ui.pngto one screenshot only, so that your UI mockup takes roughly the same amount of space as other teams' in the Teams Page.
v1.1 milestone deadline is coming up soon: Refer to v1.1 instructions carefully and try to follow as closely as you can. However, there is no lower bar on the code changes you need to do. Even a tiny change is acceptable. Use that flexibility to control your workload.
Mid-semester feedback session
- Peer Evaluation Round 1 will open on TEAMMATES. You will receive the submission link soon. If you do not submit feedback responses, you will forfeit participation marks that you earned based on feedback ratings received from others.
- The expectations are two fold. First, we hope you will give a honest and constructive feedback to your teammates to help them improve. Second, we hope that you will use the feedback you received to be an effective team player.
- An anonymous survey to submit feedback about the teaching team will be open on LumiNUS. Please take a few minutes to give feedback to your tutors and the lecturer.
- We will use your feedback to adapt some teaching strategies so that you will be benefited.
[W7.1] UML: Sequence Diagrams - Basics
Can draw basic sequence diagrams
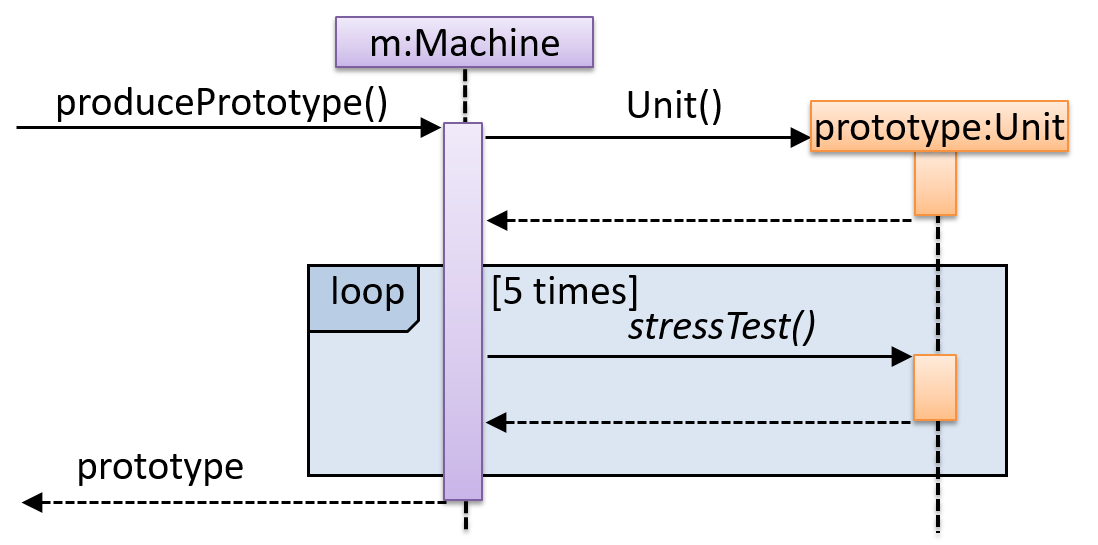
Explain in your own words the interactions illustrated by this Sequence Diagram:
Consider the code below:
class Person{
    Tag tag;
    String name;

    Person(String personName, String tagName){
        name = personName;
        tag = new Tag(tagName);
    }
}
class Tag{
    Tag(String value){
        //...
    }
}

class PersonList{
    void addPerson(Person p){
        //...
    }
}
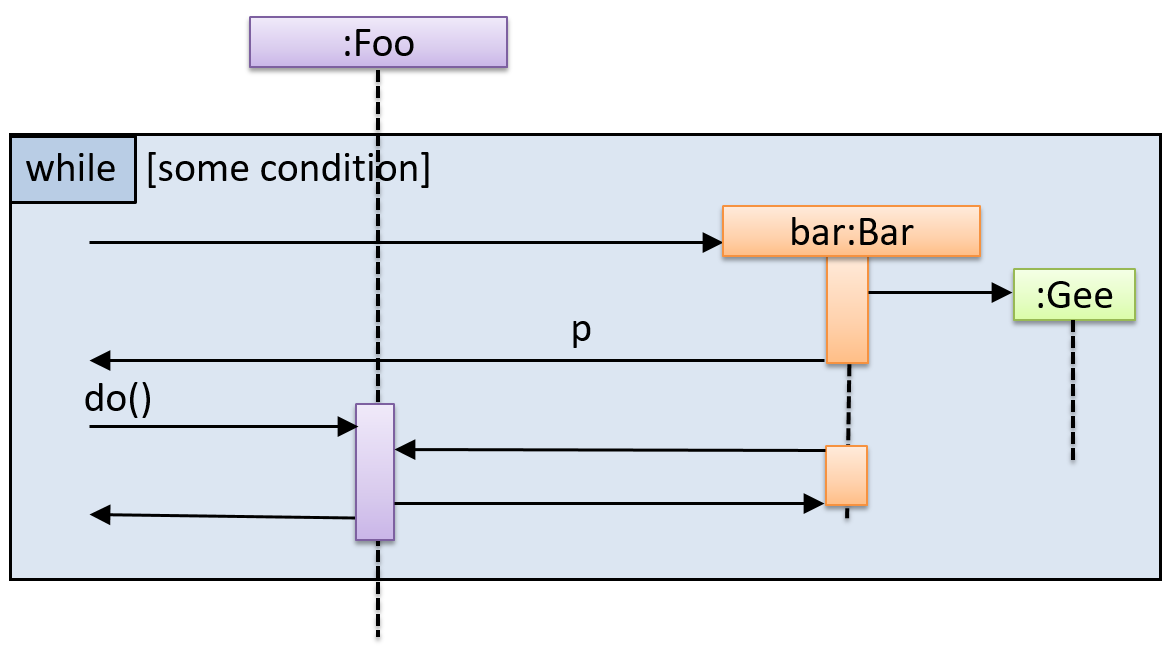
Draw a sequence diagram to illustrate the object interactions that happen in the code snippet below:
PersonList personList = new PersonList();
while (hasRoom){
    Person p = new Person("Adam", "friend");
    personList.addPerson(p);
}
Find notation mistakes in the sequence diagram below:
[W7.2] UML: Sequence Diagrams - Intermediate
Can draw intermediate-level sequence diagrams
What’s going on here?
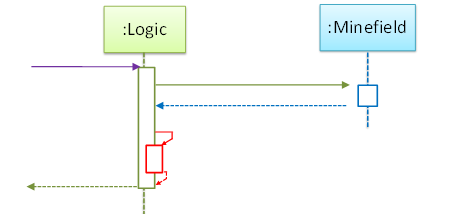
- a.
Logicobject is executing a parallel thread. - b.
Logicobject is executing a loop. - c.
Logicobject is creating anotherLogicinstance. - d. One of
Logicobject’s methods is calling another of its methods. - e.
Minefieldobject is calling a method ofLogic.
(d)
Explain the interactions depicted in this sequence diagram.
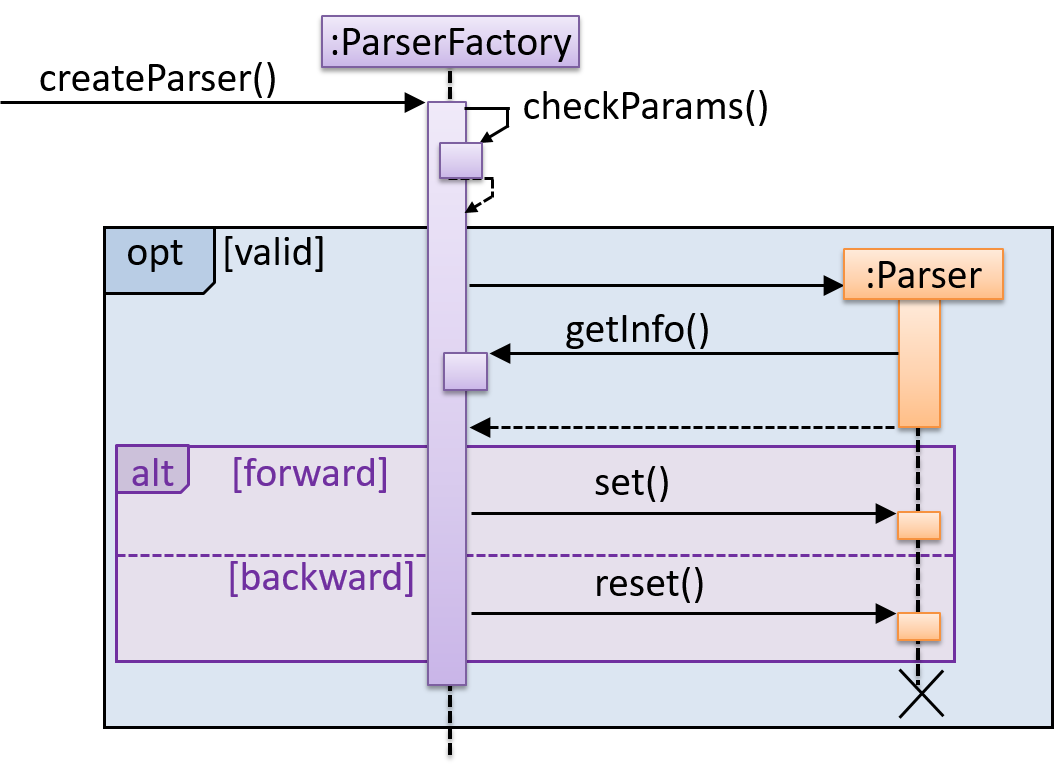
First, the createParser() method of an existing ParserFactory object is called. Then, ...
Draw a sequence diagram to represent this code snippet.
if (isFirstPage) {
    new Quote().print();
}
The Quote class:
class Quote{

    String q;

    Quote(){
        q = generate();
    }

    String generate(){
        // ...
    }

    void print(){
        System.out.println(q);
    }

}
- Show
new Quote().print();as two method calls. - As the created Quote object is not assigned to a variable, it can be considered as 'deleted' soon after its
print()method is called.
Can interpret sequence diagrams with reference frames
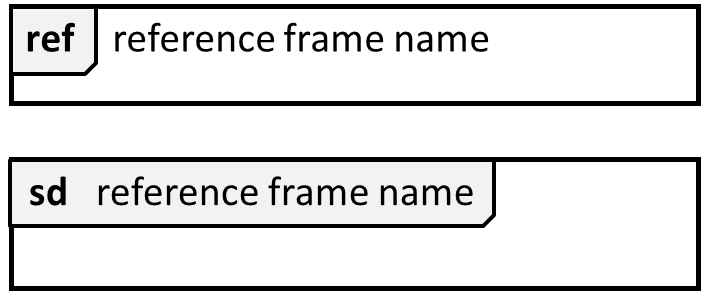
UML uses ref frame to allow a segment of the interaction to be omitted and shown as a separate sequence diagram. Reference frames help us to break complicated sequence diagrams into multiple parts or simply to omit details we are not interested in showing.
Notation:
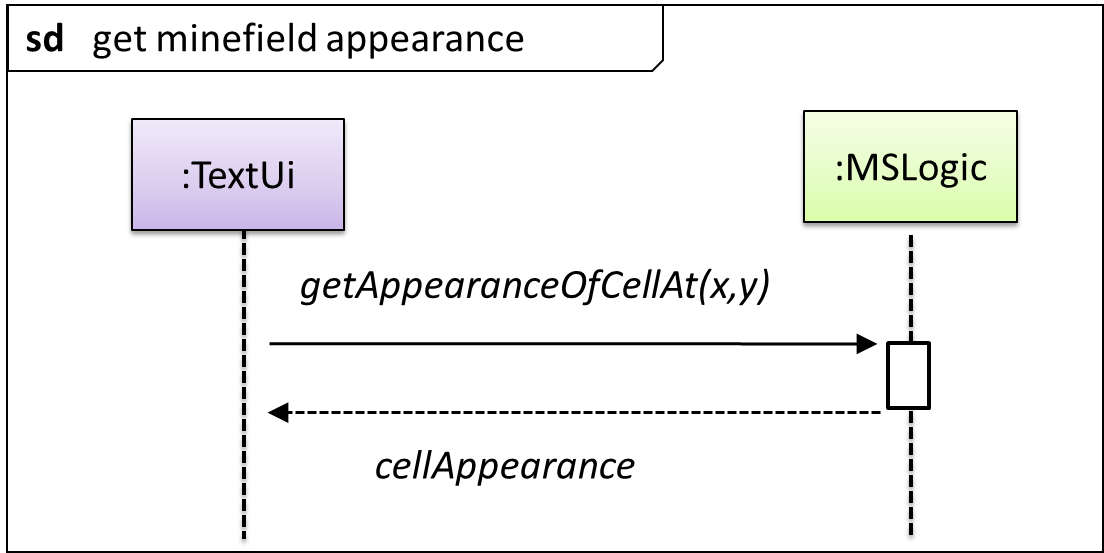
The details of the get minefield appearance interactions have been omitted from the diagram.
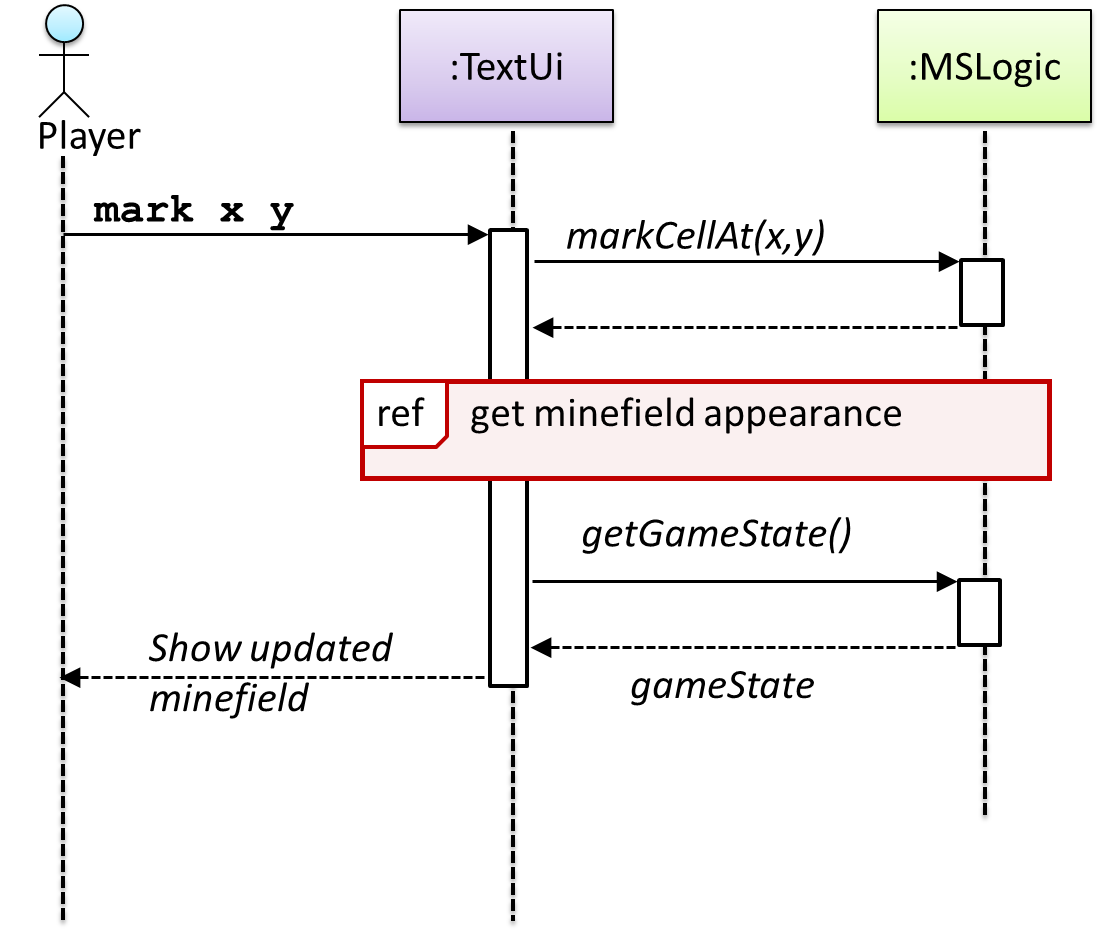
Those details are shown in a separate sequence diagram given below.
Can interpret sequence diagrams with parallel paths
UML uses par frames to indicate parallel paths.
Notation:
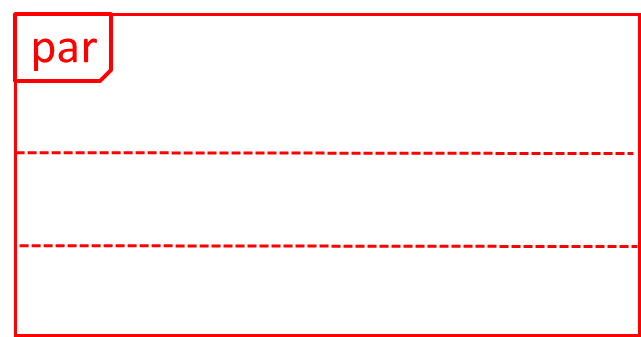
Logic is calling methods CloudServer#poll() and LocalServer#poll() in parallel.
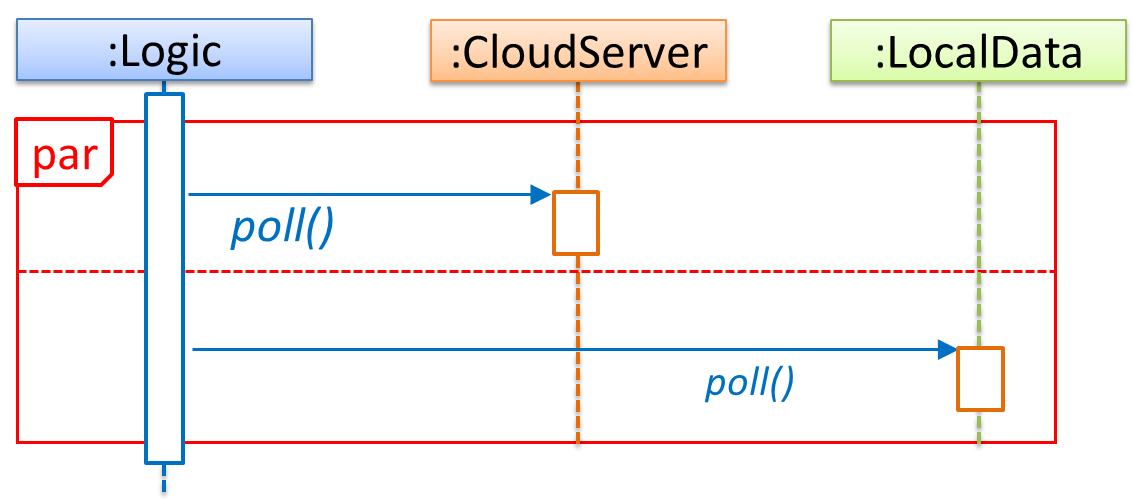
💡 If you show parallel paths in a sequence diagram, the corresponding Java implementation is likely to be multi-threaded because a normal Java program cannot do multiple things at the same time.
[W7.3] Architecture
Architecture Diagrams
Can explain what is software design
Design in the creative process of transforming the problem into a solution; the solution is also called design. -- 📖 Software Engineering Theory and Practice, Shari Lawrence; Atlee, Joanne M. Pfleeger
Software design has two main aspects:
- Product/external design: designing the external behavior of the product to meet the users' requirements. This is usually done by product designers with the input from business analysts, user experience experts, user representatives, etc.
- Implementation/internal design: designing how the product will be implemented to meet the required external behavior. This is usually done by software architects and software engineers.
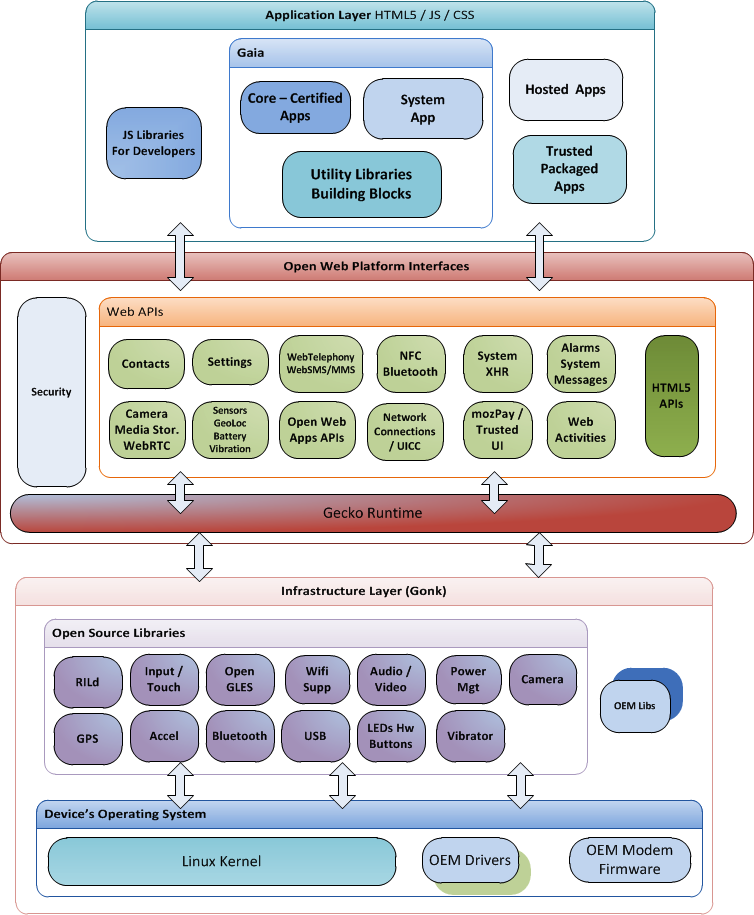
Can interpret an architecture diagram
Architecture diagrams are free-form diagrams. There is no universally adopted standard notation for architecture diagrams. Any symbol that reasonably describes the architecture may be used.
Some example architecture diagrams:


source: https://commons.wikimedia.org
source: https://commons.wikimedia.org

source: https://commons.wikimedia.org
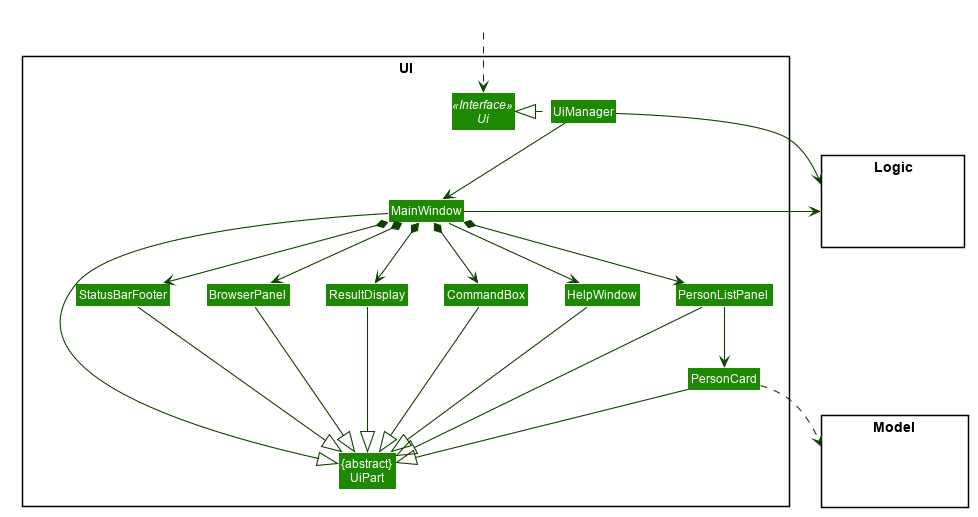
Can explain multi-level design
In a smaller system, design of the entire system can be shown in one place.
This class diagram of se-edu/addressbook-level3 depicts the design of the entire software.

Design of bigger systems needs to be done/shown at multiple levels.
This architecture diagram of se-edu/addressbook-level4 depicts the high-level design of the software.
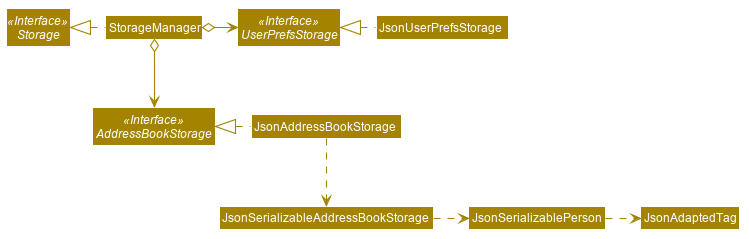
Here are examples of lower level designs of some components of the same software:

Architectural Styles
Can explain architectural styles
Software architectures follow various high-level styles (aka architectural patterns), just like
n-tier style, client-server style, event-driven style, transaction processing style, service-oriented style, pipes-and-filters style, message-driven style, broker style, ...
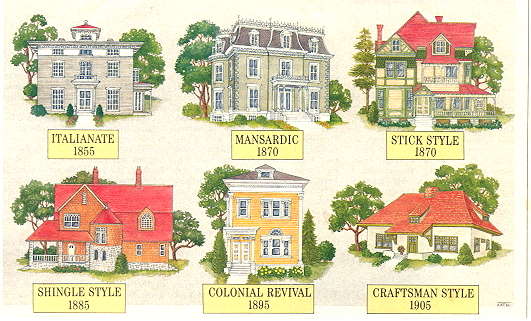
source: https://inspectapedia.com
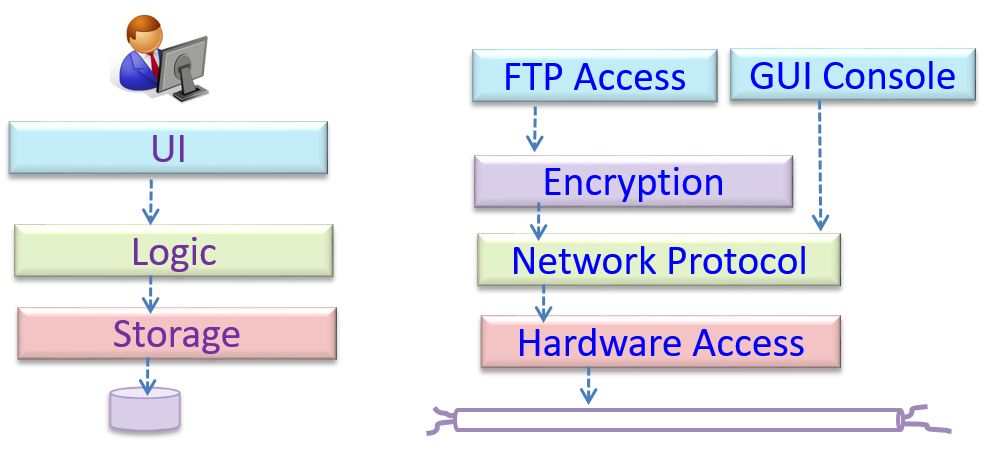
Can identify n-tier architectural style
In the n-tier style, higher layers make use of services provided by lower layers. Lower layers are independent of higher layers. Other names: multi-layered, layered.
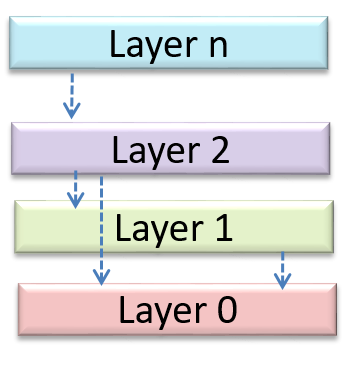
Operating systems and network communication software often use n-tier style.
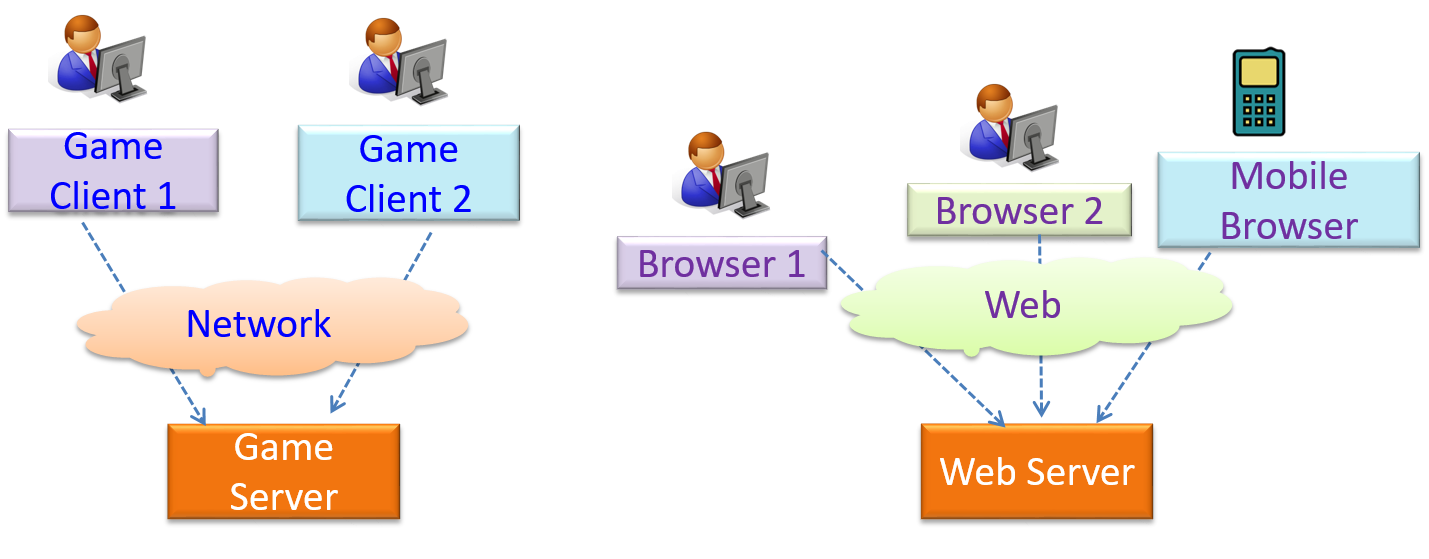
Can identify the client-server architectural style
The client-server style has at least one component playing the role of a server and at least one client component accessing the services of the server. This is an architectural style used often in distributed applications.
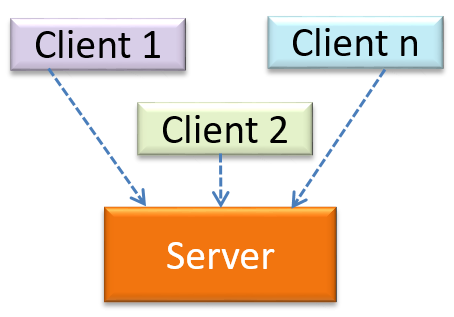
The online game and the Web application below uses the client-server style.
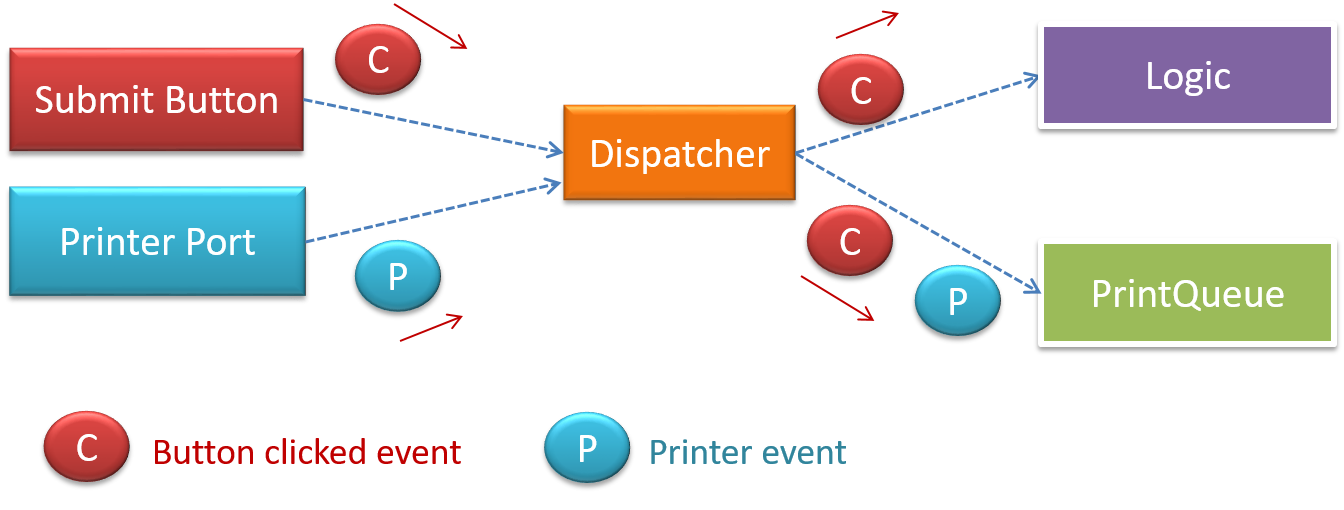
Can identify event-driven architectural style
Event-driven style controls the flow of the application by detecting
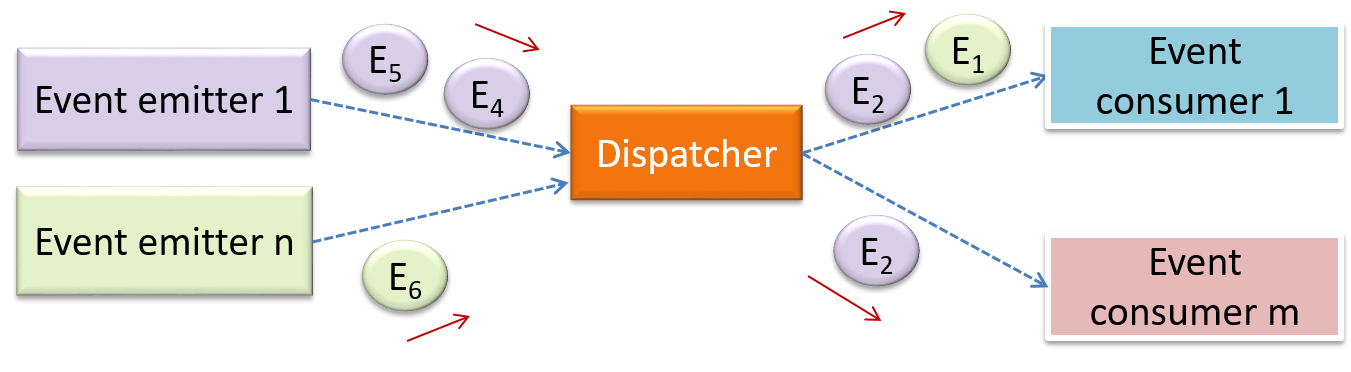
When the ‘button clicked’ event occurs in a GUI, that event can be transmitted to components that are interested in reacting to that event. Similarly, events detected at a Printer port can be transmitted to components related to operating the Printer. The same event can be sent to multiple consumers too.
Can name several other architecture styles
Other well-known architectural styles include the pipes-and-filters architectures, the broker architectures, the peer-to-peer architectures, and the message-oriented architectures.
-
Pipes and Filters pattern -- an article from Microsoft about the pipes and filters architectural style
-
Broker pattern -- Wikipedia article on the broker architectural style
-
Peer-to-peer pattern -- Wikipedia article on the P2P architectural style
-
Message-driven processing -- a post by Margaret Rouse
Can explain how architectural styles are combined
Most applications use a mix of these architectural styles.
An application can use a client-server architecture where the server component comprises several layers, i.e. it uses the n-Tier architecture.
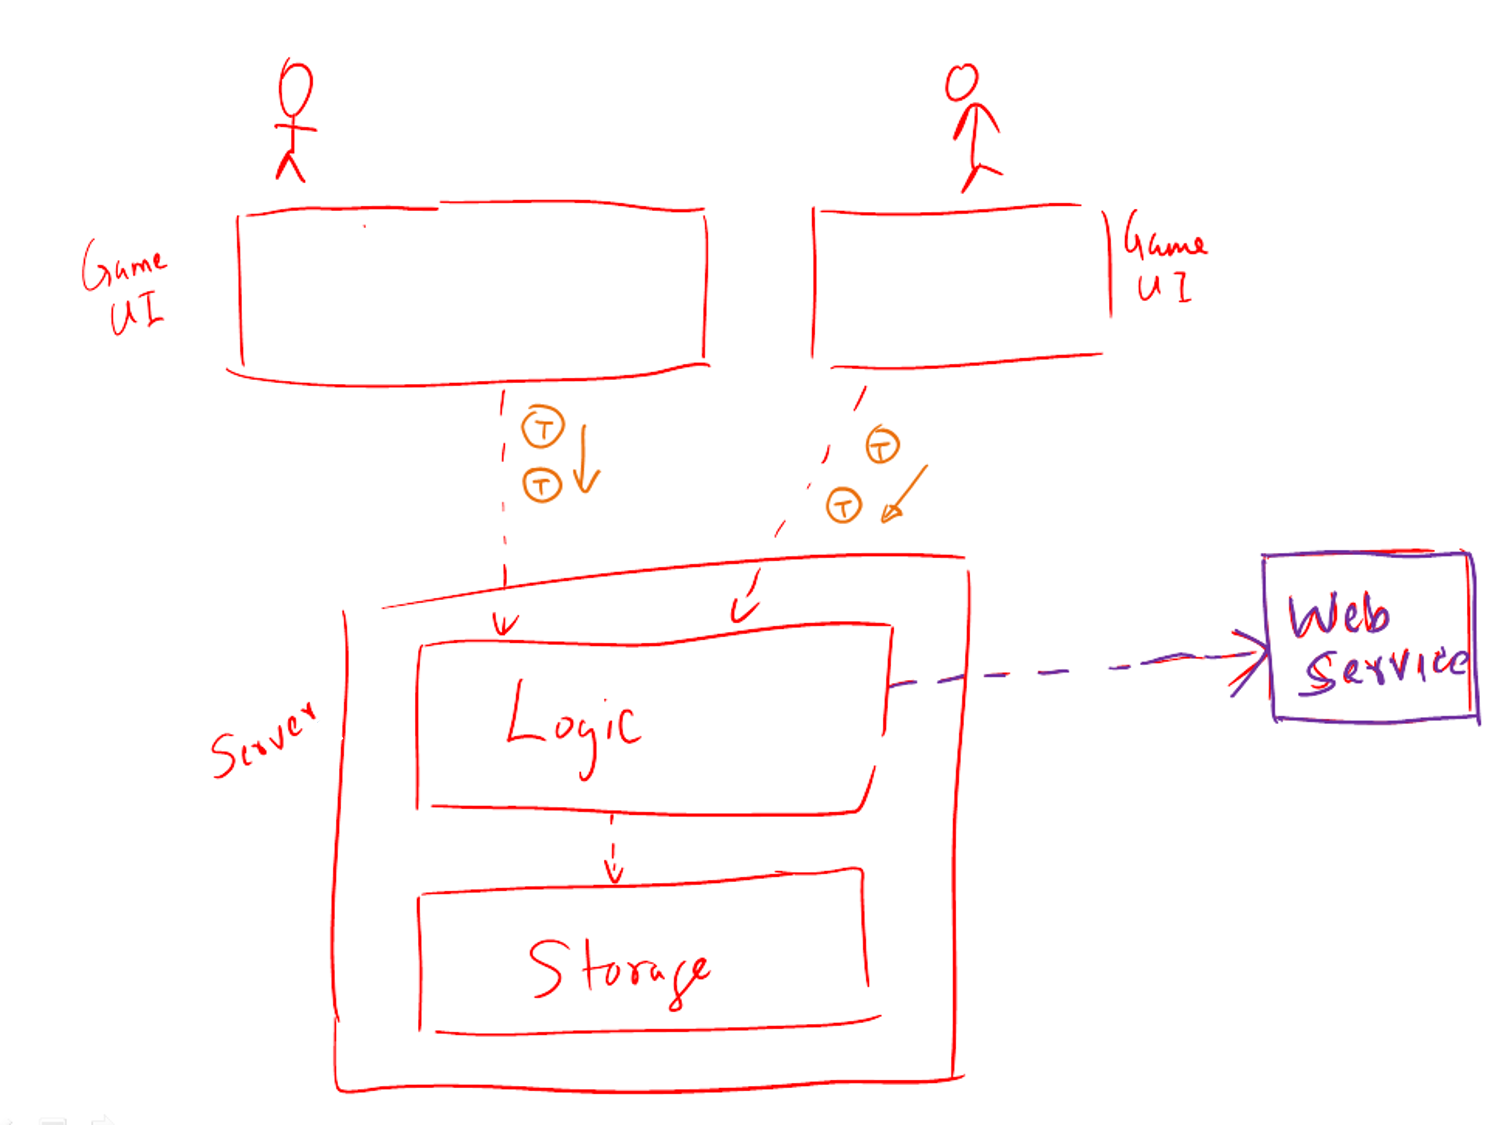
Assume you are designing a multiplayer version of the Minesweeper game where any number of players can play the same Minefield. Players use their own PCs to play the game. A player scores by deducing a cell correctly before any of the other players do. Once a cell is correctly deduced, it appears as either marked or cleared for all players.
Comment on how each of the following architectural styles could be potentially useful when designing the architecture for this game.
- Client-server
- Transaction-processing
- SOA (Service Oriented Architecture)
- multi-layer (n-tier)
- Client-server – Clients can be the game UI running on player PCs. The server can be the game logic running on one machine.
- Transaction-processing – Each player action can be packaged as transactions (by the client component running on the player PC) and sent to the server. Server processes them in the order they are received.
- SOA – The game can access a remote web services for things such as getting new puzzles, validating puzzles, charging players subscription fees, etc.
- Multi-layer – The server component can have two layers: logic layer and the storage layer.
APIs
Can explain APIs
An Application Programming Interface (API) specifies the interface through which other programs can interact with a software component. It is a contract between the component and its clients.
A class has an API (e.g., API of the Java String class, API of the Python str class) which is a collection of public methods that you can invoke to make use of the class.
The GitHub API is a collection of Web request formats GitHub server accepts and the corresponding responses. We can write a program that interacts with GitHub through that API.
When developing large systems, if you define the API of each components early, the development team can develop the components in parallel because the future behavior of the other components are now more predictable.
Choose the correct statements
- a. A software component can have an API.
- b. Any method of a class is part of its API.
- c. Private methods of a class are not part of its API.
- d. The API forms the contract between the component developer and the component user.
- e. Sequence diagrams can be used to show how components interact with each other via APIs.
(a) (c) (d) (e)
Explanation: (b) is incorrect because private methods cannot be a part of the API
Defining component APIs early is useful for developing components in parallel.
True
Explanation: Yes, once we know the precise behavior expected of each component, we can start developing them in parallel.
[W7.4] Error Handling
Logging
Can explain logging
Logging is the deliberate recording of certain information during a program execution for future reference. Logs are typically written to a log file but it is also possible to log information in other ways e.g. into a database or a remote server.
Logging can be useful for troubleshooting problems. A good logging system records some system information regularly. When bad things happen to a system e.g. an unanticipated failure, their associated log files may provide indications of what went wrong and action can then be taken to prevent it from happening again.
💡 A log file is like the

Why is logging like having the 'black box' in an airplane?
(a)
Can use logging
Most programming environments come with logging systems that allow sophisticated forms of logging. They have features such as the ability to enable and disable logging easily or to change the logging
This sample Java code uses Java’s default logging mechanism.
First, import the relevant Java package:
import java.util.logging.*;
Next, create a Logger:
private static Logger logger = Logger.getLogger("Foo");
Now, you can use the Logger object to log information. Note the use of WARNING so that log messages specified as INFO level (which is a lower level than WARNING) will not be written to the log file at all.
// log a message at INFO level
logger.log(Level.INFO, "going to start processing");
//...
processInput();
if(error){
    //log a message at WARNING level
    logger.log(Level.WARNING, "processing error", ex);
}
//...
logger.log(Level.INFO, "end of processing");
Tutorials:
- Java Logging API - Tutorial -- A tutorial by Lars Vogella
- Java Logging Tutorial -- An alternative tutorial by Jakob Jenkov
- A video tutorial by SimplyCoded:
Best Practices:
- 10 Tips for Proper Application Logging -- by Tomasz Nurkiewicz
- What each logging level means -- conventions recommended by Apache Project
Assertions
Can explain assertions
Assertions are used to define assumptions about the program state so that the runtime can verify them. An assertion failure indicates a possible bug in the code because the code has resulted in a program state that violates an assumption about how the code should behave.
An assertion can be used to express something like when the execution comes to this point, the variable v cannot be null.
If the runtime detects an assertion failure, it typically take some drastic action such as terminating the execution with an error message. This is because an assertion failure indicates a possible bug and the sooner the execution stops, the safer it is.
In the Java code below, suppose we set an assertion that timeout returned by Config.getTimeout() is greater than 0. Now, if the Config.getTimeout() returned -1 in a specific execution of this line, the runtime can detect it as a assertion failure -- i.e. an assumption about the expected behavior of the code turned out to be wrong which could potentially be the result of a bug -- and take some drastic action such as terminating the execution.
int timeout = Config.getTimeout();
Can use assertions
Use the assert keyword to define assertions.
This assertion will fail with the message x should be 0 if x is not 0 at this point.
x = getX();
assert x == 0 : "x should be 0";
...
Assertions can be disabled without modifying the code.
java -enableassertions HelloWorld (or java -ea HelloWorld) will run HelloWorld with assertions enabled while java -disableassertions HelloWorld will run it without verifying assertions.
Java disables assertions by default. This could create a situation where you think all assertions are being verified as true while in fact they are not being verified at all. Therefore, remember to enable assertions when you run the program if you want them to be in effect.
💡 Enable assertions in Intellij (how?) and get an assertion to fail temporarily (e.g. insert an assert false into the code temporarily) to confirm assertions are being verified.
Java assert vs JUnit assertions: They are similar in purpose but JUnit assertions are more powerful and customized for testing. In addition, JUnit assertions are not disabled by default. We recommend you use JUnit assertions in test code and Java assert in functional code.
Tutorials:
- Java Assertions -- a simple tutorial from javatpoint.com
- Programming with Assertions (first half) -- a more detailed tutorial from Oracle
Best practices:
- Programming with Assertions (second half) -- from Oracle (also listed above as a tutorial) contains some best practices towards the end of the article.
Can use assertions optimally
It is recommended that assertions be used liberally in the code. Their impact on performance is considered low and worth the additional safety they provide.
Do not use assertions to do work because assertions can be disabled. If not, your program will stop working when assertions are not enabled.
The code below will not invoke the writeFile() method when assertions are disabled. If that method is performing some work that is necessary for your program, your program will not work correctly when assertions are disabled.
...
assert writeFile() : "File writing is supposed to return true";
Assertions are suitable for verifying assumptions about Internal Invariants, Control-Flow Invariants, Preconditions, Postconditions, and Class Invariants. Refer to [Programming with Assertions (second half)] to learn more.
Exceptions and assertions are two complementary ways of handling errors in software but they serve different purposes. Therefore, both assertions and exceptions should be used in code.
- The raising of an exception indicates an unusual condition created by the user (e.g. user inputs an unacceptable input) or the environment (e.g., a file needed for the program is missing).
- An assertion failure indicates the programmer made a mistake in the code (e.g., a null value is returned from a method that is not supposed to return null under any circumstances).
A Calculator program crashes with an ‘assertion failure’ message when you try to find the square root of a negative number.
(c)
Explanation: An assertion failure indicates a bug in the code. (b) is not acceptable because of the word "terminated". The application should not fail at all for this input. But it could have used an exception to handle the situation internally.
Which statements are correct?
- a. Use assertions to indicate the programmer messed up; Use exceptions to indicate the user or the environment messed up.
- b. Use exceptions to indicate the programmer messed up; Use assertions to indicate the user or the environment messed up.
(a)
Exception Handling
Can explain error handling
Well-written applications include error-handling code that allows them to recover gracefully from unexpected errors. When an error occurs, the application may need to request user intervention, or it may be able to recover on its own. In extreme cases, the application may log the user off or shut down the system. --Microsoft
Can explain exceptions
Exceptions are used to deal with 'unusual' but not entirely unexpected situations that the program might encounter at run time.
Exception:
The term exception is shorthand for the phrase "exceptional event." An exception is an event, which occurs during the execution of a program, that disrupts the normal flow of the program's instructions. –- Java Tutorial (Oracle Inc.)
Examples:
- A network connection encounters a timeout due to a slow server.
- The code tries to read a file from the hard disk but the file is corrupted and cannot be read.
Can explain Java Exceptions
Given below is an extract from the -- Java Tutorial, with some adaptations.
There are three basic categories of exceptions In Java:
- Checked exceptions: exceptional conditions that a well-written application should anticipate and recover from. All exceptions are checked exceptions, except for
Error,RuntimeException, and their subclasses.
Suppose an application prompts a user for an input file name, then opens the file by passing the name to the constructor for java.io.FileReader. Normally, the user provides the name of an existing, readable file, so the construction of the FileReader object succeeds, and the execution of the application proceeds normally. But sometimes the user supplies the name of a nonexistent file, and the constructor throws java.io.FileNotFoundException. A well-written program will catch this exception and notify the user of the mistake, possibly prompting for a corrected file name.
- Errors: exceptional conditions that are external to the application, and that the application usually cannot anticipate or recover from. Errors are those exceptions indicated by
Errorand its subclasses.
Suppose that an application successfully opens a file for input, but is unable to read the file because of a hardware or system malfunction. The unsuccessful read will throw java.io.IOError. An application might choose to catch this exception, in order to notify the user of the problem — but it also might make sense for the program to print a stack trace and exit.
- Runtime exceptions: conditions that are internal to the application, and that the application usually cannot anticipate or recover from. Runtime exceptions are those indicated by
RuntimeExceptionand its subclasses. These usually indicate programming bugs, such as logic errors or improper use of an API.
Consider the application described previously that passes a file name to the constructor for FileReader. If a logic error causes a null to be passed to the constructor, the constructor will throw NullPointerException. The application can catch this exception, but it probably makes more sense to eliminate the bug that caused the exception to occur.
Errors and runtime exceptions are collectively known as unchecked exceptions.
Can explain how exception handling is done typically
Most languages allow code that encountered an "exceptional" situation to encapsulate details of the situation in an Exception object and throw/raise that object so that another piece of code can catch it and deal with it. This is especially useful when the code that encountered the unusual situation does not know how to deal with it.
The extract below from the -- Java Tutorial (with slight adaptations) explains how exceptions are typically handled.
When an error occurs at some point in the execution, the code being executed creates an exception object and hands it off to the runtime system. The exception object contains information about the error, including its type and the state of the program when the error occurred. Creating an exception object and handing it to the runtime system is called throwing an exception.
After a method throws an exception, the runtime system attempts to find something to handle it in the
The exception handler chosen is said to catch the exception. If the runtime system exhaustively searches all the methods on the call stack without finding an appropriate exception handler, the program terminates.
Advantages of exception handling in this way:
- The ability to propagate error information through the call stack.
- The separation of code that deals with 'unusual' situations from the code that does the 'usual' work.
Which are benefits of exceptions?
- a. Exceptions allow us to separate normal code from error handling code.
- b. Exceptions can prevent problems that happen in the environment.
- c. Exceptions allow us to handle in one location an error raised in another location.
(a) (c)
Explanation: Exceptions cannot prevent problems in the environment. They can only be used to handle and recover from such problems.
Can use Java Exceptions
The content below uses extracts from the -- Java Tutorial, with some adaptations.
A program can catch exceptions by using a combination of the try, catch blocks.
- The
tryblock identifies a block of code in which an exception can occur. - The
catchblock identifies a block of code, known as an exception handler, that can handle a particular type of exception.
The writeList() method below calls a method process() that can cause two type of exceptions. It uses a try-catch construct to deal with each exception.
public void writeList() {
    print("starting method");
    try {
        print("starting process");
        process();
        print("finishing process");

    } catch (IndexOutOfBoundsException e) {
        print("caught IOOBE");

    } catch (IOException e) {
        print("caught IOE");

    }
    print("finishing method");
}
Some possible outputs:
| No exceptions | IOException |
IndexOutOfBoundsException |
|---|---|---|
| starting method starting process finishing process finishing method |
starting method starting process caught IOE finishing method |
starting method starting process caught IOOBE finishing method |
You can use a finally block to specify code that is guaranteed to execute with or without the exception. This is the right place to close files, recover resources, and otherwise clean up after the code enclosed in the try block.
The writeList() method below has a finally block:
public void writeList() {
    print("starting method");
    try {
        print("starting process");
        process();
        print("finishing process");

    } catch (IndexOutOfBoundsException e) {
        print("caught IOOBE");

    } catch (IOException e) {
        print("caught IOE");

    } finally {
        // clean up
        print("cleaning up");
    }
    print("finishing method");
}
Some possible outputs:
| No exceptions | IOException |
IndexOutOfBoundsException |
|---|---|---|
| starting method starting process finishing process cleaning up finishing method |
starting method starting process caught IOE cleaning up finishing method |
starting method starting process caught IOOBE cleaning up finishing method |
-
The
trystatement should contain at least onecatchblock or a finally block and may have multiplecatchblocks. -
The class of the exception object indicates the type of exception thrown. The exception object can contain further information about the error, including an error message.
You can use the throw statement to throw an exception. The throw statement requires a
Here's an example of a throw statement.
if (size == 0) {
    throw new EmptyStackException();
}
In Java, Checked exceptions are subject to the Catch or Specify Requirement: code that might throw checked exceptions must be enclosed by either of the following:
- A
trystatement that catches the exception. Thetrymust provide a handler for the exception. - A method that specifies that it can throw the exception. The method must provide a
throwsclause that lists the exception.
Unchecked exceptions are not required to follow to the Catch or Specify Requirement but you can apply the requirement to them too.
Here's an example of a method specifying that it throws certain checked exceptions:
public void writeList() throws IOException, IndexOutOfBoundsException {
    print("starting method");
    process();
    print("finishing method");
}
Some possible outputs:
| No exceptions | IOException |
IndexOutOfBoundsException |
|---|---|---|
| starting method finishing method |
starting method |
starting method |
Java comes with a collection of built-in exception classes that you can use. When they are not enough, it is possible to create your own exception classes.
The Main class below parses a string descriptor of a rectangle of the format "WIDTHxHEIGHT" e.g., "3x4" and prints the area of the rectangle.
public class Main {

    public static void printArea(String descriptor){
        //TODO: modify the code below
        System.out.println(descriptor + "=" + calculateArea(descriptor));
    }

    private static int calculateArea(String descriptor) {
        //TODO: modify the code below
        String[] dimensions = descriptor.split("x");
        return Integer.parseInt(dimensions[0]) * Integer.parseInt(dimensions[1]);
    }

    public static void main(String[] args) {
        printArea("3x4");
        printArea("5x5");
    }
}
3x4=12
5x5=25
-
Update the code of
printAreato print an error message ifWIDTHand/orHEIGHTare not numbers e.g.,"Ax4"
💡calculateAreawill throw the unchecked exceptionNumberFormatExceptionif the code tries to parse a non-number to an integer. -
Update the code of
printAreato print an error message if the descriptor is missingWIDTHand/orHEIGHTe.g.,"x4"
💡calculateAreawill throw the unchecked exceptionIndexOutOfBoundsExceptionif one or both dimensions are missing. -
Update the code of
calculateAreato throw the checked exceptionIllegalShapeExceptionif there are more than 2 dimensions e.g.,"5x4x3"and update theprintAreato print an error message for those cases. Here is the code for theIllegalShapeException.java
public class IllegalShapeException extends Exception {
  //no other code needed
}
Here is the expected behavior after you have done the above changes:
public class Main {

    //...

    public static void main(String[] args) {
        printArea("3x4");
        printArea("3xy");
        printArea("3x");
        printArea("3");
        printArea("3x4x5");
    }
}
3x4=12
WIDTH or HEIGHT is not a number: 3xy
WIDTH or HEIGHT is missing: 3x
WIDTH or HEIGHT is missing: 3
Too many dimensions: 3x4x5
public class Main {

    public static void printArea(String descriptor){
        try {
            System.out.println(descriptor + "=" + calculateArea(descriptor));
        } catch (NumberFormatException e) {
            System.out.println("WIDTH or HEIGHT is not a number: " + descriptor);
        } // add more catch blocks here
    }

    private static int calculateArea(String descriptor) throws IllegalShapeException {
        String[] dimensions = descriptor.split("x");

        //throw IllegalShapeException here if dimensions.length > 2

        return Integer.parseInt(dimensions[0]) * Integer.parseInt(dimensions[1]);
    }


}
This exercise continues from the TaskManager Level 1-2 exercises quoted above.
Enhance the TaskManager to print an error message if a command is missing parts. Use exceptions so that error detection and printing of error message happen at different places of code and the error information is passed between the two places using an Exception object.
Here is an example output:
Welcome to TaskManager-Level3!
Your task? todo
Error: Empty description for TODO
Your task? todo read book
Tasks in the list: 1
Your task? print
Tasks:
[1] description: read book
is done? No
Your task?
Suggested approach:
- Create a
TaskManagerExceptionclass that inherits theExceptionclass. Override the constructor that takes aStringparameter so that you can specify the error information when you create aTaskManagerExceptionobject. - Throw a new
TaskManagerExceptionobject when you detect some necessary information is missing in the command. - Catch that exception somewhere else and print the message inside the exception object.
public class TaskManagerException extends Exception{
    public TaskManagerException(String message) {
        super(message);
    }
}
    public static void main(String[] args) {
        // ...
        while (!isExit) {
            try {
                line = getInput();
                String command = line.split(" ")[0];
                switch (command) {
                    case "todo":
                        addTodo(line);
                        break;
                    // ...
                }
            } catch (TaskManagerException e) {
                printError(e.getMessage());
            }
        }
        // ...

    }

    private static void addTodo(String line) throws TaskManagerException {
        String description = line.substring("todo".length()).trim();
        if (description.isEmpty()){
            throw new TaskManagerException("Empty description for TODO");
        }
        // ...
    }
Can avoid using exceptions to control normal workflow
In general, use exceptions only for 'unusual' conditions. Use normal return statements to pass control to the caller for conditions that are 'normal'.
[W7.5] Advanced Java
Streams
Can use Java8 streams
Java 8 introduced a number of new features (e.g. Lambdas, Streams) that are not trivial to learn but also extremely useful to know.
Here is an overview of new Java 8 features . (written by Benjamin Winterberg)
Tutorials:
- Java 8 Tutorial -- from tutorialspoint.com. 💡 Also provides a way to try out code online
- Tutorials from Oracle: [Lambdas][Streams]
A video tutorial by well-known Java coach Venkat Subramaniam
Java: JavaFX
Can use JavaFX to build a simple GUI
Adapted (with permissions) from Marco Jakob's JavaFX 8 tutorial.
JavaFx 9 Tutorial - Part 1: Scene Builder
Introduction
This tutorial will teach you how to create a new JavaFX application in IntelliJ, and to use the SceneBuilder to create a layouts for your application.
Prerequisites
- Latest Java JDK 9 (includes JavaFX 9)
- IntelliJ (2018.2 or later)
- SceneBuilder 8 (provided by Gluon as Oracle no longer ships the tool in binary form)
Do remember the installation path to SceneBuilder 8 as we will need it to configure IntelliJ in a later step.
IntelliJ Configurations
If this is the first time using IntelliJ, you need to tell IntelliJ where to find JDK 9 and SceneBuilder.
Configuring JDK 9
- On the Welcome screen, press
Configure→Project Default→Project Structure.
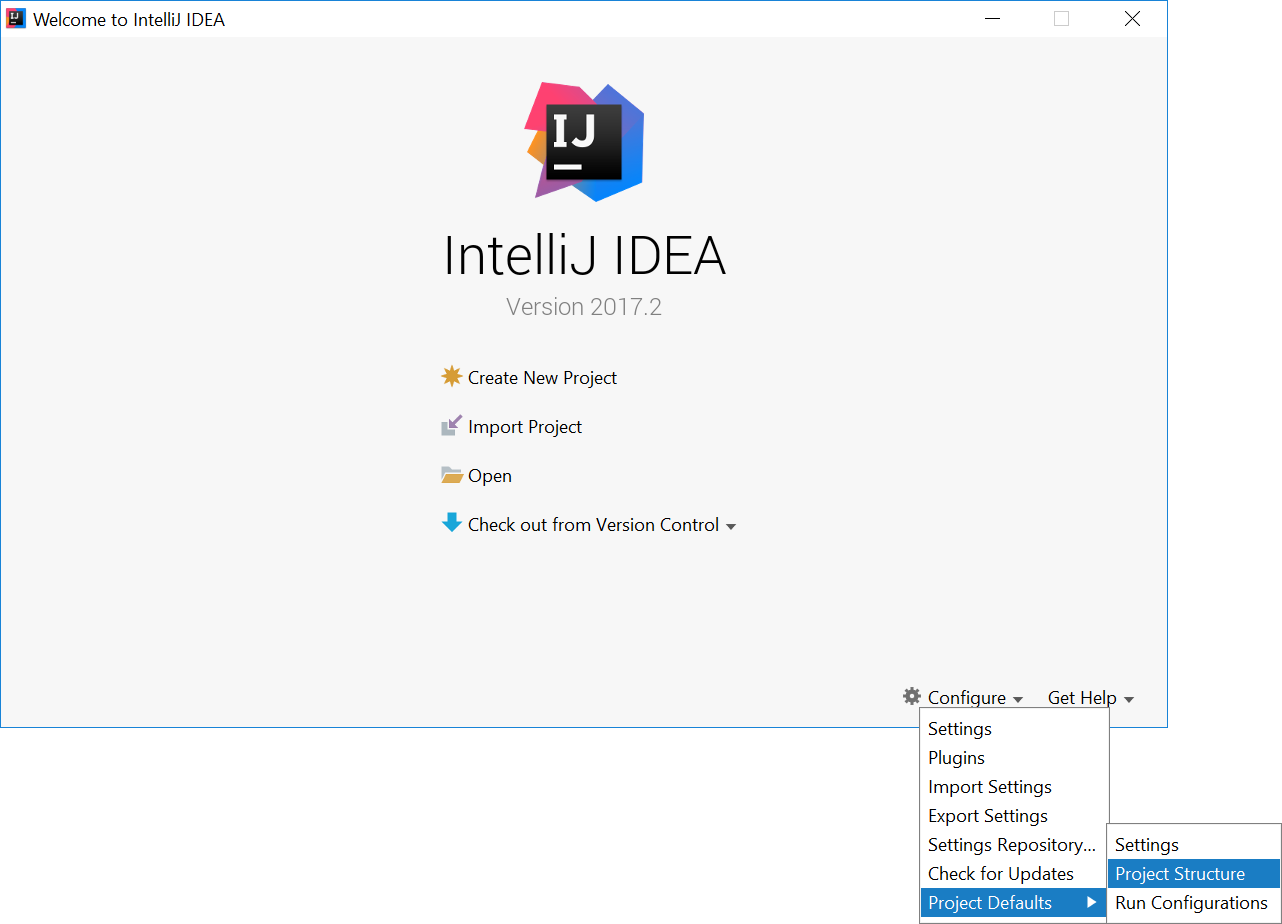
- If you already have a project open, go to the Welcome screen by going to
File→Close Project.
- Under
Project SDK:, pressNew...→JDK. - Select the directory that you install JDK on, and press
OK. - Under
Project language level:, select9 - Modules, private methods in interfaces etc..
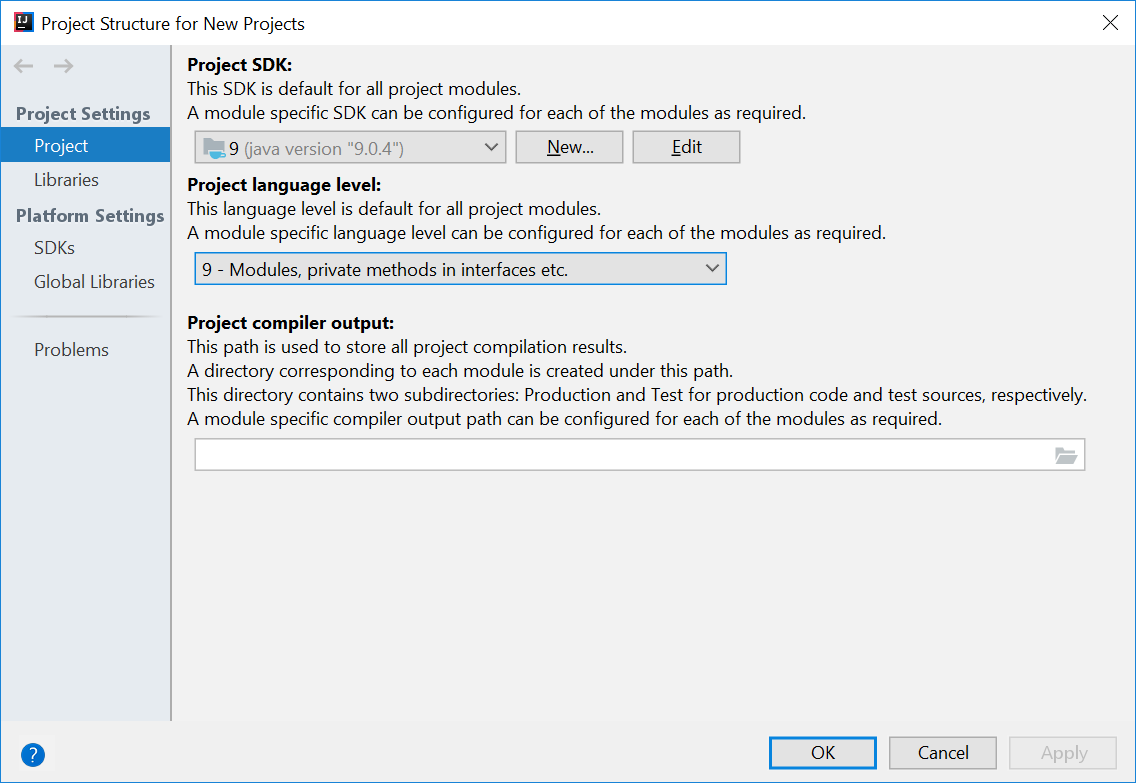
- Press
OKagain.
Configuring Scene Builder
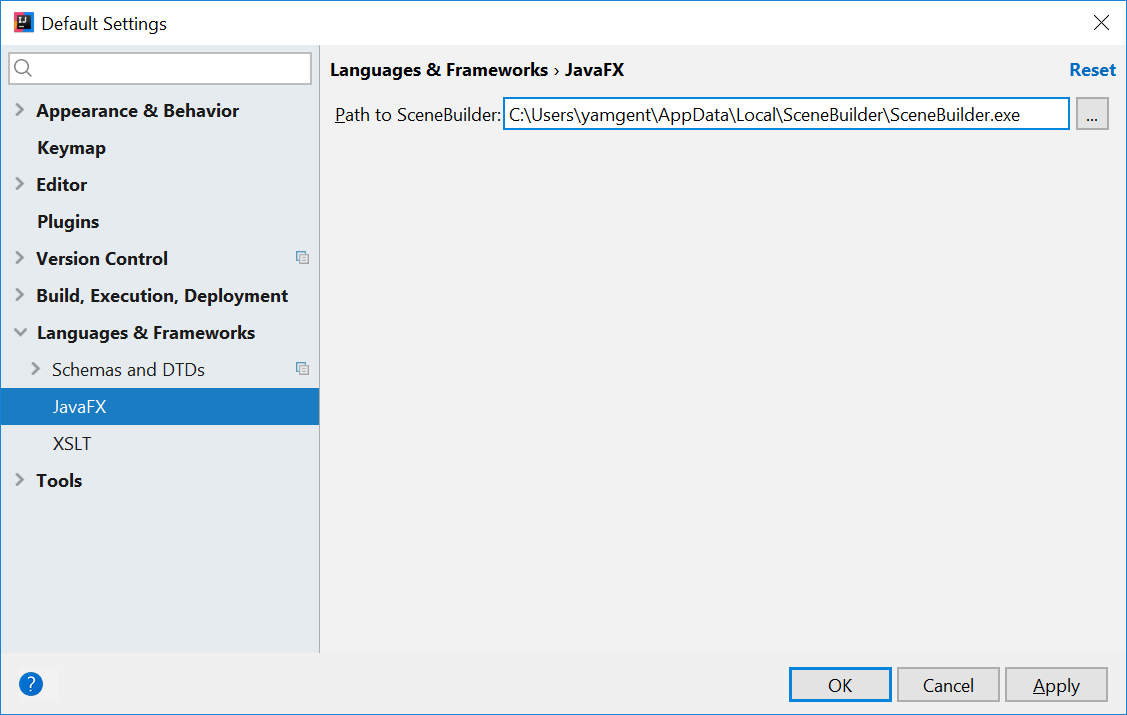
- On the Welcome screen, press
Configure→Settings. - On the left hand side, select
Languages & Frameworks→JavaFX - Under
Path to SceneBuilder:, select the path to where SceneBuilder is installed (e.g.C:\Users\Admin\AppData\Local\SceneBuilder\SceneBuilder.exeon Windows)
The JavaDocs will come in handy when writing your own JavaFX applications:
Additionally, Oracle also has a tutorial on JavaFX if you are interested.
Create a new JavaFX Project
- On the Welcome screen, press
Create New Project.
- If you already have a project, you can create a new project by going
File→New→Project....
- On the left side, select
JavaFX. Make sure that the Project SDK is set to9andJavaFX Applicationis selected.
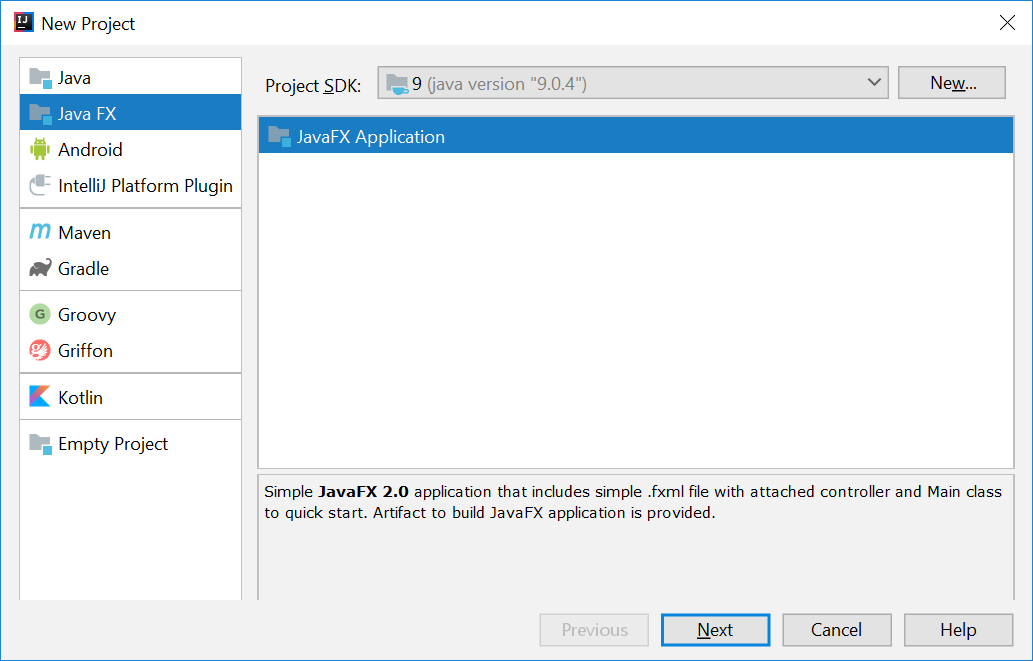
- Press
Next. - Give a name for the application (e.g.
AddressApp), and specify a suitable location. - Press
Finish. If prompted to create a new directory, just pressOK.
Remove the sample package and its content. We will manually create our own package and resources in our tutorial.
We will also have to set up the IDE further, so that warnings and errors show up correctly when working with Java 9:
- Go to the menu
File→Project Structure. - Under
Project language level:, ensure that9 - Modules, private methods in interfaces etc.is selected.
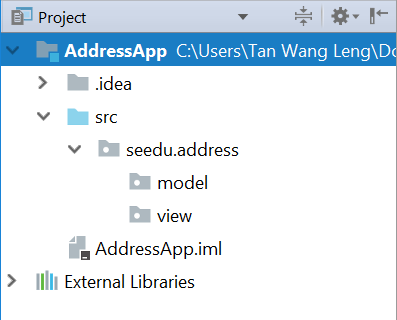
Create the Packages
In We will create a package for each of the component. Ensure that your Project pane is open (Alt+1). Right click on the src folder, and select New → Package:
seedu.address- contains the controller classes (i.e. the part that deals with the business logic)seedu.address.model- contains the model classes (i.e. the part that deals with data)seedu.address.view- contains the views (i.e. the part that deals with presenting the data to the user)
In subsequent tutorials, our view package will also contain some controllers that are directly related to a single view. We will call them view-controllers.
Create the FXML Layout File
There are two ways to create the UI:
- Use FXML, which is an XML format.
- Programmatically create the interface in Java.
We will use FXML for most parts, so that we can separate the view and controller from each other. Furthermore, we are able to use the Scene Builder tool to edit our FXML file. That means we will not have to directly work with XML.
Right click on the view package, and press New → FXML file. For the file name, type PersonOverview.fxml.
Design with Scene Builder
Right-click on PersonOverview.fxml and choose Open with Scene Builder. Now you should see the Scene Builder with just an AnchorPane (visible under Hierarchy on the left).
If IntelliJ prompts for a location of the SceneBuilder executable, make sure to point to where you install SceneBuilder.
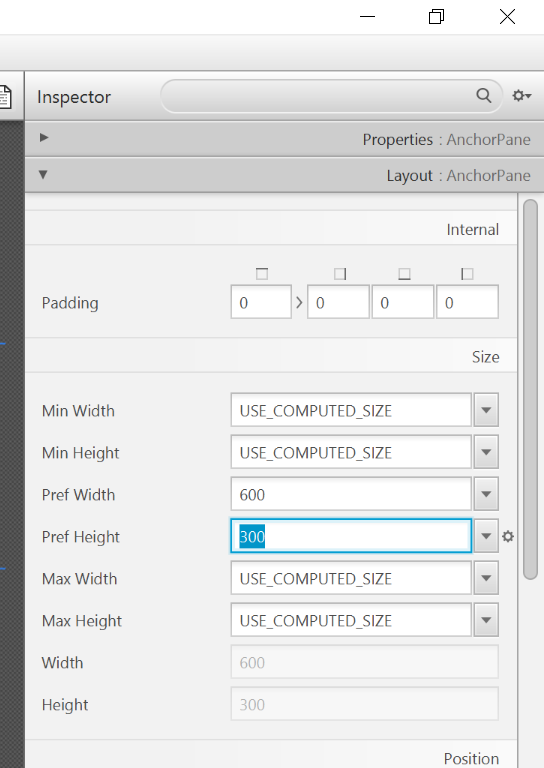
- Select the
Anchor Panein your Hierarchy, and adjust the size under Layout (right side). (Pref Width: 600, Pref Height: 300)
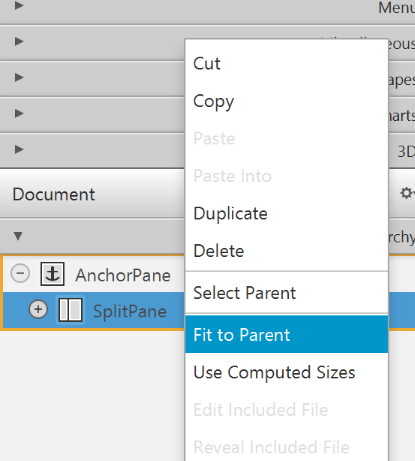
- Add a
Split Pane (horizontal)(underContainers) by dragging it from the Library into the main area. Right-click theSplit Panein the Hierarchy view and selectFit to Parent.
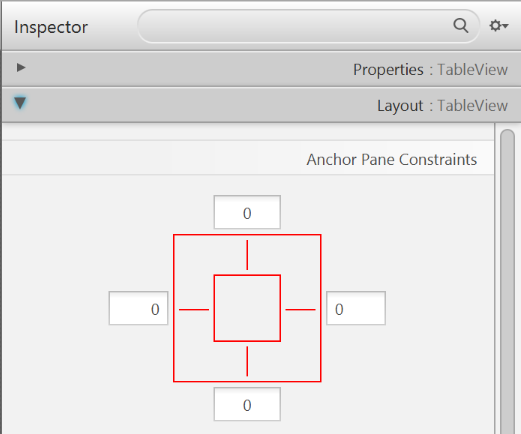
- Drag a
TableView(underControlsin Library view) into the left side of theSplitPane. Select theTableView(not a Column) and set the following layout constraints in the Inspector to theTableView. Inside anAnchorPaneyou can always set anchors to the four borders (see this page for more information on Layouts).
-
Go to the menu
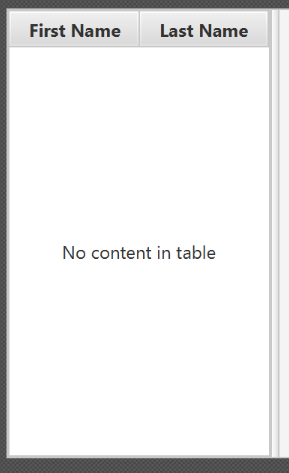
Preview→Show Preview in Windowto see whether the layout configuration is done correctly. Try resizing the window. TheTableViewshould resize together with the window as it is anchored to the borders. -
Change the column text (under Properties) to "First Name" and "Last Name".
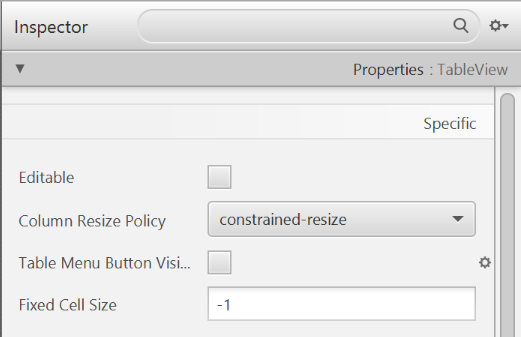
- Select the
TableViewand chooseconstrainted-resizefor the 'Column Resize Policy'. This ensures that the columns will always fill up the entire available space.
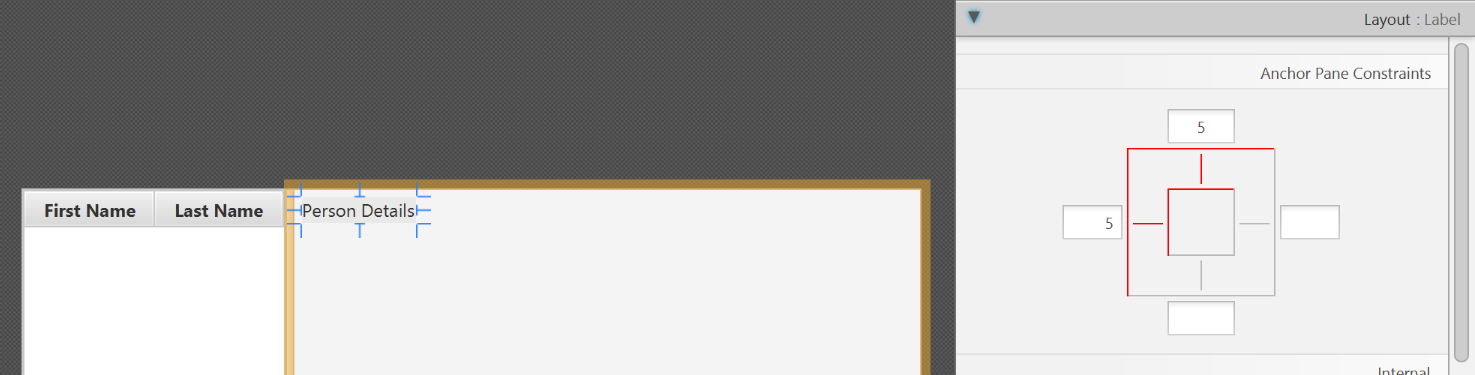
- Add a
Labelon the right side with the text "Person Details:". Adjust the layout using anchors (Top: 5, Left: 5. Right: Blank, Bottom: Blank).
You can use the Search Bar at the top of Library/Inspector to find the respective controls/properties.
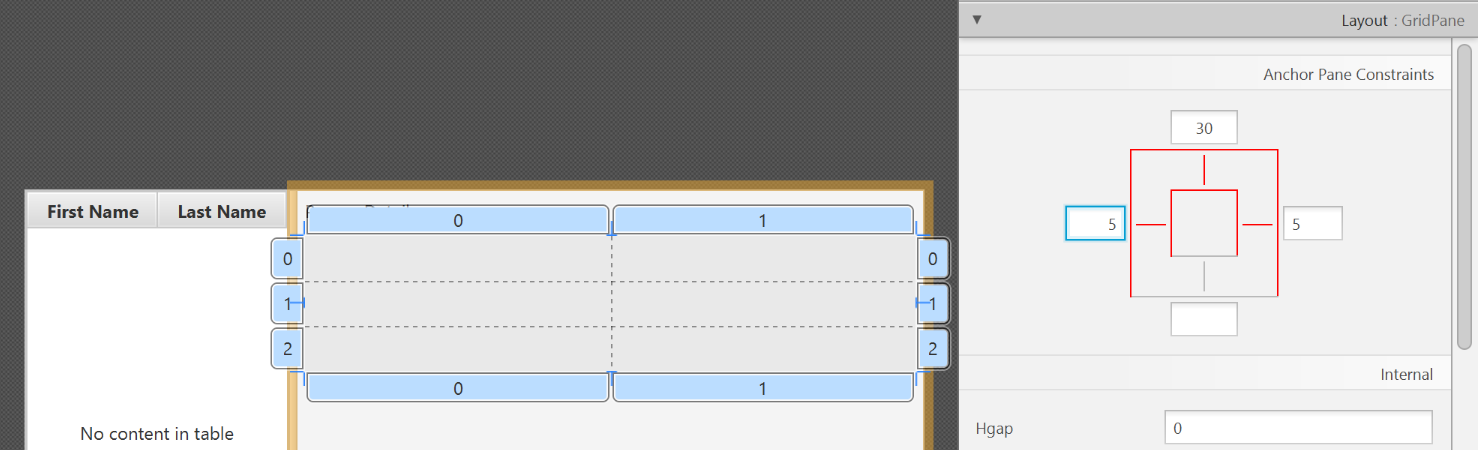
- Add a
GridPaneon the right side. Select it, and adjust its layout using anchors (Top: 30, Left: 5, Right: 5, Bottom: Blank).
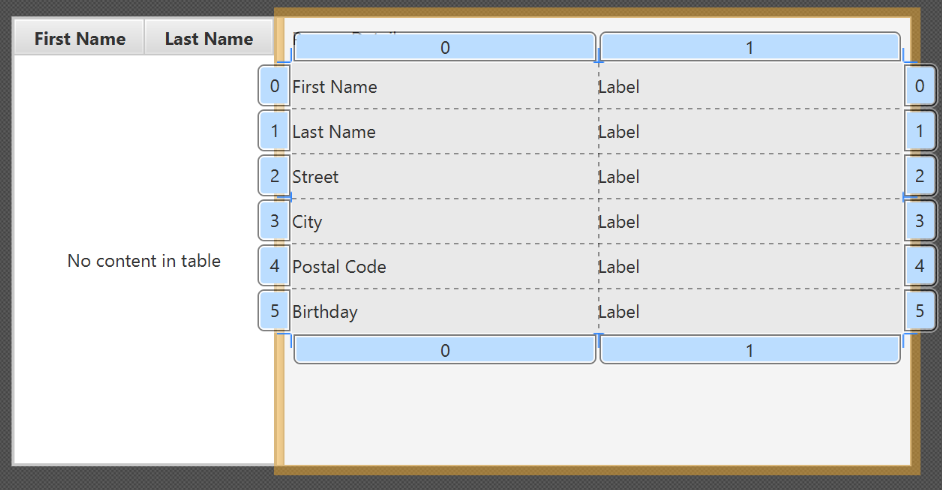
- Add the following labels to the cells, such that the grid is of this form:
| First Name | Label |
|---|---|
| Last Name | Label |
| Street | Label |
| City | Label |
| Postal Code | Label |
| Birthday | Label |
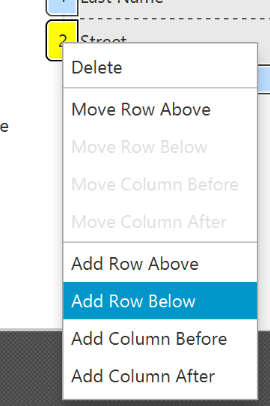
To add a row to the GridPane, select an existing row number, right click the row number and choose "Add Row Below".
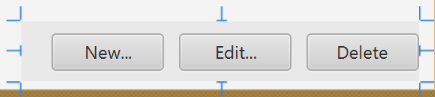
- Add a
ButtonBarat the bottom. Add three buttons to the bar ("New...", "Edit...","Delete"). Adjust the anchors so that it stays at the bottom right (Top: Blank, Left: Blank, Right: 10, Bottom: 5).
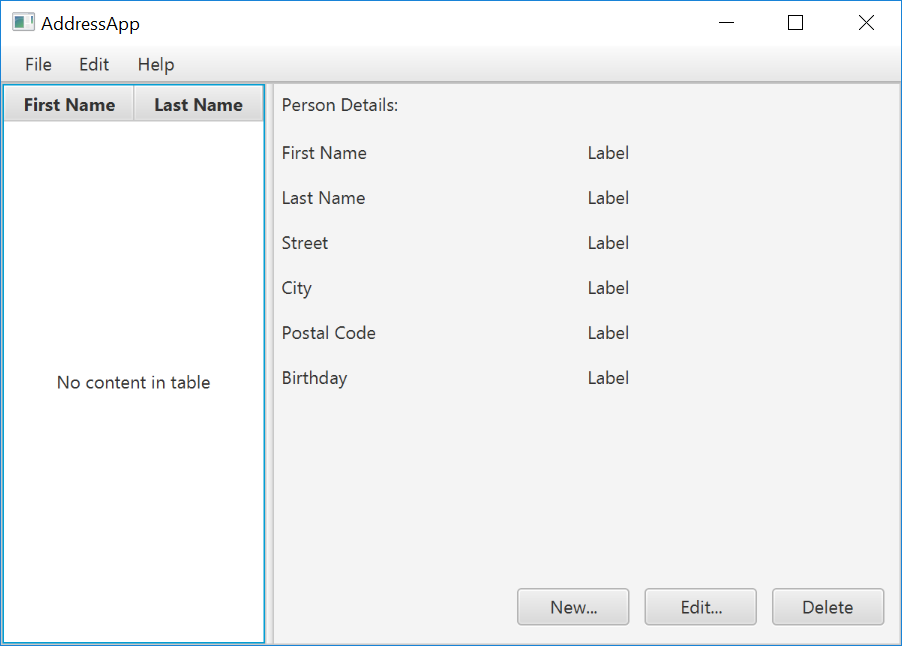
- Now you should see something like the following. Use the
Previewmenu to test its resizing behaviour.
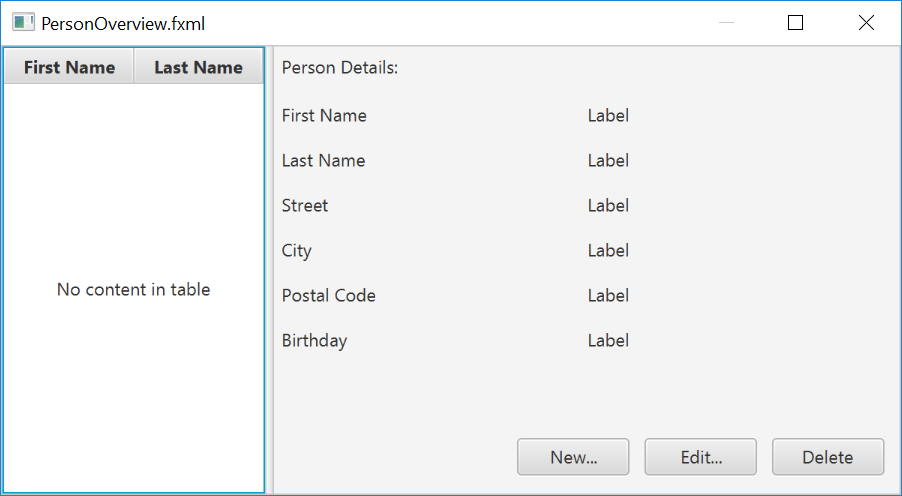
- Save the
.fxmlfile.
Create the Main Application
The PersonOverview.fxml that we just created only contains the content of our entire application. We need another FXML for our root layout, which will contain a menu bar and wraps PersonOverview.fxml.
- Inside IntelliJ, right click on the
viewpackage, and pressNew→FXML file. For the file name, typeRootLayout.fxml. - Right-click on
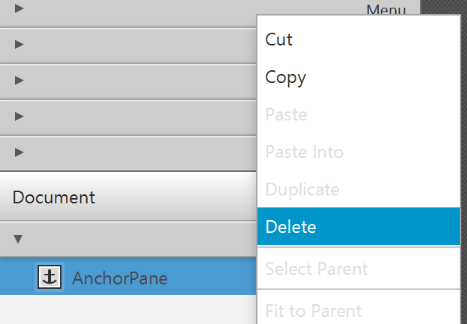
RootLayout.fxmland chooseOpen with Scene Builder. - Delete the
AnchorPane. We will use another pane for our root layout.
- Add
BorderPaneby dragging it from the Library view into the main area.
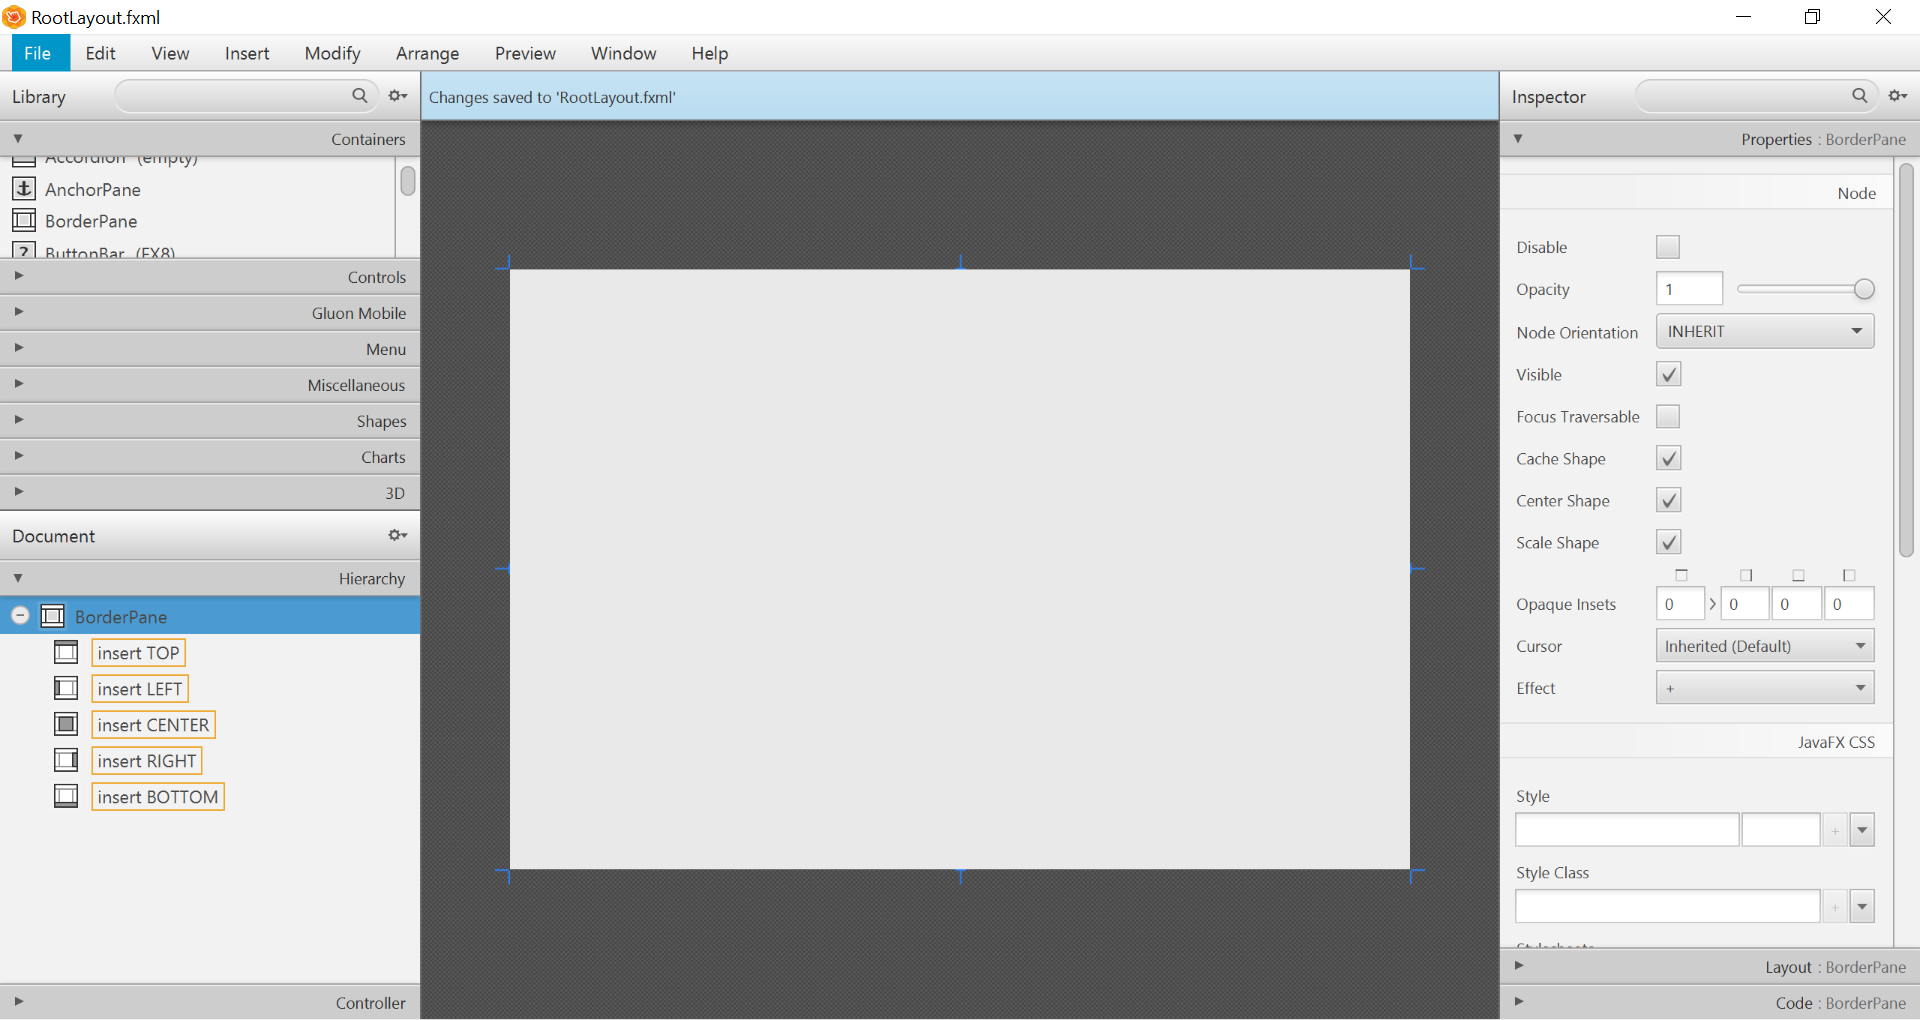
- Resize the
BorderPane(Pref Width: 600, Pref Height: 400)

- Add a
MenuBarinto theinsert TOPslot. We will not implement menu functionality for now.

The JavaFX Main Class
Now, we need to create the main Java class that starts up our application with the RootLayout.fxml and adds the PersonOverview.fxml in the center.
Right-click on your seedu.address package, and choose New → JavaFXApplication. For the class name, type MainApp.
The generated MainApp.java class extends from Application and contains two methods. This is the basic structure that we need to start a JavaFX Application. The most important part for us is the start(Stage primaryStage) method. It is automatically called when the application is launch() from within the main() method.
As you see, the start(...) method receives a Stage as parameter. The following graphic illustrates the structure of every JavaFX application:
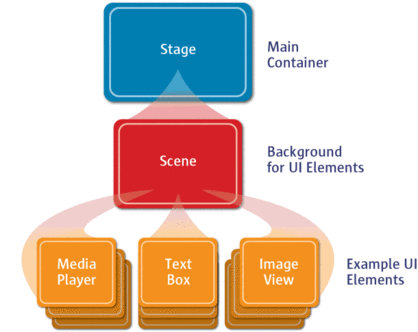
Image Source: http://www.oracle.com
It's like a theater play: The Stage is the main container which is usually a Window with a border and the typical minimize, maximize and close buttons. Inside the Stage you add a Scene which can, of course, be switched out by another Scene. Inside the Scene the actual JavaFX nodes like AnchorPane, TextBox, etc. are added.
See this page for more info on working with the JavaFX Scene Graph.
Open MainApp.java and replace the code with the following:
MainApp.java
package seedu.address;

import java.io.IOException;

import javafx.application.Application;
import javafx.fxml.FXMLLoader;
import javafx.scene.Scene;
import javafx.scene.layout.AnchorPane;
import javafx.scene.layout.BorderPane;
import javafx.stage.Stage;

public class MainApp extends Application {
    private Stage primaryStage;
    private BorderPane rootLayout;

    @Override
    public void start(Stage primaryStage) {
        this.primaryStage = primaryStage;
        this.primaryStage.setTitle("AddressApp");

        initRootLayout();

        showPersonOverview();
    }

    /**
     * Initializes the root layout.
     */
    public void initRootLayout() {
        try {
            // Load root layout from fxml file.
            FXMLLoader loader = new FXMLLoader();
            loader.setLocation(MainApp.class.getResource("view/RootLayout.fxml"));
            rootLayout = loader.load();

            // Show the scene containing the root layout.
            Scene scene = new Scene(rootLayout);
            primaryStage.setScene(scene);
            primaryStage.show();
        } catch (IOException e) {
            e.printStackTrace();
        }
    }

    /**
     * Shows the person overview inside the root layout.
     */
    public void showPersonOverview() {
        try {
            // Load person overview.
            FXMLLoader loader = new FXMLLoader();
            loader.setLocation(MainApp.class.getResource("view/PersonOverview.fxml"));
            AnchorPane personOverview = loader.load();

            // Set person overview into the center of root layout.
            rootLayout.setCenter(personOverview);
        } catch (IOException e) {
            e.printStackTrace();
        }
    }

    /**
     * Returns the main stage.
     */
    public Stage getPrimaryStage() {
        return primaryStage;
    }

    public static void main(String[] args) {
        launch(args);
    }
}
The various comments should give you some hints about what's going on.
Importing JavaFx 9
JavaFx 9 is a separate module from Java 9. We must ensure that the modules are imported correctly.
Notice that IntellJ will complain about the imported modules "not being in the module graph":
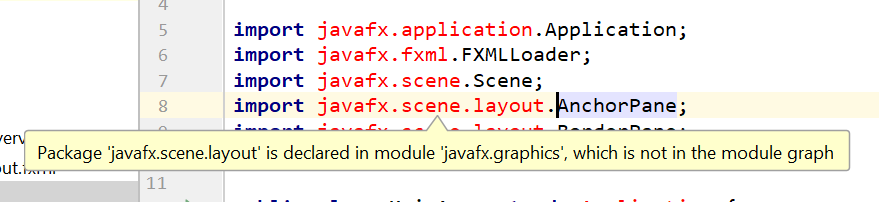
To fix this:
- Ensure that your Project pane is open (Alt+1). Right click on the
srcfolder, and selectNew→module-info.java: - Add the following
requiresandexportsin order to import and export the modules correctly:
module AddressApp {
    requires javafx.graphics;
    requires javafx.fxml;
    requires javafx.controls;

    exports seedu.address;
}
Running the Application
If you run the application now (right click MainApp.java and select Run MainApp.main()), you should see something like this:
Possible Issues
If JavaFx fails to load PersonOverview.fxml, you might get the following error message:
javafx.fxml.LoadException:
/.../AddressApp/out/production/AddressApp/seedu/address/view/PersonOverview.fxml:15
To solve this issue, open PersonOverview.fxml normally in IntelliJ and ensure that there is no such attribute around:
fx:controller="seedu.address.view.PersonOverview"
JavaFx 9 tutorial - Part 2: Model and TableView
Introduction
In this tutorial, we will create the other parts of the application (mainly the model and the controller). We will also use ObservableList and *Property to bind our list of new model's Persons, and their individual details, to the view, with the controller as the "middleman".
Create the Model class
We need a model class in order to hold information about the people in our address book. Add a new class to the model package (seedu.address.model) called Person. The Person class will encapsulate the details of an individual person such as name, address and birthday. Add the following code to the class. The JavaFX specifics will be explained after the code snippet.
Person.java
package seedu.address.model;

import java.time.LocalDate;

import javafx.beans.property.IntegerProperty;
import javafx.beans.property.ObjectProperty;
import javafx.beans.property.SimpleIntegerProperty;
import javafx.beans.property.SimpleObjectProperty;
import javafx.beans.property.SimpleStringProperty;
import javafx.beans.property.StringProperty;

/**
 * Model class for a Person.
 */
public class Person {

    private final StringProperty firstName;
    private final StringProperty lastName;
    private final StringProperty street;
    private final IntegerProperty postalCode;
    private final StringProperty city;
    private final ObjectProperty< LocalDate > birthday;

    /**
     * Default constructor.
     */
    public Person() {
        this(null, null);
    }

    /**
     * Constructor with some initial data.
     */
    public Person(String firstName, String lastName) {
        this.firstName = new SimpleStringProperty(firstName);
        this.lastName = new SimpleStringProperty(lastName);

        // Some initial dummy data, just for convenient testing.
        this.street = new SimpleStringProperty("some street");
        this.postalCode = new SimpleIntegerProperty(1234);
        this.city = new SimpleStringProperty("some city");
        this.birthday = new SimpleObjectProperty< LocalDate >(LocalDate.of(1999, 2, 21));
    }

    public String getFirstName() {
        return firstName.get();
    }

    public void setFirstName(String firstName) {
        this.firstName.set(firstName);
    }

    public StringProperty firstNameProperty() {
        return firstName;
    }

    public String getLastName() {
        return lastName.get();
    }

    public void setLastName(String lastName) {
        this.lastName.set(lastName);
    }

    public StringProperty lastNameProperty() {
        return lastName;
    }

    public String getStreet() {
        return street.get();
    }

    public void setStreet(String street) {
        this.street.set(street);
    }

    public StringProperty streetProperty() {
        return street;
    }

    public int getPostalCode() {
        return postalCode.get();
    }

    public void setPostalCode(int postalCode) {
        this.postalCode.set(postalCode);
    }

    public IntegerProperty postalCodeProperty() {
        return postalCode;
    }

    public String getCity() {
        return city.get();
    }

    public void setCity(String city) {
        this.city.set(city);
    }

    public StringProperty cityProperty() {
        return city;
    }

    public LocalDate getBirthday() {
        return birthday.get();
    }

    public void setBirthday(LocalDate birthday) {
        this.birthday.set(birthday);
    }

    public ObjectProperty< LocalDate > birthdayProperty() {
        return birthday;
    }
}
Explanations
- With JavaFX, it is common to use
*Propertyfor all fields of a model class. APropertyallows us, for example, to automatically be notified when thelastNameor any other variable is changed. This helps us keep the view in sync with the data. - To learn more about
*Property, refer to Using JavaFX Properties and Binding LocalDate, the type that we are using forbirthday, is part of the new Date and Time API since JDK 8
A List of Persons
The main data that our application manages is simply a bunch of persons. Let's create a list of Person objects inside the MainApp class. All other controller classes will later get access to that central list inside the MainApp.
ObservableList
We are working with JavaFX view classes that need to be informed about any changes made to the list of persons. This is important, since otherwise the view would not be in sync with the data. For this purpose, JavaFX introduces some new Collection classes.
Among all these collections, we need the ObservableList. To create a new ObservableList, add the following code at the beginning of the MainApp class. We'll also add a constructor that creates some sample data and a public getter method:
MainApp.java
// ... AFTER THE OTHER VARIABLES ...

/**
* The data as an observable list of {@link Person}.
*/
private ObservableList< Person > personData = FXCollections.observableArrayList();

    /**
     * Constructor
     */
    public MainApp() {
        // Add some sample data
        personData.add(new Person("Hans", "Muster"));
        personData.add(new Person("Ruth", "Mueller"));
        personData.add(new Person("Heinz", "Kurz"));
        personData.add(new Person("Cornelia", "Meier"));
        personData.add(new Person("Werner", "Meyer"));
        personData.add(new Person("Lydia", "Kunz"));
        personData.add(new Person("Anna", "Best"));
        personData.add(new Person("Stefan", "Meier"));
        personData.add(new Person("Martin", "Mueller"));
    }

    /**
     * Returns the data as an observable list of {@link Person}.
     */
    public ObservableList< Person > getPersonData() {
        return personData;
    }

    // ... THE REST OF THE CLASS ...
The PersonOverviewController
We have our model and view. Let's get our data into our table. We'll need a controller for our PersonOverview.fxml to act as a "middleman" for the model and view.
Create a normal Java class inside the view package called PersonOverviewController.
Note: We must put the class inside the same package as PersonOverview.fxml, otherwise the SceneBuilder won't be able to find it.
We will add some instance variables that give us access to the table and the labels inside the view. The fields and some methods have a special @FXML annotation. This is necessary in order for the .fxml file to have access to private fields and private methods. After we have everything set up in the .fxml file, the application will automatically fill the variables when the .fxml file is loaded.
So let's add the following code:
Note: Remember to always use the javafx imports, NOT awt or swing.
PersonOverviewController.java
package seedu.address.view;

import javafx.fxml.FXML;
import javafx.scene.control.Label;
import javafx.scene.control.TableColumn;
import javafx.scene.control.TableView;
import seedu.address.MainApp;
import seedu.address.model.Person;

public class PersonOverviewController {
    @FXML
    private TableView< Person> personTable;
    @FXML
    private TableColumn< Person, String> firstNameColumn;
    @FXML
    private TableColumn< Person, String> lastNameColumn;

    @FXML
    private Label firstNameLabel;
    @FXML
    private Label lastNameLabel;
    @FXML
    private Label streetLabel;
    @FXML
    private Label postalCodeLabel;
    @FXML
    private Label cityLabel;
    @FXML
    private Label birthdayLabel;

    // Reference to the main application.
    private MainApp mainApp;

    /**
     * The constructor. It is called before the initialize() method.
     */
    public PersonOverviewController() {
    }

    /**
     * Initializes the controller class. This method is automatically called
     * after the fxml file has been loaded.
     */
    @FXML
    private void initialize() {
        // Initialize the person table with the two columns.
        firstNameColumn.setCellValueFactory(cellData -> cellData.getValue().firstNameProperty());
        lastNameColumn.setCellValueFactory(cellData -> cellData.getValue().lastNameProperty());
    }

    /**
     * Is called by the main application to give a reference back to itself.
     */
    public void setMainApp(MainApp mainApp) {
        this.mainApp = mainApp;

        // Add observable list data to the table
        personTable.setItems(mainApp.getPersonData());
    }
}
Explanations
- All fields and methods where the
.fxmlfile needs access must be annotated with@FXML.- Actually, only if they are private, but it's better to have them private and mark them with the annotation!
- The
initialize()method is automatically called after the.fxmlfile has been loaded. At this time, all the FXML fields should have been initialized already. - The
setCellValueFactory(...)that we set on the table colums are used to determine which field inside thePersonobjects should be used for the particular column. The arrow->indicates that we're using a Java 8 feature called Lambdas. (Another option would be to use aPropertyValueFactory, but this is not type-safe).
Note:
We're only using StringProperty values for our table columns in this example. When you want to use IntegerProperty or DoubleProperty, the setCellValueFactory(...) must have an additional asObject():
myIntegerColumn.setCellValueFactory(cellData ->
    cellData.getValue().myIntegerProperty().asObject());
This is necessary because of a bad design decision of JavaFX (see this discussion for more details).
Connecting MainApp with the PersonOverviewController
The setMainApp(...) method must be called by the MainApp class. This gives us a way to access the MainApp object and get the list of Persons and other things. Add the following three lines to showPersonOverview() the method:
MainApp.java - additional lines to add to showPersonOverview() method
// (.... root layout statement goes here ....)

// Give the controller access to the main app.
    PersonOverviewController controller = loader.getController();
    controller.setMainApp(this);

// (.... catch statement goes here ....)
Your showPersonOverview() method in MainApp should now look like this:
MainApp.java - new showPersonOverview() method
/**
* Shows the person overview inside the root layout.
*/
public void showPersonOverview() {
    try {
        // Load person overview.
        FXMLLoader loader = new FXMLLoader();
        loader.setLocation(MainApp.class.getResource("view/PersonOverview.fxml"));
        AnchorPane personOverview = loader.load();

        // Set person overview into the center of root layout.
        rootLayout.setCenter(personOverview);

        // Give the controller access to the main app.
        PersonOverviewController controller = loader.getController();
        controller.setMainApp(this);
    } catch (IOException e) {
        e.printStackTrace();
    }
}
Hook the View to the controller
We're almost there! But one thing is missing: We haven't told our PersonOverview.fxml file which controller to use, and which element should match to which field inside the controller.
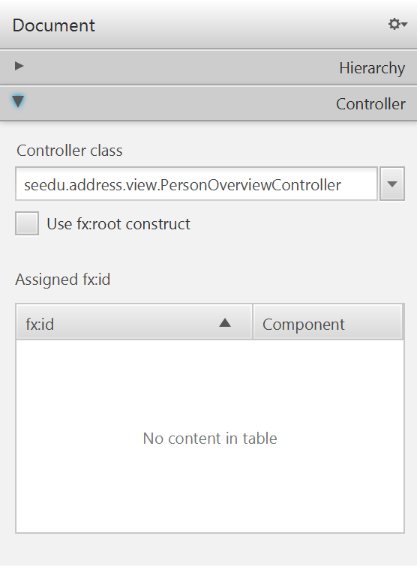
- Open
PersonOverview.fxmlwith the SceneBuilder. - Open the Controller group on the left side (just below Hierarchy), and select the
seedu.address.view.PersonOverviewControlleras the controller class.
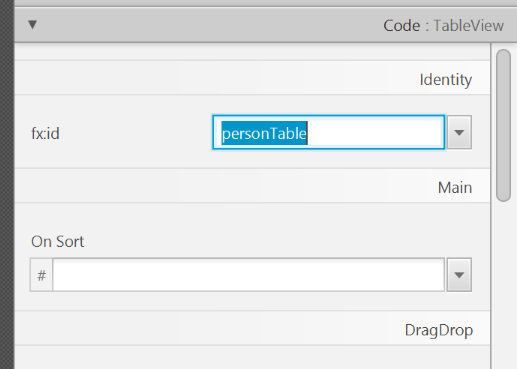
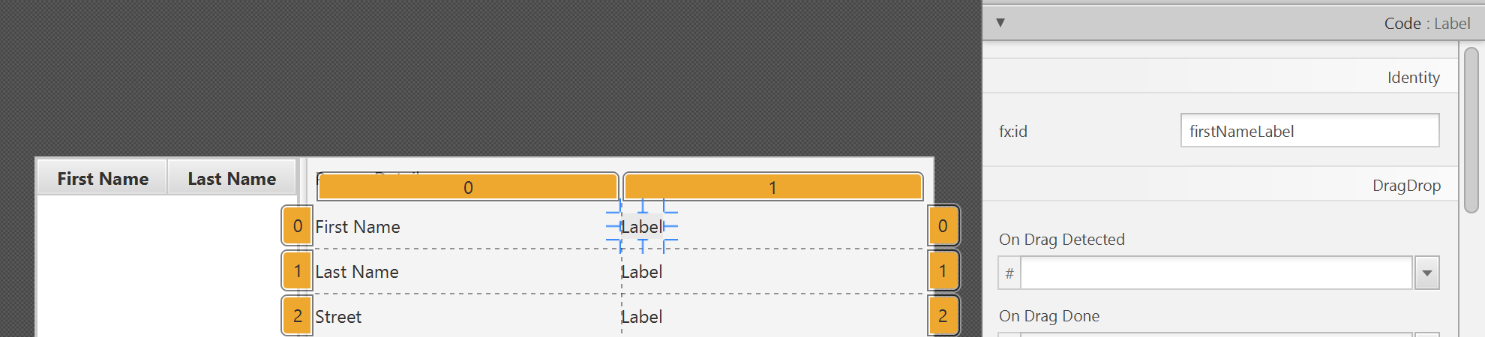
- Select the
TableViewin the Hierarchy group. - In the Inspector view, under the Code group, set 'fx:id' to
personTable.
- Do the same for the table columns. Select
firstNameColumnandlastNameColumnfor the 'fx:id' respectively. - For each label in the second column of the grid pane, choose the corresponding 'fx:id'.
- Save the
.fxmlfile.
Opening up the PersonOverviewController to JavaFx
If you try and run the application now, you will encounter the following error:
javafx.fxml.LoadException: ...

...

Caused by: java.lang.IllegalAccessException: class javafx.fxml.FXMLLoader$ValueElement (in module javafx.fxml) cannot access class seedu.address.view.PersonOverviewController (in module AddressApp) because module AddressApp does not export seedu.address.view to module javafx.fxml
This is because JavaFx is unable to access our PersonOverviewController class.
To fix this, add this line of code to src/module-info.java:
module AddressApp {
    ...

    opens seedu.address.view;
}
The file should now look something like this:
module-info.java
module AddressApp {
    requires javafx.graphics;
    requires javafx.fxml;
    requires javafx.controls;

    exports seedu.address;
    opens seedu.address.view;
}
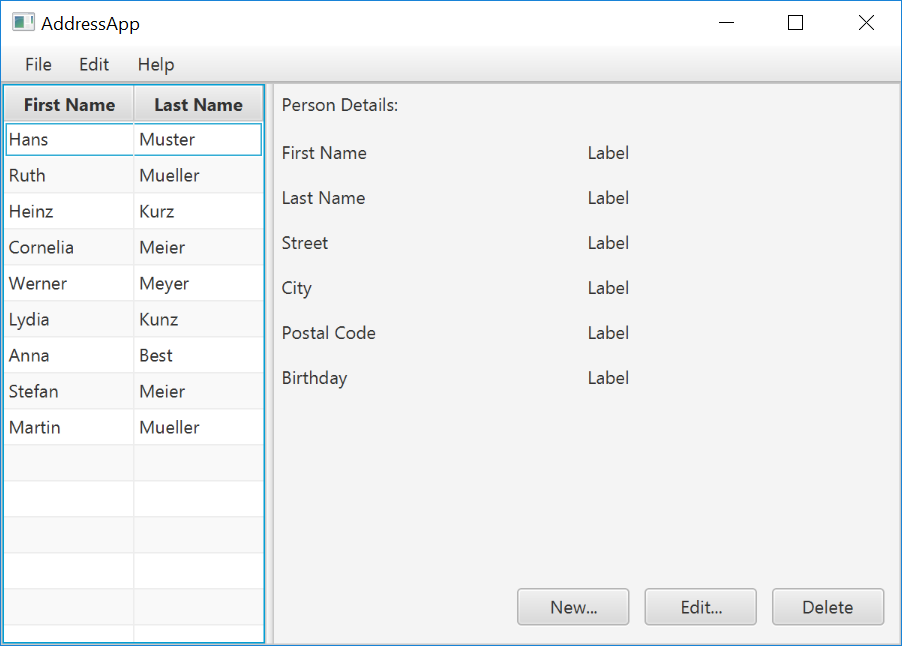
Start the Application
When you start your application now, you should see something like this:
Congratulations! The application now shows the list of Persons in the view!
You may notice that selecting a person in the TableView does nothing to the labels at the right side. That is because the user interaction portion has not been programmed yet, which we will cover in the next part of the tutorial.
Project Milestone: v1.1
Update UG and DG in the repo, attempt to do global-impact changes to the code base.
Milestone progress is graded. Be reminded that reaching individual and team milestones are considered for
Most aspects project progress are tracked using automated scripts. Please follow our instructions closely or else the script will not be able to detect your progress. We prefer not to spend admin resources processing requests for partial credit for work that did not follow the instructions precisely, unless the progress was not detected due to a bug in the script.
Milestone requirements are cumulative. The recommended progress for the mid-milestone is an implicit requirement for the actual milestone unless a milestone requirement overrides a mid-milestone requirement e.g., mid-milestone requires a document to be in a temp format while the actual milestone requires it to be in the proper format. Similarly, a requirement for milestone n is also an implicit requirement for milestone n+1 unless n+1 overrides the n requirement. This means if you miss some requirement at milestone n, you should try to achieve it before milestone n+1 or else it could be noted again as a 'missed requirement' at milestone n+1.
v1.1 Summary of Milestone
| Milestone | Minimum acceptable performance to consider as 'reached' |
|---|---|
| Team org/repo set up | as stated in |
| Some code enhancements done | created PRs to do local/global changes |
| Photo uploaded | a photo complying to |
| Project docs updated | updated docs are merged to the master branch |
| Milestone wrapped up | a commit in the master branch tagged as v1.1 |
Set up project repo, start moving UG and DG to the repo, attempt to do local-impact changes to the code base.
Project Management:
Set up the team org and the team repo as explained below:
Relevant: [
Organization setup
Please follow the organization/repo name format precisely because we use scripts to download your code or else our scripts will not be able to detect your work.
After receiving your team ID, one team member should do the following steps:
- Create a GitHub organization with the following details:
- Organization name :
CS2113-AY1819S2-TEAM_ID. e.g.CS2113-AY1819S2-M11-1 - Plan: Open Source ($0/month)
- Organization name :
- Add members to the organization:
- Create a team called
developersto your organization. - Add your team members to the developers team.
- Create a team called
Relevant: [
Repo setup
Only one team member:
- Fork either Address Book Level 3 or Address Book Level 4 to your team org.
- Rename the forked repo as
main. This repo (let's call it the team repo) is to be used as the repo for your project. - Ensure the issue tracker of your team repo is enabled. Reason: our bots will be posting your weekly progress reports on the issue tracker of your team repo.
- Ensure your team members have the desired level of access to your team repo.
- Enable Travis CI for the team repo.
- Set up auto-publishing of docs. When set up correctly, your project website should be available via the URL
https://nus-cs2113-ay1819s2-{team-id}.github.io/maine.g.,https://cs2113-ay1819s2-w13-1.github.io/main/. This also requires you to enable the GitHub Pages feature of your team repo and configure it to serve the website from thegh-pagesbranch. - create a team PR for us to track your project progress: i.e., create a PR from your team repo
masterbranch to [nuscs2113-AY1819S2/addressbook-level4]masterbranch. PR name:[Team ID] Product Namee.g.,[T09-2] Contact List Pro. As you merge code to your team repo'smasterbranch, this PR will auto-update to reflect how much your team's product has progressed. In the PR description@mention the other team members so that they get notified when the tutor adds comments to the PR.
All team members:
- Watchthe
mainrepo (created above) i.e., go to the repo and click on thewatchbutton to subscribe to activities of the repo - Fork the
mainrepo to your personal GitHub account. - Clone the fork to your Computer.
- Recommended: Set it up as an Intellij project (follow the instructions in the Developer Guide carefully).
- Set up the developer environment in your computer. You are recommended to use JDK 9 for AB-4 as some of the libraries used in AB-4 have not updated to support Java 10 yet. JDK 9 can be downloaded from the Java Archive.
Note that some of our download scripts depend on the following folder paths. Please do not alter those paths in your project.
/src/main/src/test/docs
- Note: If you fork from Address Book Level 3, ensure that the folder structure is similar to the one in Address Book Level 4
When updating code in the repo, follow the workflow explained below:
Relevant: [
Workflow
Before you do any coding for the project,
- Ensure you have
set the Git username correctly (as explained in Appendix E) in all Computers you use for coding. - Read
our reuse policy (in Admin: Appendix B) , in particular, how to give credit when you reuse code from the Internet or classmates:
Setting Git Username to Match GitHub Username
We use various tools to analyze your code. For us to be able to identify your commits, you should use the GitHub username as your Git username as well. If there is a mismatch, or if you use multiple user names for Git, our tools might miss some of your work and as a result you might not get credit for some of your work.
In each Computer you use for coding, after installing Git, you should set the Git username as follows.
- Open a command window that can run Git commands (e.g., Git bash window)
- Run the command
git config --global user.name YOUR_GITHUB_USERNAME
e.g.,git config --global user.name JohnDoe
More info about setting Git username is here.
Policy on reuse
Reuse is encouraged. However, note that reuse has its own costs (such as the learning curve, additional complexity, usage restrictions, and unknown bugs). Furthermore, you will not be given credit for work done by others. Rather, you will be given credit for using work done by others.
- You are allowed to reuse work from your classmates, subject to following conditions:
- The work has been published by us or the authors.
- You clearly give credit to the original author(s).
- You are allowed to reuse work from external sources, subject to following conditions:
- The work comes from a source of 'good standing' (such as an established open source project). This means you cannot reuse code written by an outside 'friend'.
- You clearly give credit to the original author. Acknowledge use of third party resources clearly e.g. in the welcome message, splash screen (if any) or under the 'about' menu. If you are open about reuse, you are less likely to get into trouble if you unintentionally reused something copyrighted.
- You do not violate the license under which the work has been released. Please do not use 3rd-party images/audio in your software unless they have been specifically released to be used freely. Just because you found it in the Internet does not mean it is free for reuse.
- Always get permission from us before you reuse third-party libraries. Please post your 'request to use 3rd party library' in our forum. That way, the whole class get to see what libraries are being used by others.
- This also ensures you learn the ethics to attribute credits to the correct stake holders/owners.
Giving credit for reused work
Given below are how to give credit for things you reuse from elsewhere. These requirements are specific to this module i.e., not applicable outside the module (outside the module you should follow the rules specified by your employer and the license of the reused work)
If you used a third party library:
- Mention in the
README.adoc(under the Acknowledgements section) - mention in the
Project Portfolio Page if the library has a significant relevance to the features you implemented
If you reused code snippets found on the Internet e.g. from StackOverflow answers or
referred code in another software or
referred project code by current/past student:
- If you read the code to understand the approach and implemented it yourself, mention it as a comment
Example://Solution below adapted from https://stackoverflow.com/a/16252290 {Your implmentation of the reused solution here ...} - If you copy-pasted a non-trivial code block (possibly with minor modifications renaming, layout changes, changes to comments, etc.), also mark the code block as reused code (using
@@authortags
Format://@@author {yourGithubUsername}-reused //{Info about the source...} {Reused code (possibly with minor modifications) here ...} //@@authorpersons = getList() //@@author johndoe-reused //Reused from https://stackoverflow.com/a/34646172 with minor modifications Collections.sort(persons, new Comparator<CustomData>() { @Override public int compare(CustomData lhs, CustomData rhs) { return lhs.customInt > rhs.customInt ? -1 : (lhs.customInt < rhs.customInt) ? 1 : 0; } }); //@@author return persons;
Adding @@author tags indicate authorship
-
Mark your code with a
//@@author {yourGithubUsername}. Note the double@.
The//@@authortag should indicates the beginning of the code you wrote. The code up to the next//@@authortag or the end of the file (whichever comes first) will be considered as was written by that author. Here is a sample code file://@@author johndoe method 1 ... method 2 ... //@@author sarahkhoo method 3 ... //@@author johndoe method 4 ... -
If you don't know who wrote the code segment below yours, you may put an empty
//@@author(i.e. no GitHub username) to indicate the end of the code segment you wrote. The author of code below yours can add the GitHub username to the empty tag later. Here is a sample code with an emptyauthortag:method 0 ... //@@author johndoe method 1 ... method 2 ... //@@author method 3 ... method 4 ... -
The author tag syntax varies based on file type e.g. for java, css, fxml. Use the corresponding comment syntax for non-Java files.
Here is an example code from an xml/fxml file.<!-- @@author sereneWong --> <textbox> <label>...</label> <input>...</input> </textbox> ... -
Do not put the
//@@authorinside java header comments.
👎/** * Returns true if ... * @@author johndoe */👍
//@@author johndoe
/**
  * Returns true if ...
  */
What to and what not to annotate
-
Annotate both functional and test code There is no need to annotate documentation files.
-
Annotate only significant size code blocks that can be reviewed on its own e.g., a class, a sequence of methods, a method.
Claiming credit for code blocks smaller than a method is discouraged but allowed. If you do, do it sparingly and only claim meaningful blocks of code such as a block of statements, a loop, or an if-else statement.- If an enhancement required you to do tiny changes in many places, there is no need to annotate all those tiny changes; you can describe those changes in the Project Portfolio page instead.
- If a code block was touched by more than one person, either let the person who wrote most of it (e.g. more than 80%) take credit for the entire block, or leave it as 'unclaimed' (i.e., no author tags).
- Related to the above point, if you claim a code block as your own, more than 80% of the code in that block should have been written by yourself. For example, no more than 20% of it can be code you reused from somewhere.
- 💡 GitHub has a blame feature and a history feature that can help you determine who wrote a piece of code.
-
Do not try to boost the quantity of your contribution using unethical means such as duplicating the same code in multiple places. In particular, do not copy-paste test cases to create redundant tests. Even repetitive code blocks within test methods should be extracted out as utility methods to reduce code duplication. Individual members are responsible for making sure code attributed to them are correct. If you notice a team member claiming credit for code that he/she did not write or use other questionable tactics, you can email us (after the final submission) to let us know.
-
If you wrote a significant amount of code that was not used in the final product,
- Create a folder called
{project root}/unused - Move unused files (or copies of files containing unused code) to that folder
- use
//@@author {yourGithubUsername}-unusedto mark unused code in those files (note the suffixunused) e.g.
//@@author johndoe-unused
method 1 ...
method 2 ...
Please put a comment in the code to explain why it was not used.
- Create a folder called
-
If you reused code from elsewhere, mark such code as
//@@author {yourGithubUsername}-reused(note the suffixreused) e.g.//@@author johndoe-reused method 1 ... method 2 ... -
You can use empty
@@authortags to mark code as not yours when RepoSense attribute the to you incorrectly.-
Code generated by the IDE/framework, should not be annotated as your own.
-
Code you modified in minor ways e.g. adding a parameter. These should not be claimed as yours but you can mention these additional contributions in the Project Portfolio page if you want to claim credit for them.
-
At the end of the project each student is required to submit a Project Portfolio Page.
-
Objective:
- For you to use (e.g. in your resume) as a well-documented data point of your SE experience
- For us to use as a data point to evaluate your,
- contributions to the project
- your documentation skills
-
Sections to include:
-
Overview: A short overview of your product to provide some context to the reader.
-
Summary of Contributions:
- Code contributed: Give a link to your code on Project Code Dashboard, which should be
https://nuscs2113-ay1819s2.github.io/dashboard-beta/#=undefined&search=github_username_in_lower_case(replacegithub_username_in_lower_casewith your actual username in lower case e.g.,johndoe). This link is also available in the Project List Page -- linked to the icon under your photo. - Features implemented: A summary of the features you implemented. If you implemented multiple features, you are recommended to indicate which one is the biggest feature.
- Other contributions:
- Contributions to project management e.g., setting up project tools, managing releases, managing issue tracker etc.
- Evidence of helping others e.g. responses you posted in our forum, bugs you reported in other team's products,
- Evidence of technical leadership e.g. sharing useful information in the forum
- Code contributed: Give a link to your code on Project Code Dashboard, which should be
-
Relevant descriptions/terms/conventions: Include all relevant details necessary to understand the document, e.g., conventions, symbols or labels introduced by you, even if it was not introduced by you.
-
Contributions to the User Guide: Reproduce the parts in the User Guide that you wrote. This can include features you implemented as well as features you propose to implement.
The purpose of allowing you to include proposed features is to provide you more flexibility to show your documentation skills. e.g. you can bring in a proposed feature just to give you an opportunity to use a UML diagram type not used by the actual features. -
Contributions to the Developer Guide: Reproduce the parts in the Developer Guide that you wrote. Ensure there is enough content to evaluate your technical documentation skills and UML modelling skills. You can include descriptions of your design/implementations, possible alternatives, pros and cons of alternatives, etc.
-
If you plan to use the PPP in your Resume, you can also include your SE work outside of the module (will not be graded)
-
-
Format:
-
File name:
docs/team/githbub_username_in_lower_case.adoce.g.,docs/team/johndoe.adoc -
Follow the example in the AddressBook-Level4
-
💡 You can use the Asciidoc's
includefeature to include sections from the developer guide or the user guide in your PPP. Follow the example in the sample. -
It is assumed that all contents in the PPP were written primarily by you. If any section is written by someone else e.g. someone else wrote described the feature in the User Guide but you implemented the feature, clearly state that the section was written by someone else (e.g.
Start of Extract [from: User Guide] written by Jane Doe). Reason: Your writing skills will be evaluated based on the PPP
-
-
Page limit:
Content Limit Overview + Summary of contributions 0.5-1 (soft limit) Contributions to the User Guide 1-3 (soft limit) Contributions to the Developer Guide 3-6 (soft limit) Total 5-10 (strict) - The page limits given above are after converting to PDF format. The actual amount of content you require is actually less than what these numbers suggest because the HTML → PDF conversion adds a lot of spacing around content.
- Reason for page limit: These submissions are peer-graded (in the PE) which needs to be done in a limited time span.
If you have more content than the limit given above, you can give a representative samples of UG and DG that showcase your documentation skills. Those samples should be understandable on their own. For the parts left-out, you can give an abbreviated version and refer the reader to the full UG/DG for more details.
It's similar to giving extra details as appendices; the reader will look at the UG/DG if the PPP is not enough to make a judgment. For example, when judging documentation quality, if the part in the PPP is not well-written, there is no point reading the rest in the main UG/DG. That's why you need to put the most representative part of your writings in the PPP and still give an abbreviated version of the rest in the PPP itself. Even when judging the quantity of work, the reader should be able to get a good sense of the quantity by combining what is quoted in the PPP and your abbreviated description of the missing part. There is no guarantee that the evaluator will read the full document.
Follow the
- Get team members to review PRs. A workflow without PR reviews is a risky workflow.
- Do not merge PRs failing
CI . After setting up Travis, the CI status of a PR is reported at the bottom of the PR page. The screenshot below shows the status of a PR that is passing all CI checks.
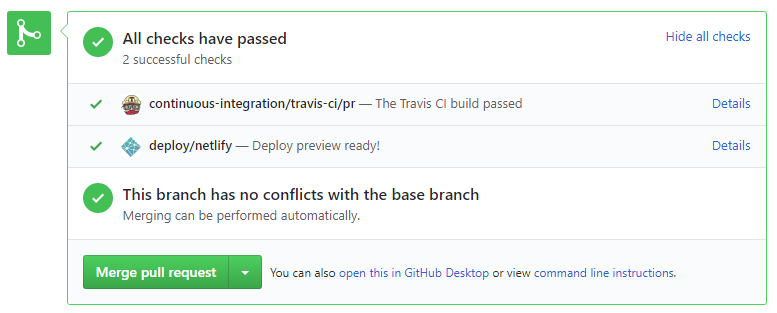
If there is a failure, you can click on theDetailslink in corresponding line to find out more about the failure. Once you figure out the cause of the failure, push the a fix to the PR. - After setting up Netlify, you can use Netlify PR Preview to preview changes to documentation files, if the PR contains updates to documentation. To see the preview, click on the
Detailslink in front of the Netlify status reported (refer screenshot above).
After completing v1.1, you can adjust process rigor to suit your team's pace, as explained below.
-
Reduce automated tests have benefits, but they can be a pain to write/maintain; GUI tests are especially hard to maintain because their behavior can sometimes depend on things such as the OS, resolution etc.
It is OK to get rid of some of the troublesome tests and rely more on manual testing instead. The less automated tests you have, the higher the risk of regressions; but it may be an acceptable trade-off under the circumstances if tests are slowing you down too much.
There is no direct penalty for removing GUI tests. Also noteour expectation on test code . -
Reduce automated checks: You can also reduce the rigor of checkstyle checks to expedite PR processing.
-
Switch to a lighter workflow: While forking workflow is the safest, it is also rather heavy. You an switch to a simpler workflow if the forking workflow is slowing you down. Refer the textbook to find more about alternative workflows: branching workflow, centralized workflow. However, we still recommend that you use PR reviews, at least for PRs affecting others' features.
You can also increase the rigor/safety of your workflow in the following ways:
- Use GitHub's Protected Branches feature to protect your
masterbranch against rogue PRs.
- There is no requirement for a minimum coverage level. Note that in a production environment you are often required to have at least 90% of the code covered by tests. In this project, it can be less. The less coverage you have, the higher the risk of regression bugs, which will cost marks if not fixed before the final submission.
- You must write some tests so that we can evaluate your ability to write tests.
- How much of each type of testing should you do? We expect you to decide. You learned different types of testing and what they try to achieve. Based on that, you should decide how much of each type is required. Similarly, you can decide to what extent you want to automate tests, depending on the benefits and the effort required.
Project Management → Revision Control →
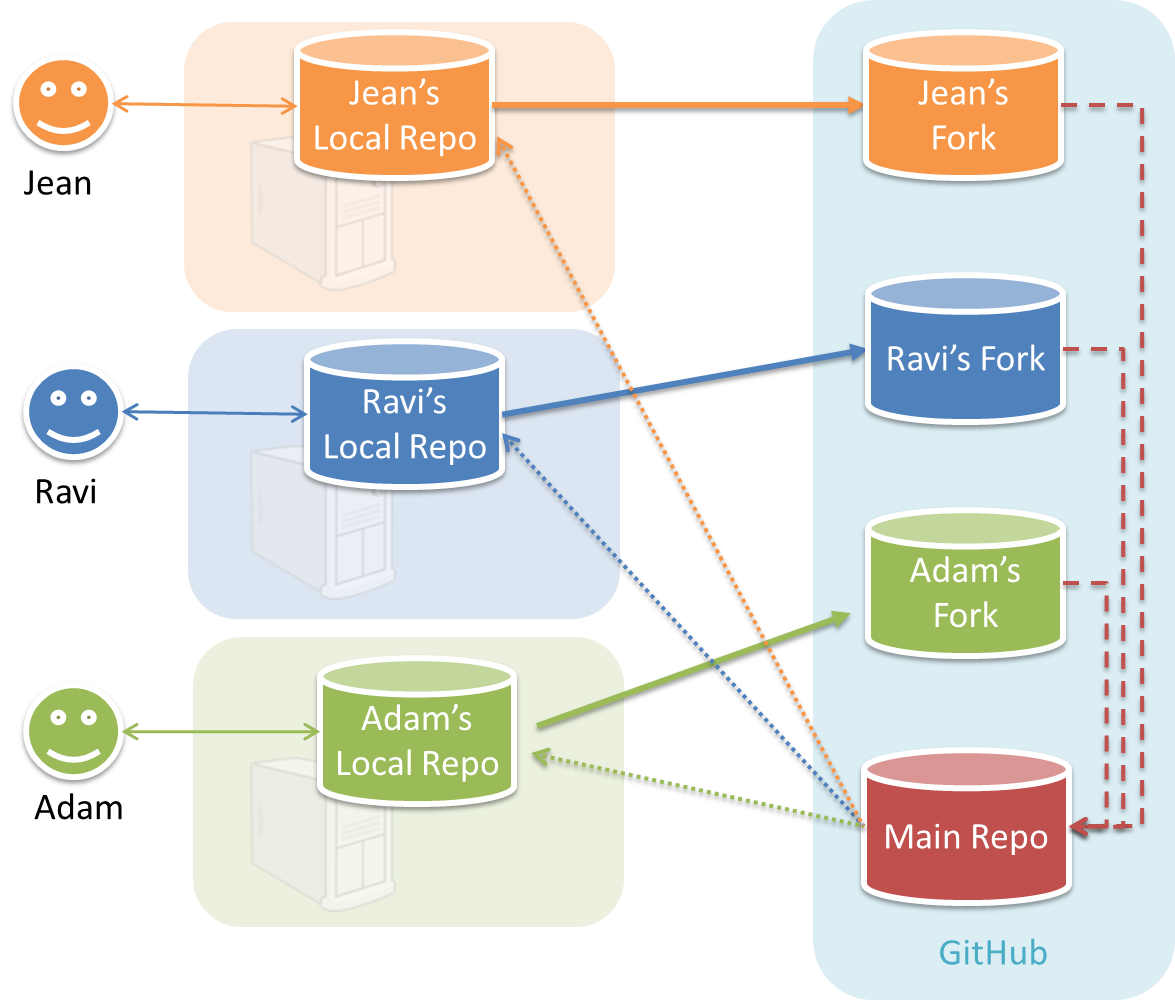
In the forking workflow, the 'official' version of the software is kept in a remote repo designated as the 'main repo'. All team members fork the main repo create pull requests from their fork to the main repo.
To illustrate how the workflow goes, let’s assume Jean wants to fix a bug in the code. Here are the steps:
- Jean creates a separate branch in her local repo and fixes the bug in that branch.
- Jean pushes the branch to her fork.
- Jean creates a pull request from that branch in her fork to the main repo.
- Other members review Jean’s pull request.
- If reviewers suggested any changes, Jean updates the PR accordingly.
- When reviewers are satisfied with the PR, one of the members (usually the team lead or a designated 'maintainer' of the main repo) merges the PR, which brings Jean’s code to the main repo.
- Other members, realizing there is new code in the upstream repo, sync their forks with the new upstream repo (i.e. the main repo). This is done by pulling the new code to their own local repo and pushing the updated code to their own fork.
- A detailed explanation of the Forking Workflow - From Atlassian
Documentation:
Recommended procedure for updating docs:
- Divide among yourselves who will update which parts of the document(s).
- Update the team repo by following the workflow mentioned above.
Update the following pages in your project repo:
- About Us page:
This page is used for module admin purposes. Please follow the format closely or else our scripts will not be able to give credit for your work.
- Replace info of SE-EDU developers with info of your team, including a suitable photo as described
here . - Including the name/photo of the supervisor/lecturer is optional.
- The photo of a team member should be
doc/images/githbub_username_in_lower_case.pnge.g.docs/images/damithc.png. If you photo is in jpg format, name the file as.pnganyway. - Indicate the different roles played and responsibilities held by each team member. You can reassign these
roles and responsibilities (as explained in Admin Project Scope) later in the project, if necessary.
- Replace info of SE-EDU developers with info of your team, including a suitable photo as described
-
The purpose of the profile photo is for the teaching team to identify you. Therefore, you should choose a recent individual photo showing your face clearly (i.e., not too small) -- somewhat similar to a passport photo. Some examples can be seen in the 'Teaching team' page. Given below are some examples of good and bad profile photos.
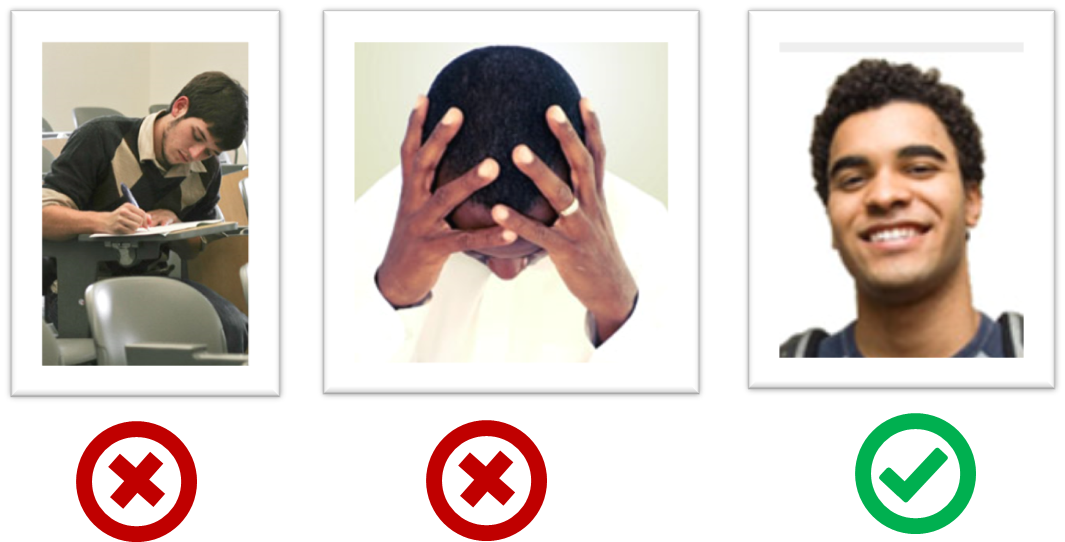
-
If you are uncomfortable posting your photo due to security reasons, you can post a lower resolution image so that it is hard for someone to misuse that image for fraudulent purposes. If you are concerned about privacy, you can request permission to omit your photo from the page by writing to prof.
Roles indicate aspects you are in charge of and responsible for. E.g., if you are in charge of documentation, you are the person who should allocate which parts of the documentation is to be done by who, ensure the document is in right format, ensure consistency etc.
This is a non-exhaustive list; you may define additional roles.
- Team lead: Responsible for overall project coordination.
- Documentation (short for ‘in charge of documentation’): Responsible for the quality of various project documents.
- Testing: Ensures the testing of the project is done properly and on time.
- Code quality: Looks after code quality, ensures adherence to coding standards, etc.
- Deliverables and deadlines: Ensure project deliverables are done on time and in the right format.
- Integration: In charge of versioning of the code, maintaining the code repository, integrating various parts of the software to create a whole.
- Scheduling and tracking: In charge of defining, assigning, and tracking project tasks.
- [Tool ABC] expert: e.g. Intellij expert, Git expert, etc. Helps other team member with matters related to the specific tool.
- In charge of[Component XYZ]: e.g. In charge of
Model,UI,Storage, etc. If you are in charge of a component, you are expected to know that component well, and review changes done to that component in v1.3-v1.4.
Please make sure each of the important roles are assigned to one person in the team. It is OK to have a 'backup' for each role, but for each aspect there should be one person who is unequivocally the person responsible for it.
-
Contact Us Page: Update to match your product.
-
README.adoc page: Update it to match your project.
-
Add a UI mockup of your intended final product.
Note that the image of the UI should bedocs/images/Ui.pngso that it can be downloaded by our scripts. Limit the file to contain one screenshot/mockup only and ensure the new image is roughly the sameheight x widthproportions as the original one. Reason: when we compile these images from all teams into one page (example), yours should not look out of place. -
The original
README.adocfile (which doubles as the landing page of your project website) is written to read like the introduction to an SE learning/teaching resource. You should restructure this page to look like the home page of a real product (not a school project) targeting real users e.g. remove references to addressbook-level3, Learning Outcomes etc. mention target users, add a marketing blurb etc. On a related note, also removeLearning Outcomeslink and related pages. -
Update the link of the Travis build status badge (
 ) so that it reflects the build status of your team repo.
For the other badges,- either set up the respective tool for your project (AB-4 Developer Guide has instructions on how to set up AppVeyor and Coveralls) and update the badges accordingly,
- or remove the badge.
-
Acknowledge the original source of the code i.e. AddressBook-Level4 project created by SE-EDU initiative at
https://github.com/se-edu/
-
-
User Guide: Start moving the content from your User Guide (draft created in previous weeks) into the User Guide page in your repository. If a feature is not implemented, mark it as 'Coming in v2.0' (example).
-
Developer Guide: Similar to the User Guide, start moving the content from your Developer Guide (draft created in previous weeks) into the Developer Guide page in your team repository.
Product:
-
Each member can attempt to do a
local-impact change to the code base.Objective: To familiarize yourself with at least one
components of the product.Description: Divide the components among yourselves. Each member can do some small enhancements to their component(s) to learn the code of that component. Some suggested enhancements are given in the AddressBook-Level4 developer guide.
Submission: Create PRs from your own fork to your team repo. Get it merged by following your team's workflow.
A. Process:
Evaluates: How well you did in project management related aspects of the project, as an individual and as a team
Based on: Supervisor observations of project milestones and GitHub data.
Milestones need to be reached the midnight before of the tutorial for it to be counted as achieved. To get a good grade for this aspect, achieve at least 60% of the recommended milestone progress.
Other criteria:
- Good use of GitHub milestones
- Good use of GitHub release mechanism
- Good version control, based on the repo
- Reasonable attempt to use the forking workflow
- Good task definition, assignment and tracking, based on the issue tracker
- Good use of buffers (opposite: everything at the last minute)
- Project done iteratively and incrementally (opposite: doing most of the work in one big burst)
B. Team-tasks:
Evaluates: How much did you contribute to team-tasks?
Based on: peer evaluations and tutor observations
Relevant: [
Here is a non-exhaustive list of team-tasks:
- Necessary general code enhancements e.g.,
- Work related to renaming the product
- Work related to changing the product icon
- Morphing the product into a different product
- Setting up the GitHub, Travis, AppVeyor, etc.
- Maintaining the issue tracker
- Release management
- Updating user/developer docs that are not specific to a feature e.g. documenting the target user profile
- Incorporating more useful tools/libraries/frameworks into the product or the project workflow (e.g. automate more aspects of the project workflow using a GitHub plugin)
-
The purpose of the profile photo is for the teaching team to identify you. Therefore, you should choose a recent individual photo showing your face clearly (i.e., not too small) -- somewhat similar to a passport photo. Some examples can be seen in the 'Teaching team' page. Given below are some examples of good and bad profile photos.
-
If you are uncomfortable posting your photo due to security reasons, you can post a lower resolution image so that it is hard for someone to misuse that image for fraudulent purposes. If you are concerned about privacy, you can request permission to omit your photo from the page by writing to prof.
v1.1 Project Management
- Fix any errors in org/repo set up (e.g. wrong repo name).
- Wrap up the milestone using a git tag
v1.1as explained below:- When the milestone deadline is near (e.g., 0.5 days before the deadline), if you think some of the ongoing work intended for the current milestone may not finish in time, reassign them to a future milestone.
- After all changes that can be merged before the milestone deadline has been merged, use
git tagfeature to tag the current version with the milestone and push the tag to the team repo.
v1.1 Documentation
-
Update User Guide, Developer Guide, README, and About Us pages as described earlier in
mid-v1.1 progress guide .Submission: merge your changes to the master branch of your repo.
Set up project repo, start moving UG and DG to the repo, attempt to do local-impact changes to the code base.
Project Management:
Set up the team org and the team repo as explained below:
Relevant: [
Organization setup
Please follow the organization/repo name format precisely because we use scripts to download your code or else our scripts will not be able to detect your work.
After receiving your team ID, one team member should do the following steps:
- Create a GitHub organization with the following details:
- Organization name :
CS2113-AY1819S2-TEAM_ID. e.g.CS2113-AY1819S2-M11-1 - Plan: Open Source ($0/month)
- Organization name :
- Add members to the organization:
- Create a team called
developersto your organization. - Add your team members to the developers team.
- Create a team called
Relevant: [
Repo setup
Only one team member:
- Fork either Address Book Level 3 or Address Book Level 4 to your team org.
- Rename the forked repo as
main. This repo (let's call it the team repo) is to be used as the repo for your project. - Ensure the issue tracker of your team repo is enabled. Reason: our bots will be posting your weekly progress reports on the issue tracker of your team repo.
- Ensure your team members have the desired level of access to your team repo.
- Enable Travis CI for the team repo.
- Set up auto-publishing of docs. When set up correctly, your project website should be available via the URL
https://nus-cs2113-ay1819s2-{team-id}.github.io/maine.g.,https://cs2113-ay1819s2-w13-1.github.io/main/. This also requires you to enable the GitHub Pages feature of your team repo and configure it to serve the website from thegh-pagesbranch. - create a team PR for us to track your project progress: i.e., create a PR from your team repo
masterbranch to [nuscs2113-AY1819S2/addressbook-level4]masterbranch. PR name:[Team ID] Product Namee.g.,[T09-2] Contact List Pro. As you merge code to your team repo'smasterbranch, this PR will auto-update to reflect how much your team's product has progressed. In the PR description@mention the other team members so that they get notified when the tutor adds comments to the PR.
All team members:
- Watchthe
mainrepo (created above) i.e., go to the repo and click on thewatchbutton to subscribe to activities of the repo - Fork the
mainrepo to your personal GitHub account. - Clone the fork to your Computer.
- Recommended: Set it up as an Intellij project (follow the instructions in the Developer Guide carefully).
- Set up the developer environment in your computer. You are recommended to use JDK 9 for AB-4 as some of the libraries used in AB-4 have not updated to support Java 10 yet. JDK 9 can be downloaded from the Java Archive.
Note that some of our download scripts depend on the following folder paths. Please do not alter those paths in your project.
/src/main/src/test/docs
- Note: If you fork from Address Book Level 3, ensure that the folder structure is similar to the one in Address Book Level 4
When updating code in the repo, follow the workflow explained below:
Relevant: [
Workflow
Before you do any coding for the project,
- Ensure you have
set the Git username correctly (as explained in Appendix E) in all Computers you use for coding. - Read
our reuse policy (in Admin: Appendix B) , in particular, how to give credit when you reuse code from the Internet or classmates:
Setting Git Username to Match GitHub Username
We use various tools to analyze your code. For us to be able to identify your commits, you should use the GitHub username as your Git username as well. If there is a mismatch, or if you use multiple user names for Git, our tools might miss some of your work and as a result you might not get credit for some of your work.
In each Computer you use for coding, after installing Git, you should set the Git username as follows.
- Open a command window that can run Git commands (e.g., Git bash window)
- Run the command
git config --global user.name YOUR_GITHUB_USERNAME
e.g.,git config --global user.name JohnDoe
More info about setting Git username is here.
Policy on reuse
Reuse is encouraged. However, note that reuse has its own costs (such as the learning curve, additional complexity, usage restrictions, and unknown bugs). Furthermore, you will not be given credit for work done by others. Rather, you will be given credit for using work done by others.
- You are allowed to reuse work from your classmates, subject to following conditions:
- The work has been published by us or the authors.
- You clearly give credit to the original author(s).
- You are allowed to reuse work from external sources, subject to following conditions:
- The work comes from a source of 'good standing' (such as an established open source project). This means you cannot reuse code written by an outside 'friend'.
- You clearly give credit to the original author. Acknowledge use of third party resources clearly e.g. in the welcome message, splash screen (if any) or under the 'about' menu. If you are open about reuse, you are less likely to get into trouble if you unintentionally reused something copyrighted.
- You do not violate the license under which the work has been released. Please do not use 3rd-party images/audio in your software unless they have been specifically released to be used freely. Just because you found it in the Internet does not mean it is free for reuse.
- Always get permission from us before you reuse third-party libraries. Please post your 'request to use 3rd party library' in our forum. That way, the whole class get to see what libraries are being used by others.
- This also ensures you learn the ethics to attribute credits to the correct stake holders/owners.
Giving credit for reused work
Given below are how to give credit for things you reuse from elsewhere. These requirements are specific to this module i.e., not applicable outside the module (outside the module you should follow the rules specified by your employer and the license of the reused work)
If you used a third party library:
- Mention in the
README.adoc(under the Acknowledgements section) - mention in the
Project Portfolio Page if the library has a significant relevance to the features you implemented
If you reused code snippets found on the Internet e.g. from StackOverflow answers or
referred code in another software or
referred project code by current/past student:
- If you read the code to understand the approach and implemented it yourself, mention it as a comment
Example://Solution below adapted from https://stackoverflow.com/a/16252290 {Your implmentation of the reused solution here ...} - If you copy-pasted a non-trivial code block (possibly with minor modifications renaming, layout changes, changes to comments, etc.), also mark the code block as reused code (using
@@authortags
Format://@@author {yourGithubUsername}-reused //{Info about the source...} {Reused code (possibly with minor modifications) here ...} //@@authorpersons = getList() //@@author johndoe-reused //Reused from https://stackoverflow.com/a/34646172 with minor modifications Collections.sort(persons, new Comparator<CustomData>() { @Override public int compare(CustomData lhs, CustomData rhs) { return lhs.customInt > rhs.customInt ? -1 : (lhs.customInt < rhs.customInt) ? 1 : 0; } }); //@@author return persons;
Adding @@author tags indicate authorship
-
Mark your code with a
//@@author {yourGithubUsername}. Note the double@.
The//@@authortag should indicates the beginning of the code you wrote. The code up to the next//@@authortag or the end of the file (whichever comes first) will be considered as was written by that author. Here is a sample code file://@@author johndoe method 1 ... method 2 ... //@@author sarahkhoo method 3 ... //@@author johndoe method 4 ... -
If you don't know who wrote the code segment below yours, you may put an empty
//@@author(i.e. no GitHub username) to indicate the end of the code segment you wrote. The author of code below yours can add the GitHub username to the empty tag later. Here is a sample code with an emptyauthortag:method 0 ... //@@author johndoe method 1 ... method 2 ... //@@author method 3 ... method 4 ... -
The author tag syntax varies based on file type e.g. for java, css, fxml. Use the corresponding comment syntax for non-Java files.
Here is an example code from an xml/fxml file.<!-- @@author sereneWong --> <textbox> <label>...</label> <input>...</input> </textbox> ... -
Do not put the
//@@authorinside java header comments.
👎/** * Returns true if ... * @@author johndoe */👍
//@@author johndoe
/**
  * Returns true if ...
  */
What to and what not to annotate
-
Annotate both functional and test code There is no need to annotate documentation files.
-
Annotate only significant size code blocks that can be reviewed on its own e.g., a class, a sequence of methods, a method.
Claiming credit for code blocks smaller than a method is discouraged but allowed. If you do, do it sparingly and only claim meaningful blocks of code such as a block of statements, a loop, or an if-else statement.- If an enhancement required you to do tiny changes in many places, there is no need to annotate all those tiny changes; you can describe those changes in the Project Portfolio page instead.
- If a code block was touched by more than one person, either let the person who wrote most of it (e.g. more than 80%) take credit for the entire block, or leave it as 'unclaimed' (i.e., no author tags).
- Related to the above point, if you claim a code block as your own, more than 80% of the code in that block should have been written by yourself. For example, no more than 20% of it can be code you reused from somewhere.
- 💡 GitHub has a blame feature and a history feature that can help you determine who wrote a piece of code.
-
Do not try to boost the quantity of your contribution using unethical means such as duplicating the same code in multiple places. In particular, do not copy-paste test cases to create redundant tests. Even repetitive code blocks within test methods should be extracted out as utility methods to reduce code duplication. Individual members are responsible for making sure code attributed to them are correct. If you notice a team member claiming credit for code that he/she did not write or use other questionable tactics, you can email us (after the final submission) to let us know.
-
If you wrote a significant amount of code that was not used in the final product,
- Create a folder called
{project root}/unused - Move unused files (or copies of files containing unused code) to that folder
- use
//@@author {yourGithubUsername}-unusedto mark unused code in those files (note the suffixunused) e.g.
//@@author johndoe-unused
method 1 ...
method 2 ...
Please put a comment in the code to explain why it was not used.
- Create a folder called
-
If you reused code from elsewhere, mark such code as
//@@author {yourGithubUsername}-reused(note the suffixreused) e.g.//@@author johndoe-reused method 1 ... method 2 ... -
You can use empty
@@authortags to mark code as not yours when RepoSense attribute the to you incorrectly.-
Code generated by the IDE/framework, should not be annotated as your own.
-
Code you modified in minor ways e.g. adding a parameter. These should not be claimed as yours but you can mention these additional contributions in the Project Portfolio page if you want to claim credit for them.
-
At the end of the project each student is required to submit a Project Portfolio Page.
-
Objective:
- For you to use (e.g. in your resume) as a well-documented data point of your SE experience
- For us to use as a data point to evaluate your,
- contributions to the project
- your documentation skills
-
Sections to include:
-
Overview: A short overview of your product to provide some context to the reader.
-
Summary of Contributions:
- Code contributed: Give a link to your code on Project Code Dashboard, which should be
https://nuscs2113-ay1819s2.github.io/dashboard-beta/#=undefined&search=github_username_in_lower_case(replacegithub_username_in_lower_casewith your actual username in lower case e.g.,johndoe). This link is also available in the Project List Page -- linked to the icon under your photo. - Features implemented: A summary of the features you implemented. If you implemented multiple features, you are recommended to indicate which one is the biggest feature.
- Other contributions:
- Contributions to project management e.g., setting up project tools, managing releases, managing issue tracker etc.
- Evidence of helping others e.g. responses you posted in our forum, bugs you reported in other team's products,
- Evidence of technical leadership e.g. sharing useful information in the forum
- Code contributed: Give a link to your code on Project Code Dashboard, which should be
-
Relevant descriptions/terms/conventions: Include all relevant details necessary to understand the document, e.g., conventions, symbols or labels introduced by you, even if it was not introduced by you.
-
Contributions to the User Guide: Reproduce the parts in the User Guide that you wrote. This can include features you implemented as well as features you propose to implement.
The purpose of allowing you to include proposed features is to provide you more flexibility to show your documentation skills. e.g. you can bring in a proposed feature just to give you an opportunity to use a UML diagram type not used by the actual features. -
Contributions to the Developer Guide: Reproduce the parts in the Developer Guide that you wrote. Ensure there is enough content to evaluate your technical documentation skills and UML modelling skills. You can include descriptions of your design/implementations, possible alternatives, pros and cons of alternatives, etc.
-
If you plan to use the PPP in your Resume, you can also include your SE work outside of the module (will not be graded)
-
-
Format:
-
File name:
docs/team/githbub_username_in_lower_case.adoce.g.,docs/team/johndoe.adoc -
Follow the example in the AddressBook-Level4
-
💡 You can use the Asciidoc's
includefeature to include sections from the developer guide or the user guide in your PPP. Follow the example in the sample. -
It is assumed that all contents in the PPP were written primarily by you. If any section is written by someone else e.g. someone else wrote described the feature in the User Guide but you implemented the feature, clearly state that the section was written by someone else (e.g.
Start of Extract [from: User Guide] written by Jane Doe). Reason: Your writing skills will be evaluated based on the PPP
-
-
Page limit:
Content Limit Overview + Summary of contributions 0.5-1 (soft limit) Contributions to the User Guide 1-3 (soft limit) Contributions to the Developer Guide 3-6 (soft limit) Total 5-10 (strict) - The page limits given above are after converting to PDF format. The actual amount of content you require is actually less than what these numbers suggest because the HTML → PDF conversion adds a lot of spacing around content.
- Reason for page limit: These submissions are peer-graded (in the PE) which needs to be done in a limited time span.
If you have more content than the limit given above, you can give a representative samples of UG and DG that showcase your documentation skills. Those samples should be understandable on their own. For the parts left-out, you can give an abbreviated version and refer the reader to the full UG/DG for more details.
It's similar to giving extra details as appendices; the reader will look at the UG/DG if the PPP is not enough to make a judgment. For example, when judging documentation quality, if the part in the PPP is not well-written, there is no point reading the rest in the main UG/DG. That's why you need to put the most representative part of your writings in the PPP and still give an abbreviated version of the rest in the PPP itself. Even when judging the quantity of work, the reader should be able to get a good sense of the quantity by combining what is quoted in the PPP and your abbreviated description of the missing part. There is no guarantee that the evaluator will read the full document.
Follow the
- Get team members to review PRs. A workflow without PR reviews is a risky workflow.
- Do not merge PRs failing
CI . After setting up Travis, the CI status of a PR is reported at the bottom of the PR page. The screenshot below shows the status of a PR that is passing all CI checks.
If there is a failure, you can click on theDetailslink in corresponding line to find out more about the failure. Once you figure out the cause of the failure, push the a fix to the PR. - After setting up Netlify, you can use Netlify PR Preview to preview changes to documentation files, if the PR contains updates to documentation. To see the preview, click on the
Detailslink in front of the Netlify status reported (refer screenshot above).
After completing v1.1, you can adjust process rigor to suit your team's pace, as explained below.
-
Reduce automated tests have benefits, but they can be a pain to write/maintain; GUI tests are especially hard to maintain because their behavior can sometimes depend on things such as the OS, resolution etc.
It is OK to get rid of some of the troublesome tests and rely more on manual testing instead. The less automated tests you have, the higher the risk of regressions; but it may be an acceptable trade-off under the circumstances if tests are slowing you down too much.
There is no direct penalty for removing GUI tests. Also noteour expectation on test code . -
Reduce automated checks: You can also reduce the rigor of checkstyle checks to expedite PR processing.
-
Switch to a lighter workflow: While forking workflow is the safest, it is also rather heavy. You an switch to a simpler workflow if the forking workflow is slowing you down. Refer the textbook to find more about alternative workflows: branching workflow, centralized workflow. However, we still recommend that you use PR reviews, at least for PRs affecting others' features.
You can also increase the rigor/safety of your workflow in the following ways:
- Use GitHub's Protected Branches feature to protect your
masterbranch against rogue PRs.
- There is no requirement for a minimum coverage level. Note that in a production environment you are often required to have at least 90% of the code covered by tests. In this project, it can be less. The less coverage you have, the higher the risk of regression bugs, which will cost marks if not fixed before the final submission.
- You must write some tests so that we can evaluate your ability to write tests.
- How much of each type of testing should you do? We expect you to decide. You learned different types of testing and what they try to achieve. Based on that, you should decide how much of each type is required. Similarly, you can decide to what extent you want to automate tests, depending on the benefits and the effort required.
Project Management → Revision Control →
In the forking workflow, the 'official' version of the software is kept in a remote repo designated as the 'main repo'. All team members fork the main repo create pull requests from their fork to the main repo.
To illustrate how the workflow goes, let’s assume Jean wants to fix a bug in the code. Here are the steps:
- Jean creates a separate branch in her local repo and fixes the bug in that branch.
- Jean pushes the branch to her fork.
- Jean creates a pull request from that branch in her fork to the main repo.
- Other members review Jean’s pull request.
- If reviewers suggested any changes, Jean updates the PR accordingly.
- When reviewers are satisfied with the PR, one of the members (usually the team lead or a designated 'maintainer' of the main repo) merges the PR, which brings Jean’s code to the main repo.
- Other members, realizing there is new code in the upstream repo, sync their forks with the new upstream repo (i.e. the main repo). This is done by pulling the new code to their own local repo and pushing the updated code to their own fork.
- A detailed explanation of the Forking Workflow - From Atlassian
Documentation:
Recommended procedure for updating docs:
- Divide among yourselves who will update which parts of the document(s).
- Update the team repo by following the workflow mentioned above.
Update the following pages in your project repo:
- About Us page:
This page is used for module admin purposes. Please follow the format closely or else our scripts will not be able to give credit for your work.
- Replace info of SE-EDU developers with info of your team, including a suitable photo as described
here . - Including the name/photo of the supervisor/lecturer is optional.
- The photo of a team member should be
doc/images/githbub_username_in_lower_case.pnge.g.docs/images/damithc.png. If you photo is in jpg format, name the file as.pnganyway. - Indicate the different roles played and responsibilities held by each team member. You can reassign these
roles and responsibilities (as explained in Admin Project Scope) later in the project, if necessary.
- Replace info of SE-EDU developers with info of your team, including a suitable photo as described
-
The purpose of the profile photo is for the teaching team to identify you. Therefore, you should choose a recent individual photo showing your face clearly (i.e., not too small) -- somewhat similar to a passport photo. Some examples can be seen in the 'Teaching team' page. Given below are some examples of good and bad profile photos.
-
If you are uncomfortable posting your photo due to security reasons, you can post a lower resolution image so that it is hard for someone to misuse that image for fraudulent purposes. If you are concerned about privacy, you can request permission to omit your photo from the page by writing to prof.
Roles indicate aspects you are in charge of and responsible for. E.g., if you are in charge of documentation, you are the person who should allocate which parts of the documentation is to be done by who, ensure the document is in right format, ensure consistency etc.
This is a non-exhaustive list; you may define additional roles.
- Team lead: Responsible for overall project coordination.
- Documentation (short for ‘in charge of documentation’): Responsible for the quality of various project documents.
- Testing: Ensures the testing of the project is done properly and on time.
- Code quality: Looks after code quality, ensures adherence to coding standards, etc.
- Deliverables and deadlines: Ensure project deliverables are done on time and in the right format.
- Integration: In charge of versioning of the code, maintaining the code repository, integrating various parts of the software to create a whole.
- Scheduling and tracking: In charge of defining, assigning, and tracking project tasks.
- [Tool ABC] expert: e.g. Intellij expert, Git expert, etc. Helps other team member with matters related to the specific tool.
- In charge of[Component XYZ]: e.g. In charge of
Model,UI,Storage, etc. If you are in charge of a component, you are expected to know that component well, and review changes done to that component in v1.3-v1.4.
Please make sure each of the important roles are assigned to one person in the team. It is OK to have a 'backup' for each role, but for each aspect there should be one person who is unequivocally the person responsible for it.
-
Contact Us Page: Update to match your product.
-
README.adoc page: Update it to match your project.
-
Add a UI mockup of your intended final product.
Note that the image of the UI should bedocs/images/Ui.pngso that it can be downloaded by our scripts. Limit the file to contain one screenshot/mockup only and ensure the new image is roughly the sameheight x widthproportions as the original one. Reason: when we compile these images from all teams into one page (example), yours should not look out of place. -
The original
README.adocfile (which doubles as the landing page of your project website) is written to read like the introduction to an SE learning/teaching resource. You should restructure this page to look like the home page of a real product (not a school project) targeting real users e.g. remove references to addressbook-level3, Learning Outcomes etc. mention target users, add a marketing blurb etc. On a related note, also removeLearning Outcomeslink and related pages. -
Update the link of the Travis build status badge (
) so that it reflects the build status of your team repo.
For the other badges,- either set up the respective tool for your project (AB-4 Developer Guide has instructions on how to set up AppVeyor and Coveralls) and update the badges accordingly,
- or remove the badge.
-
Acknowledge the original source of the code i.e. AddressBook-Level4 project created by SE-EDU initiative at
https://github.com/se-edu/
-
-
User Guide: Start moving the content from your User Guide (draft created in previous weeks) into the User Guide page in your repository. If a feature is not implemented, mark it as 'Coming in v2.0' (example).
-
Developer Guide: Similar to the User Guide, start moving the content from your Developer Guide (draft created in previous weeks) into the Developer Guide page in your team repository.
Product:
-
Each member can attempt to do a
local-impact change to the code base.Objective: To familiarize yourself with at least one
components of the product.Description: Divide the components among yourselves. Each member can do some small enhancements to their component(s) to learn the code of that component. Some suggested enhancements are given in the AddressBook-Level4 developer guide.
Submission: Create PRs from your own fork to your team repo. Get it merged by following your team's workflow.
v1.1 Product
- Each member should try to add some enhancements that are in line with the vision for v2.0. After adding some local-impact changes as recommended in
mid-v1.1 progress guide , attempt to do someglobal-impact enhancements , touching as many other components as possible. Refer to the AddressBook-Level4 Developer Guide has some guidance on how to implement a new feature end-to-end.
Questions to discuss during tutorial:
- Which architecture styles are used by AB-4?
- What is an API? How is it used in AB-4?
Explain in your own words the interactions illustrated by this Sequence Diagram:
Consider the code below:
class Person{
    Tag tag;
    String name;

    Person(String personName, String tagName){
        name = personName;
        tag = new Tag(tagName);
    }
}
class Tag{
    Tag(String value){
        //...
    }
}

class PersonList{
    void addPerson(Person p){
        //...
    }
}
Draw a sequence diagram to illustrate the object interactions that happen in the code snippet below:
PersonList personList = new PersonList();
while (hasRoom){
    Person p = new Person("Adam", "friend");
    personList.addPerson(p);
}
Explain the interactions depicted in this sequence diagram.
First, the createParser() method of an existing ParserFactory object is called. Then, ...
Draw a sequence diagram to represent this code snippet.
if (isFirstPage) {
    new Quote().print();
}
The Quote class:
class Quote{

    String q;

    Quote(){
        q = generate();
    }

    String generate(){
        // ...
    }

    void print(){
        System.out.println(q);
    }

}
- Show
new Quote().print();as two method calls. - As the created Quote object is not assigned to a variable, it can be considered as 'deleted' soon after its
print()method is called.
Update UG and DG in the repo, attempt to do global-impact changes to the code base.
Milestone progress is graded. Be reminded that reaching individual and team milestones are considered for
Most aspects project progress are tracked using automated scripts. Please follow our instructions closely or else the script will not be able to detect your progress. We prefer not to spend admin resources processing requests for partial credit for work that did not follow the instructions precisely, unless the progress was not detected due to a bug in the script.
Milestone requirements are cumulative. The recommended progress for the mid-milestone is an implicit requirement for the actual milestone unless a milestone requirement overrides a mid-milestone requirement e.g., mid-milestone requires a document to be in a temp format while the actual milestone requires it to be in the proper format. Similarly, a requirement for milestone n is also an implicit requirement for milestone n+1 unless n+1 overrides the n requirement. This means if you miss some requirement at milestone n, you should try to achieve it before milestone n+1 or else it could be noted again as a 'missed requirement' at milestone n+1.
v1.1 Summary of Milestone
| Milestone | Minimum acceptable performance to consider as 'reached' |
|---|---|
| Team org/repo set up | as stated in |
| Some code enhancements done | created PRs to do local/global changes |
| Photo uploaded | a photo complying to |
| Project docs updated | updated docs are merged to the master branch |
| Milestone wrapped up | a commit in the master branch tagged as v1.1 |
Set up project repo, start moving UG and DG to the repo, attempt to do local-impact changes to the code base.
Project Management:
Set up the team org and the team repo as explained below:
Relevant: [
Organization setup
Please follow the organization/repo name format precisely because we use scripts to download your code or else our scripts will not be able to detect your work.
After receiving your team ID, one team member should do the following steps:
- Create a GitHub organization with the following details:
- Organization name :
CS2113-AY1819S2-TEAM_ID. e.g.CS2113-AY1819S2-M11-1 - Plan: Open Source ($0/month)
- Organization name :
- Add members to the organization:
- Create a team called
developersto your organization. - Add your team members to the developers team.
- Create a team called
Relevant: [
Repo setup
Only one team member:
- Fork either Address Book Level 3 or Address Book Level 4 to your team org.
- Rename the forked repo as
main. This repo (let's call it the team repo) is to be used as the repo for your project. - Ensure the issue tracker of your team repo is enabled. Reason: our bots will be posting your weekly progress reports on the issue tracker of your team repo.
- Ensure your team members have the desired level of access to your team repo.
- Enable Travis CI for the team repo.
- Set up auto-publishing of docs. When set up correctly, your project website should be available via the URL
https://nus-cs2113-ay1819s2-{team-id}.github.io/maine.g.,https://cs2113-ay1819s2-w13-1.github.io/main/. This also requires you to enable the GitHub Pages feature of your team repo and configure it to serve the website from thegh-pagesbranch. - create a team PR for us to track your project progress: i.e., create a PR from your team repo
masterbranch to [nuscs2113-AY1819S2/addressbook-level4]masterbranch. PR name:[Team ID] Product Namee.g.,[T09-2] Contact List Pro. As you merge code to your team repo'smasterbranch, this PR will auto-update to reflect how much your team's product has progressed. In the PR description@mention the other team members so that they get notified when the tutor adds comments to the PR.
All team members:
- Watchthe
mainrepo (created above) i.e., go to the repo and click on thewatchbutton to subscribe to activities of the repo - Fork the
mainrepo to your personal GitHub account. - Clone the fork to your Computer.
- Recommended: Set it up as an Intellij project (follow the instructions in the Developer Guide carefully).
- Set up the developer environment in your computer. You are recommended to use JDK 9 for AB-4 as some of the libraries used in AB-4 have not updated to support Java 10 yet. JDK 9 can be downloaded from the Java Archive.
Note that some of our download scripts depend on the following folder paths. Please do not alter those paths in your project.
/src/main/src/test/docs
- Note: If you fork from Address Book Level 3, ensure that the folder structure is similar to the one in Address Book Level 4
When updating code in the repo, follow the workflow explained below:
Relevant: [
Workflow
Before you do any coding for the project,
- Ensure you have
set the Git username correctly (as explained in Appendix E) in all Computers you use for coding. - Read
our reuse policy (in Admin: Appendix B) , in particular, how to give credit when you reuse code from the Internet or classmates:
Setting Git Username to Match GitHub Username
We use various tools to analyze your code. For us to be able to identify your commits, you should use the GitHub username as your Git username as well. If there is a mismatch, or if you use multiple user names for Git, our tools might miss some of your work and as a result you might not get credit for some of your work.
In each Computer you use for coding, after installing Git, you should set the Git username as follows.
- Open a command window that can run Git commands (e.g., Git bash window)
- Run the command
git config --global user.name YOUR_GITHUB_USERNAME
e.g.,git config --global user.name JohnDoe
More info about setting Git username is here.
Policy on reuse
Reuse is encouraged. However, note that reuse has its own costs (such as the learning curve, additional complexity, usage restrictions, and unknown bugs). Furthermore, you will not be given credit for work done by others. Rather, you will be given credit for using work done by others.
- You are allowed to reuse work from your classmates, subject to following conditions:
- The work has been published by us or the authors.
- You clearly give credit to the original author(s).
- You are allowed to reuse work from external sources, subject to following conditions:
- The work comes from a source of 'good standing' (such as an established open source project). This means you cannot reuse code written by an outside 'friend'.
- You clearly give credit to the original author. Acknowledge use of third party resources clearly e.g. in the welcome message, splash screen (if any) or under the 'about' menu. If you are open about reuse, you are less likely to get into trouble if you unintentionally reused something copyrighted.
- You do not violate the license under which the work has been released. Please do not use 3rd-party images/audio in your software unless they have been specifically released to be used freely. Just because you found it in the Internet does not mean it is free for reuse.
- Always get permission from us before you reuse third-party libraries. Please post your 'request to use 3rd party library' in our forum. That way, the whole class get to see what libraries are being used by others.
- This also ensures you learn the ethics to attribute credits to the correct stake holders/owners.
Giving credit for reused work
Given below are how to give credit for things you reuse from elsewhere. These requirements are specific to this module i.e., not applicable outside the module (outside the module you should follow the rules specified by your employer and the license of the reused work)
If you used a third party library:
- Mention in the
README.adoc(under the Acknowledgements section) - mention in the
Project Portfolio Page if the library has a significant relevance to the features you implemented
If you reused code snippets found on the Internet e.g. from StackOverflow answers or
referred code in another software or
referred project code by current/past student:
- If you read the code to understand the approach and implemented it yourself, mention it as a comment
Example://Solution below adapted from https://stackoverflow.com/a/16252290 {Your implmentation of the reused solution here ...} - If you copy-pasted a non-trivial code block (possibly with minor modifications renaming, layout changes, changes to comments, etc.), also mark the code block as reused code (using
@@authortags
Format://@@author {yourGithubUsername}-reused //{Info about the source...} {Reused code (possibly with minor modifications) here ...} //@@authorpersons = getList() //@@author johndoe-reused //Reused from https://stackoverflow.com/a/34646172 with minor modifications Collections.sort(persons, new Comparator<CustomData>() { @Override public int compare(CustomData lhs, CustomData rhs) { return lhs.customInt > rhs.customInt ? -1 : (lhs.customInt < rhs.customInt) ? 1 : 0; } }); //@@author return persons;
Adding @@author tags indicate authorship
-
Mark your code with a
//@@author {yourGithubUsername}. Note the double@.
The//@@authortag should indicates the beginning of the code you wrote. The code up to the next//@@authortag or the end of the file (whichever comes first) will be considered as was written by that author. Here is a sample code file://@@author johndoe method 1 ... method 2 ... //@@author sarahkhoo method 3 ... //@@author johndoe method 4 ... -
If you don't know who wrote the code segment below yours, you may put an empty
//@@author(i.e. no GitHub username) to indicate the end of the code segment you wrote. The author of code below yours can add the GitHub username to the empty tag later. Here is a sample code with an emptyauthortag:method 0 ... //@@author johndoe method 1 ... method 2 ... //@@author method 3 ... method 4 ... -
The author tag syntax varies based on file type e.g. for java, css, fxml. Use the corresponding comment syntax for non-Java files.
Here is an example code from an xml/fxml file.<!-- @@author sereneWong --> <textbox> <label>...</label> <input>...</input> </textbox> ... -
Do not put the
//@@authorinside java header comments.
👎/** * Returns true if ... * @@author johndoe */👍
//@@author johndoe
/**
  * Returns true if ...
  */
What to and what not to annotate
-
Annotate both functional and test code There is no need to annotate documentation files.
-
Annotate only significant size code blocks that can be reviewed on its own e.g., a class, a sequence of methods, a method.
Claiming credit for code blocks smaller than a method is discouraged but allowed. If you do, do it sparingly and only claim meaningful blocks of code such as a block of statements, a loop, or an if-else statement.- If an enhancement required you to do tiny changes in many places, there is no need to annotate all those tiny changes; you can describe those changes in the Project Portfolio page instead.
- If a code block was touched by more than one person, either let the person who wrote most of it (e.g. more than 80%) take credit for the entire block, or leave it as 'unclaimed' (i.e., no author tags).
- Related to the above point, if you claim a code block as your own, more than 80% of the code in that block should have been written by yourself. For example, no more than 20% of it can be code you reused from somewhere.
- 💡 GitHub has a blame feature and a history feature that can help you determine who wrote a piece of code.
-
Do not try to boost the quantity of your contribution using unethical means such as duplicating the same code in multiple places. In particular, do not copy-paste test cases to create redundant tests. Even repetitive code blocks within test methods should be extracted out as utility methods to reduce code duplication. Individual members are responsible for making sure code attributed to them are correct. If you notice a team member claiming credit for code that he/she did not write or use other questionable tactics, you can email us (after the final submission) to let us know.
-
If you wrote a significant amount of code that was not used in the final product,
- Create a folder called
{project root}/unused - Move unused files (or copies of files containing unused code) to that folder
- use
//@@author {yourGithubUsername}-unusedto mark unused code in those files (note the suffixunused) e.g.
//@@author johndoe-unused
method 1 ...
method 2 ...
Please put a comment in the code to explain why it was not used.
- Create a folder called
-
If you reused code from elsewhere, mark such code as
//@@author {yourGithubUsername}-reused(note the suffixreused) e.g.//@@author johndoe-reused method 1 ... method 2 ... -
You can use empty
@@authortags to mark code as not yours when RepoSense attribute the to you incorrectly.-
Code generated by the IDE/framework, should not be annotated as your own.
-
Code you modified in minor ways e.g. adding a parameter. These should not be claimed as yours but you can mention these additional contributions in the Project Portfolio page if you want to claim credit for them.
-
At the end of the project each student is required to submit a Project Portfolio Page.
-
Objective:
- For you to use (e.g. in your resume) as a well-documented data point of your SE experience
- For us to use as a data point to evaluate your,
- contributions to the project
- your documentation skills
-
Sections to include:
-
Overview: A short overview of your product to provide some context to the reader.
-
Summary of Contributions:
- Code contributed: Give a link to your code on Project Code Dashboard, which should be
https://nuscs2113-ay1819s2.github.io/dashboard-beta/#=undefined&search=github_username_in_lower_case(replacegithub_username_in_lower_casewith your actual username in lower case e.g.,johndoe). This link is also available in the Project List Page -- linked to the icon under your photo. - Features implemented: A summary of the features you implemented. If you implemented multiple features, you are recommended to indicate which one is the biggest feature.
- Other contributions:
- Contributions to project management e.g., setting up project tools, managing releases, managing issue tracker etc.
- Evidence of helping others e.g. responses you posted in our forum, bugs you reported in other team's products,
- Evidence of technical leadership e.g. sharing useful information in the forum
- Code contributed: Give a link to your code on Project Code Dashboard, which should be
-
Relevant descriptions/terms/conventions: Include all relevant details necessary to understand the document, e.g., conventions, symbols or labels introduced by you, even if it was not introduced by you.
-
Contributions to the User Guide: Reproduce the parts in the User Guide that you wrote. This can include features you implemented as well as features you propose to implement.
The purpose of allowing you to include proposed features is to provide you more flexibility to show your documentation skills. e.g. you can bring in a proposed feature just to give you an opportunity to use a UML diagram type not used by the actual features. -
Contributions to the Developer Guide: Reproduce the parts in the Developer Guide that you wrote. Ensure there is enough content to evaluate your technical documentation skills and UML modelling skills. You can include descriptions of your design/implementations, possible alternatives, pros and cons of alternatives, etc.
-
If you plan to use the PPP in your Resume, you can also include your SE work outside of the module (will not be graded)
-
-
Format:
-
File name:
docs/team/githbub_username_in_lower_case.adoce.g.,docs/team/johndoe.adoc -
Follow the example in the AddressBook-Level4
-
💡 You can use the Asciidoc's
includefeature to include sections from the developer guide or the user guide in your PPP. Follow the example in the sample. -
It is assumed that all contents in the PPP were written primarily by you. If any section is written by someone else e.g. someone else wrote described the feature in the User Guide but you implemented the feature, clearly state that the section was written by someone else (e.g.
Start of Extract [from: User Guide] written by Jane Doe). Reason: Your writing skills will be evaluated based on the PPP
-
-
Page limit:
Content Limit Overview + Summary of contributions 0.5-1 (soft limit) Contributions to the User Guide 1-3 (soft limit) Contributions to the Developer Guide 3-6 (soft limit) Total 5-10 (strict) - The page limits given above are after converting to PDF format. The actual amount of content you require is actually less than what these numbers suggest because the HTML → PDF conversion adds a lot of spacing around content.
- Reason for page limit: These submissions are peer-graded (in the PE) which needs to be done in a limited time span.
If you have more content than the limit given above, you can give a representative samples of UG and DG that showcase your documentation skills. Those samples should be understandable on their own. For the parts left-out, you can give an abbreviated version and refer the reader to the full UG/DG for more details.
It's similar to giving extra details as appendices; the reader will look at the UG/DG if the PPP is not enough to make a judgment. For example, when judging documentation quality, if the part in the PPP is not well-written, there is no point reading the rest in the main UG/DG. That's why you need to put the most representative part of your writings in the PPP and still give an abbreviated version of the rest in the PPP itself. Even when judging the quantity of work, the reader should be able to get a good sense of the quantity by combining what is quoted in the PPP and your abbreviated description of the missing part. There is no guarantee that the evaluator will read the full document.
Follow the
- Get team members to review PRs. A workflow without PR reviews is a risky workflow.
- Do not merge PRs failing
CI . After setting up Travis, the CI status of a PR is reported at the bottom of the PR page. The screenshot below shows the status of a PR that is passing all CI checks.
If there is a failure, you can click on theDetailslink in corresponding line to find out more about the failure. Once you figure out the cause of the failure, push the a fix to the PR. - After setting up Netlify, you can use Netlify PR Preview to preview changes to documentation files, if the PR contains updates to documentation. To see the preview, click on the
Detailslink in front of the Netlify status reported (refer screenshot above).
After completing v1.1, you can adjust process rigor to suit your team's pace, as explained below.
-
Reduce automated tests have benefits, but they can be a pain to write/maintain; GUI tests are especially hard to maintain because their behavior can sometimes depend on things such as the OS, resolution etc.
It is OK to get rid of some of the troublesome tests and rely more on manual testing instead. The less automated tests you have, the higher the risk of regressions; but it may be an acceptable trade-off under the circumstances if tests are slowing you down too much.
There is no direct penalty for removing GUI tests. Also noteour expectation on test code . -
Reduce automated checks: You can also reduce the rigor of checkstyle checks to expedite PR processing.
-
Switch to a lighter workflow: While forking workflow is the safest, it is also rather heavy. You an switch to a simpler workflow if the forking workflow is slowing you down. Refer the textbook to find more about alternative workflows: branching workflow, centralized workflow. However, we still recommend that you use PR reviews, at least for PRs affecting others' features.
You can also increase the rigor/safety of your workflow in the following ways:
- Use GitHub's Protected Branches feature to protect your
masterbranch against rogue PRs.
- There is no requirement for a minimum coverage level. Note that in a production environment you are often required to have at least 90% of the code covered by tests. In this project, it can be less. The less coverage you have, the higher the risk of regression bugs, which will cost marks if not fixed before the final submission.
- You must write some tests so that we can evaluate your ability to write tests.
- How much of each type of testing should you do? We expect you to decide. You learned different types of testing and what they try to achieve. Based on that, you should decide how much of each type is required. Similarly, you can decide to what extent you want to automate tests, depending on the benefits and the effort required.
Project Management → Revision Control →
In the forking workflow, the 'official' version of the software is kept in a remote repo designated as the 'main repo'. All team members fork the main repo create pull requests from their fork to the main repo.
To illustrate how the workflow goes, let’s assume Jean wants to fix a bug in the code. Here are the steps:
- Jean creates a separate branch in her local repo and fixes the bug in that branch.
- Jean pushes the branch to her fork.
- Jean creates a pull request from that branch in her fork to the main repo.
- Other members review Jean’s pull request.
- If reviewers suggested any changes, Jean updates the PR accordingly.
- When reviewers are satisfied with the PR, one of the members (usually the team lead or a designated 'maintainer' of the main repo) merges the PR, which brings Jean’s code to the main repo.
- Other members, realizing there is new code in the upstream repo, sync their forks with the new upstream repo (i.e. the main repo). This is done by pulling the new code to their own local repo and pushing the updated code to their own fork.
- A detailed explanation of the Forking Workflow - From Atlassian
Documentation:
Recommended procedure for updating docs:
- Divide among yourselves who will update which parts of the document(s).
- Update the team repo by following the workflow mentioned above.
Update the following pages in your project repo:
- About Us page:
This page is used for module admin purposes. Please follow the format closely or else our scripts will not be able to give credit for your work.
- Replace info of SE-EDU developers with info of your team, including a suitable photo as described
here . - Including the name/photo of the supervisor/lecturer is optional.
- The photo of a team member should be
doc/images/githbub_username_in_lower_case.pnge.g.docs/images/damithc.png. If you photo is in jpg format, name the file as.pnganyway. - Indicate the different roles played and responsibilities held by each team member. You can reassign these
roles and responsibilities (as explained in Admin Project Scope) later in the project, if necessary.
- Replace info of SE-EDU developers with info of your team, including a suitable photo as described
-
The purpose of the profile photo is for the teaching team to identify you. Therefore, you should choose a recent individual photo showing your face clearly (i.e., not too small) -- somewhat similar to a passport photo. Some examples can be seen in the 'Teaching team' page. Given below are some examples of good and bad profile photos.
-
If you are uncomfortable posting your photo due to security reasons, you can post a lower resolution image so that it is hard for someone to misuse that image for fraudulent purposes. If you are concerned about privacy, you can request permission to omit your photo from the page by writing to prof.
Roles indicate aspects you are in charge of and responsible for. E.g., if you are in charge of documentation, you are the person who should allocate which parts of the documentation is to be done by who, ensure the document is in right format, ensure consistency etc.
This is a non-exhaustive list; you may define additional roles.
- Team lead: Responsible for overall project coordination.
- Documentation (short for ‘in charge of documentation’): Responsible for the quality of various project documents.
- Testing: Ensures the testing of the project is done properly and on time.
- Code quality: Looks after code quality, ensures adherence to coding standards, etc.
- Deliverables and deadlines: Ensure project deliverables are done on time and in the right format.
- Integration: In charge of versioning of the code, maintaining the code repository, integrating various parts of the software to create a whole.
- Scheduling and tracking: In charge of defining, assigning, and tracking project tasks.
- [Tool ABC] expert: e.g. Intellij expert, Git expert, etc. Helps other team member with matters related to the specific tool.
- In charge of[Component XYZ]: e.g. In charge of
Model,UI,Storage, etc. If you are in charge of a component, you are expected to know that component well, and review changes done to that component in v1.3-v1.4.
Please make sure each of the important roles are assigned to one person in the team. It is OK to have a 'backup' for each role, but for each aspect there should be one person who is unequivocally the person responsible for it.
-
Contact Us Page: Update to match your product.
-
README.adoc page: Update it to match your project.
-
Add a UI mockup of your intended final product.
Note that the image of the UI should bedocs/images/Ui.pngso that it can be downloaded by our scripts. Limit the file to contain one screenshot/mockup only and ensure the new image is roughly the sameheight x widthproportions as the original one. Reason: when we compile these images from all teams into one page (example), yours should not look out of place. -
The original
README.adocfile (which doubles as the landing page of your project website) is written to read like the introduction to an SE learning/teaching resource. You should restructure this page to look like the home page of a real product (not a school project) targeting real users e.g. remove references to addressbook-level3, Learning Outcomes etc. mention target users, add a marketing blurb etc. On a related note, also removeLearning Outcomeslink and related pages. -
Update the link of the Travis build status badge (
) so that it reflects the build status of your team repo.
For the other badges,- either set up the respective tool for your project (AB-4 Developer Guide has instructions on how to set up AppVeyor and Coveralls) and update the badges accordingly,
- or remove the badge.
-
Acknowledge the original source of the code i.e. AddressBook-Level4 project created by SE-EDU initiative at
https://github.com/se-edu/
-
-
User Guide: Start moving the content from your User Guide (draft created in previous weeks) into the User Guide page in your repository. If a feature is not implemented, mark it as 'Coming in v2.0' (example).
-
Developer Guide: Similar to the User Guide, start moving the content from your Developer Guide (draft created in previous weeks) into the Developer Guide page in your team repository.
Product:
-
Each member can attempt to do a
local-impact change to the code base.Objective: To familiarize yourself with at least one
components of the product.Description: Divide the components among yourselves. Each member can do some small enhancements to their component(s) to learn the code of that component. Some suggested enhancements are given in the AddressBook-Level4 developer guide.
Submission: Create PRs from your own fork to your team repo. Get it merged by following your team's workflow.
A. Process:
Evaluates: How well you did in project management related aspects of the project, as an individual and as a team
Based on: Supervisor observations of project milestones and GitHub data.
Milestones need to be reached the midnight before of the tutorial for it to be counted as achieved. To get a good grade for this aspect, achieve at least 60% of the recommended milestone progress.
Other criteria:
- Good use of GitHub milestones
- Good use of GitHub release mechanism
- Good version control, based on the repo
- Reasonable attempt to use the forking workflow
- Good task definition, assignment and tracking, based on the issue tracker
- Good use of buffers (opposite: everything at the last minute)
- Project done iteratively and incrementally (opposite: doing most of the work in one big burst)
B. Team-tasks:
Evaluates: How much did you contribute to team-tasks?
Based on: peer evaluations and tutor observations
Relevant: [
Here is a non-exhaustive list of team-tasks:
- Necessary general code enhancements e.g.,
- Work related to renaming the product
- Work related to changing the product icon
- Morphing the product into a different product
- Setting up the GitHub, Travis, AppVeyor, etc.
- Maintaining the issue tracker
- Release management
- Updating user/developer docs that are not specific to a feature e.g. documenting the target user profile
- Incorporating more useful tools/libraries/frameworks into the product or the project workflow (e.g. automate more aspects of the project workflow using a GitHub plugin)
-
The purpose of the profile photo is for the teaching team to identify you. Therefore, you should choose a recent individual photo showing your face clearly (i.e., not too small) -- somewhat similar to a passport photo. Some examples can be seen in the 'Teaching team' page. Given below are some examples of good and bad profile photos.
-
If you are uncomfortable posting your photo due to security reasons, you can post a lower resolution image so that it is hard for someone to misuse that image for fraudulent purposes. If you are concerned about privacy, you can request permission to omit your photo from the page by writing to prof.
v1.1 Project Management
- Fix any errors in org/repo set up (e.g. wrong repo name).
- Wrap up the milestone using a git tag
v1.1as explained below:- When the milestone deadline is near (e.g., 0.5 days before the deadline), if you think some of the ongoing work intended for the current milestone may not finish in time, reassign them to a future milestone.
- After all changes that can be merged before the milestone deadline has been merged, use
git tagfeature to tag the current version with the milestone and push the tag to the team repo.
v1.1 Documentation
-
Update User Guide, Developer Guide, README, and About Us pages as described earlier in
mid-v1.1 progress guide .Submission: merge your changes to the master branch of your repo.
Set up project repo, start moving UG and DG to the repo, attempt to do local-impact changes to the code base.
Project Management:
Set up the team org and the team repo as explained below:
Relevant: [
Organization setup
Please follow the organization/repo name format precisely because we use scripts to download your code or else our scripts will not be able to detect your work.
After receiving your team ID, one team member should do the following steps:
- Create a GitHub organization with the following details:
- Organization name :
CS2113-AY1819S2-TEAM_ID. e.g.CS2113-AY1819S2-M11-1 - Plan: Open Source ($0/month)
- Organization name :
- Add members to the organization:
- Create a team called
developersto your organization. - Add your team members to the developers team.
- Create a team called
Relevant: [
Repo setup
Only one team member:
- Fork either Address Book Level 3 or Address Book Level 4 to your team org.
- Rename the forked repo as
main. This repo (let's call it the team repo) is to be used as the repo for your project. - Ensure the issue tracker of your team repo is enabled. Reason: our bots will be posting your weekly progress reports on the issue tracker of your team repo.
- Ensure your team members have the desired level of access to your team repo.
- Enable Travis CI for the team repo.
- Set up auto-publishing of docs. When set up correctly, your project website should be available via the URL
https://nus-cs2113-ay1819s2-{team-id}.github.io/maine.g.,https://cs2113-ay1819s2-w13-1.github.io/main/. This also requires you to enable the GitHub Pages feature of your team repo and configure it to serve the website from thegh-pagesbranch. - create a team PR for us to track your project progress: i.e., create a PR from your team repo
masterbranch to [nuscs2113-AY1819S2/addressbook-level4]masterbranch. PR name:[Team ID] Product Namee.g.,[T09-2] Contact List Pro. As you merge code to your team repo'smasterbranch, this PR will auto-update to reflect how much your team's product has progressed. In the PR description@mention the other team members so that they get notified when the tutor adds comments to the PR.
All team members:
- Watchthe
mainrepo (created above) i.e., go to the repo and click on thewatchbutton to subscribe to activities of the repo - Fork the
mainrepo to your personal GitHub account. - Clone the fork to your Computer.
- Recommended: Set it up as an Intellij project (follow the instructions in the Developer Guide carefully).
- Set up the developer environment in your computer. You are recommended to use JDK 9 for AB-4 as some of the libraries used in AB-4 have not updated to support Java 10 yet. JDK 9 can be downloaded from the Java Archive.
Note that some of our download scripts depend on the following folder paths. Please do not alter those paths in your project.
/src/main/src/test/docs
- Note: If you fork from Address Book Level 3, ensure that the folder structure is similar to the one in Address Book Level 4
When updating code in the repo, follow the workflow explained below:
Relevant: [
Workflow
Before you do any coding for the project,
- Ensure you have
set the Git username correctly (as explained in Appendix E) in all Computers you use for coding. - Read
our reuse policy (in Admin: Appendix B) , in particular, how to give credit when you reuse code from the Internet or classmates:
Setting Git Username to Match GitHub Username
We use various tools to analyze your code. For us to be able to identify your commits, you should use the GitHub username as your Git username as well. If there is a mismatch, or if you use multiple user names for Git, our tools might miss some of your work and as a result you might not get credit for some of your work.
In each Computer you use for coding, after installing Git, you should set the Git username as follows.
- Open a command window that can run Git commands (e.g., Git bash window)
- Run the command
git config --global user.name YOUR_GITHUB_USERNAME
e.g.,git config --global user.name JohnDoe
More info about setting Git username is here.
Policy on reuse
Reuse is encouraged. However, note that reuse has its own costs (such as the learning curve, additional complexity, usage restrictions, and unknown bugs). Furthermore, you will not be given credit for work done by others. Rather, you will be given credit for using work done by others.
- You are allowed to reuse work from your classmates, subject to following conditions:
- The work has been published by us or the authors.
- You clearly give credit to the original author(s).
- You are allowed to reuse work from external sources, subject to following conditions:
- The work comes from a source of 'good standing' (such as an established open source project). This means you cannot reuse code written by an outside 'friend'.
- You clearly give credit to the original author. Acknowledge use of third party resources clearly e.g. in the welcome message, splash screen (if any) or under the 'about' menu. If you are open about reuse, you are less likely to get into trouble if you unintentionally reused something copyrighted.
- You do not violate the license under which the work has been released. Please do not use 3rd-party images/audio in your software unless they have been specifically released to be used freely. Just because you found it in the Internet does not mean it is free for reuse.
- Always get permission from us before you reuse third-party libraries. Please post your 'request to use 3rd party library' in our forum. That way, the whole class get to see what libraries are being used by others.
- This also ensures you learn the ethics to attribute credits to the correct stake holders/owners.
Giving credit for reused work
Given below are how to give credit for things you reuse from elsewhere. These requirements are specific to this module i.e., not applicable outside the module (outside the module you should follow the rules specified by your employer and the license of the reused work)
If you used a third party library:
- Mention in the
README.adoc(under the Acknowledgements section) - mention in the
Project Portfolio Page if the library has a significant relevance to the features you implemented
If you reused code snippets found on the Internet e.g. from StackOverflow answers or
referred code in another software or
referred project code by current/past student:
- If you read the code to understand the approach and implemented it yourself, mention it as a comment
Example://Solution below adapted from https://stackoverflow.com/a/16252290 {Your implmentation of the reused solution here ...} - If you copy-pasted a non-trivial code block (possibly with minor modifications renaming, layout changes, changes to comments, etc.), also mark the code block as reused code (using
@@authortags
Format://@@author {yourGithubUsername}-reused //{Info about the source...} {Reused code (possibly with minor modifications) here ...} //@@authorpersons = getList() //@@author johndoe-reused //Reused from https://stackoverflow.com/a/34646172 with minor modifications Collections.sort(persons, new Comparator<CustomData>() { @Override public int compare(CustomData lhs, CustomData rhs) { return lhs.customInt > rhs.customInt ? -1 : (lhs.customInt < rhs.customInt) ? 1 : 0; } }); //@@author return persons;
Adding @@author tags indicate authorship
-
Mark your code with a
//@@author {yourGithubUsername}. Note the double@.
The//@@authortag should indicates the beginning of the code you wrote. The code up to the next//@@authortag or the end of the file (whichever comes first) will be considered as was written by that author. Here is a sample code file://@@author johndoe method 1 ... method 2 ... //@@author sarahkhoo method 3 ... //@@author johndoe method 4 ... -
If you don't know who wrote the code segment below yours, you may put an empty
//@@author(i.e. no GitHub username) to indicate the end of the code segment you wrote. The author of code below yours can add the GitHub username to the empty tag later. Here is a sample code with an emptyauthortag:method 0 ... //@@author johndoe method 1 ... method 2 ... //@@author method 3 ... method 4 ... -
The author tag syntax varies based on file type e.g. for java, css, fxml. Use the corresponding comment syntax for non-Java files.
Here is an example code from an xml/fxml file.<!-- @@author sereneWong --> <textbox> <label>...</label> <input>...</input> </textbox> ... -
Do not put the
//@@authorinside java header comments.
👎/** * Returns true if ... * @@author johndoe */👍
//@@author johndoe
/**
  * Returns true if ...
  */
What to and what not to annotate
-
Annotate both functional and test code There is no need to annotate documentation files.
-
Annotate only significant size code blocks that can be reviewed on its own e.g., a class, a sequence of methods, a method.
Claiming credit for code blocks smaller than a method is discouraged but allowed. If you do, do it sparingly and only claim meaningful blocks of code such as a block of statements, a loop, or an if-else statement.- If an enhancement required you to do tiny changes in many places, there is no need to annotate all those tiny changes; you can describe those changes in the Project Portfolio page instead.
- If a code block was touched by more than one person, either let the person who wrote most of it (e.g. more than 80%) take credit for the entire block, or leave it as 'unclaimed' (i.e., no author tags).
- Related to the above point, if you claim a code block as your own, more than 80% of the code in that block should have been written by yourself. For example, no more than 20% of it can be code you reused from somewhere.
- 💡 GitHub has a blame feature and a history feature that can help you determine who wrote a piece of code.
-
Do not try to boost the quantity of your contribution using unethical means such as duplicating the same code in multiple places. In particular, do not copy-paste test cases to create redundant tests. Even repetitive code blocks within test methods should be extracted out as utility methods to reduce code duplication. Individual members are responsible for making sure code attributed to them are correct. If you notice a team member claiming credit for code that he/she did not write or use other questionable tactics, you can email us (after the final submission) to let us know.
-
If you wrote a significant amount of code that was not used in the final product,
- Create a folder called
{project root}/unused - Move unused files (or copies of files containing unused code) to that folder
- use
//@@author {yourGithubUsername}-unusedto mark unused code in those files (note the suffixunused) e.g.
//@@author johndoe-unused
method 1 ...
method 2 ...
Please put a comment in the code to explain why it was not used.
- Create a folder called
-
If you reused code from elsewhere, mark such code as
//@@author {yourGithubUsername}-reused(note the suffixreused) e.g.//@@author johndoe-reused method 1 ... method 2 ... -
You can use empty
@@authortags to mark code as not yours when RepoSense attribute the to you incorrectly.-
Code generated by the IDE/framework, should not be annotated as your own.
-
Code you modified in minor ways e.g. adding a parameter. These should not be claimed as yours but you can mention these additional contributions in the Project Portfolio page if you want to claim credit for them.
-
At the end of the project each student is required to submit a Project Portfolio Page.
-
Objective:
- For you to use (e.g. in your resume) as a well-documented data point of your SE experience
- For us to use as a data point to evaluate your,
- contributions to the project
- your documentation skills
-
Sections to include:
-
Overview: A short overview of your product to provide some context to the reader.
-
Summary of Contributions:
- Code contributed: Give a link to your code on Project Code Dashboard, which should be
https://nuscs2113-ay1819s2.github.io/dashboard-beta/#=undefined&search=github_username_in_lower_case(replacegithub_username_in_lower_casewith your actual username in lower case e.g.,johndoe). This link is also available in the Project List Page -- linked to the icon under your photo. - Features implemented: A summary of the features you implemented. If you implemented multiple features, you are recommended to indicate which one is the biggest feature.
- Other contributions:
- Contributions to project management e.g., setting up project tools, managing releases, managing issue tracker etc.
- Evidence of helping others e.g. responses you posted in our forum, bugs you reported in other team's products,
- Evidence of technical leadership e.g. sharing useful information in the forum
- Code contributed: Give a link to your code on Project Code Dashboard, which should be
-
Relevant descriptions/terms/conventions: Include all relevant details necessary to understand the document, e.g., conventions, symbols or labels introduced by you, even if it was not introduced by you.
-
Contributions to the User Guide: Reproduce the parts in the User Guide that you wrote. This can include features you implemented as well as features you propose to implement.
The purpose of allowing you to include proposed features is to provide you more flexibility to show your documentation skills. e.g. you can bring in a proposed feature just to give you an opportunity to use a UML diagram type not used by the actual features. -
Contributions to the Developer Guide: Reproduce the parts in the Developer Guide that you wrote. Ensure there is enough content to evaluate your technical documentation skills and UML modelling skills. You can include descriptions of your design/implementations, possible alternatives, pros and cons of alternatives, etc.
-
If you plan to use the PPP in your Resume, you can also include your SE work outside of the module (will not be graded)
-
-
Format:
-
File name:
docs/team/githbub_username_in_lower_case.adoce.g.,docs/team/johndoe.adoc -
Follow the example in the AddressBook-Level4
-
💡 You can use the Asciidoc's
includefeature to include sections from the developer guide or the user guide in your PPP. Follow the example in the sample. -
It is assumed that all contents in the PPP were written primarily by you. If any section is written by someone else e.g. someone else wrote described the feature in the User Guide but you implemented the feature, clearly state that the section was written by someone else (e.g.
Start of Extract [from: User Guide] written by Jane Doe). Reason: Your writing skills will be evaluated based on the PPP
-
-
Page limit:
Content Limit Overview + Summary of contributions 0.5-1 (soft limit) Contributions to the User Guide 1-3 (soft limit) Contributions to the Developer Guide 3-6 (soft limit) Total 5-10 (strict) - The page limits given above are after converting to PDF format. The actual amount of content you require is actually less than what these numbers suggest because the HTML → PDF conversion adds a lot of spacing around content.
- Reason for page limit: These submissions are peer-graded (in the PE) which needs to be done in a limited time span.
If you have more content than the limit given above, you can give a representative samples of UG and DG that showcase your documentation skills. Those samples should be understandable on their own. For the parts left-out, you can give an abbreviated version and refer the reader to the full UG/DG for more details.
It's similar to giving extra details as appendices; the reader will look at the UG/DG if the PPP is not enough to make a judgment. For example, when judging documentation quality, if the part in the PPP is not well-written, there is no point reading the rest in the main UG/DG. That's why you need to put the most representative part of your writings in the PPP and still give an abbreviated version of the rest in the PPP itself. Even when judging the quantity of work, the reader should be able to get a good sense of the quantity by combining what is quoted in the PPP and your abbreviated description of the missing part. There is no guarantee that the evaluator will read the full document.
Follow the
- Get team members to review PRs. A workflow without PR reviews is a risky workflow.
- Do not merge PRs failing
CI . After setting up Travis, the CI status of a PR is reported at the bottom of the PR page. The screenshot below shows the status of a PR that is passing all CI checks.
If there is a failure, you can click on theDetailslink in corresponding line to find out more about the failure. Once you figure out the cause of the failure, push the a fix to the PR. - After setting up Netlify, you can use Netlify PR Preview to preview changes to documentation files, if the PR contains updates to documentation. To see the preview, click on the
Detailslink in front of the Netlify status reported (refer screenshot above).
After completing v1.1, you can adjust process rigor to suit your team's pace, as explained below.
-
Reduce automated tests have benefits, but they can be a pain to write/maintain; GUI tests are especially hard to maintain because their behavior can sometimes depend on things such as the OS, resolution etc.
It is OK to get rid of some of the troublesome tests and rely more on manual testing instead. The less automated tests you have, the higher the risk of regressions; but it may be an acceptable trade-off under the circumstances if tests are slowing you down too much.
There is no direct penalty for removing GUI tests. Also noteour expectation on test code . -
Reduce automated checks: You can also reduce the rigor of checkstyle checks to expedite PR processing.
-
Switch to a lighter workflow: While forking workflow is the safest, it is also rather heavy. You an switch to a simpler workflow if the forking workflow is slowing you down. Refer the textbook to find more about alternative workflows: branching workflow, centralized workflow. However, we still recommend that you use PR reviews, at least for PRs affecting others' features.
You can also increase the rigor/safety of your workflow in the following ways:
- Use GitHub's Protected Branches feature to protect your
masterbranch against rogue PRs.
- There is no requirement for a minimum coverage level. Note that in a production environment you are often required to have at least 90% of the code covered by tests. In this project, it can be less. The less coverage you have, the higher the risk of regression bugs, which will cost marks if not fixed before the final submission.
- You must write some tests so that we can evaluate your ability to write tests.
- How much of each type of testing should you do? We expect you to decide. You learned different types of testing and what they try to achieve. Based on that, you should decide how much of each type is required. Similarly, you can decide to what extent you want to automate tests, depending on the benefits and the effort required.
Project Management → Revision Control →
In the forking workflow, the 'official' version of the software is kept in a remote repo designated as the 'main repo'. All team members fork the main repo create pull requests from their fork to the main repo.
To illustrate how the workflow goes, let’s assume Jean wants to fix a bug in the code. Here are the steps:
- Jean creates a separate branch in her local repo and fixes the bug in that branch.
- Jean pushes the branch to her fork.
- Jean creates a pull request from that branch in her fork to the main repo.
- Other members review Jean’s pull request.
- If reviewers suggested any changes, Jean updates the PR accordingly.
- When reviewers are satisfied with the PR, one of the members (usually the team lead or a designated 'maintainer' of the main repo) merges the PR, which brings Jean’s code to the main repo.
- Other members, realizing there is new code in the upstream repo, sync their forks with the new upstream repo (i.e. the main repo). This is done by pulling the new code to their own local repo and pushing the updated code to their own fork.
- A detailed explanation of the Forking Workflow - From Atlassian
Documentation:
Recommended procedure for updating docs:
- Divide among yourselves who will update which parts of the document(s).
- Update the team repo by following the workflow mentioned above.
Update the following pages in your project repo:
- About Us page:
This page is used for module admin purposes. Please follow the format closely or else our scripts will not be able to give credit for your work.
- Replace info of SE-EDU developers with info of your team, including a suitable photo as described
here . - Including the name/photo of the supervisor/lecturer is optional.
- The photo of a team member should be
doc/images/githbub_username_in_lower_case.pnge.g.docs/images/damithc.png. If you photo is in jpg format, name the file as.pnganyway. - Indicate the different roles played and responsibilities held by each team member. You can reassign these
roles and responsibilities (as explained in Admin Project Scope) later in the project, if necessary.
- Replace info of SE-EDU developers with info of your team, including a suitable photo as described
-
The purpose of the profile photo is for the teaching team to identify you. Therefore, you should choose a recent individual photo showing your face clearly (i.e., not too small) -- somewhat similar to a passport photo. Some examples can be seen in the 'Teaching team' page. Given below are some examples of good and bad profile photos.
-
If you are uncomfortable posting your photo due to security reasons, you can post a lower resolution image so that it is hard for someone to misuse that image for fraudulent purposes. If you are concerned about privacy, you can request permission to omit your photo from the page by writing to prof.
Roles indicate aspects you are in charge of and responsible for. E.g., if you are in charge of documentation, you are the person who should allocate which parts of the documentation is to be done by who, ensure the document is in right format, ensure consistency etc.
This is a non-exhaustive list; you may define additional roles.
- Team lead: Responsible for overall project coordination.
- Documentation (short for ‘in charge of documentation’): Responsible for the quality of various project documents.
- Testing: Ensures the testing of the project is done properly and on time.
- Code quality: Looks after code quality, ensures adherence to coding standards, etc.
- Deliverables and deadlines: Ensure project deliverables are done on time and in the right format.
- Integration: In charge of versioning of the code, maintaining the code repository, integrating various parts of the software to create a whole.
- Scheduling and tracking: In charge of defining, assigning, and tracking project tasks.
- [Tool ABC] expert: e.g. Intellij expert, Git expert, etc. Helps other team member with matters related to the specific tool.
- In charge of[Component XYZ]: e.g. In charge of
Model,UI,Storage, etc. If you are in charge of a component, you are expected to know that component well, and review changes done to that component in v1.3-v1.4.
Please make sure each of the important roles are assigned to one person in the team. It is OK to have a 'backup' for each role, but for each aspect there should be one person who is unequivocally the person responsible for it.
-
Contact Us Page: Update to match your product.
-
README.adoc page: Update it to match your project.
-
Add a UI mockup of your intended final product.
Note that the image of the UI should bedocs/images/Ui.pngso that it can be downloaded by our scripts. Limit the file to contain one screenshot/mockup only and ensure the new image is roughly the sameheight x widthproportions as the original one. Reason: when we compile these images from all teams into one page (example), yours should not look out of place. -
The original
README.adocfile (which doubles as the landing page of your project website) is written to read like the introduction to an SE learning/teaching resource. You should restructure this page to look like the home page of a real product (not a school project) targeting real users e.g. remove references to addressbook-level3, Learning Outcomes etc. mention target users, add a marketing blurb etc. On a related note, also removeLearning Outcomeslink and related pages. -
Update the link of the Travis build status badge (
) so that it reflects the build status of your team repo.
For the other badges,- either set up the respective tool for your project (AB-4 Developer Guide has instructions on how to set up AppVeyor and Coveralls) and update the badges accordingly,
- or remove the badge.
-
Acknowledge the original source of the code i.e. AddressBook-Level4 project created by SE-EDU initiative at
https://github.com/se-edu/
-
-
User Guide: Start moving the content from your User Guide (draft created in previous weeks) into the User Guide page in your repository. If a feature is not implemented, mark it as 'Coming in v2.0' (example).
-
Developer Guide: Similar to the User Guide, start moving the content from your Developer Guide (draft created in previous weeks) into the Developer Guide page in your team repository.
Product:
-
Each member can attempt to do a
local-impact change to the code base.Objective: To familiarize yourself with at least one
components of the product.Description: Divide the components among yourselves. Each member can do some small enhancements to their component(s) to learn the code of that component. Some suggested enhancements are given in the AddressBook-Level4 developer guide.
Submission: Create PRs from your own fork to your team repo. Get it merged by following your team's workflow.
v1.1 Product
- Each member should try to add some enhancements that are in line with the vision for v2.0. After adding some local-impact changes as recommended in
mid-v1.1 progress guide , attempt to do someglobal-impact enhancements , touching as many other components as possible. Refer to the AddressBook-Level4 Developer Guide has some guidance on how to implement a new feature end-to-end.
If your team is facing difficulties due to differences in skill/motivation /availability among team members,
-
First, do not expect everyone to have the same skill/motivation level as you. It is fine if someone wants to do less and have low expectations from the module. That doesn't mean that person is a bad person. Everyone is entitled to have their own priorities.
-
Second, don't give up. It is unfortunate that your team ended up in this situation, but you can turn it into a good learning opportunity. You don't get an opportunity to save a sinking team every day 😃
-
Third, if you care about your grade and willing to work for it, you need to take initiative to turn the situation around or else the whole team is going to suffer. Don't hesitate to take charge if the situation calls for it. By doing so, you'll be doing a favor for your team. Be professional, kind, and courteous to the team members, but also be firm and assertive. It is your grade that is at stake. Don't worry about making a bad situation worse. You won't know until you try.
-
Finally, don't feel angry or 'wronged'. Teamwork problems are not uncommon in this module and we know how to grade so that you will not be penalized for others' low contribution. We can use Git to find exactly what others did. It's not your responsibility to get others to contribute.
Given below are some suggestions you can adopt if the project work is not going smooth due to team issues. Note that the below measures can result in some team members doing more work than others and earning better project grades than others. It is still better than sinking the whole team together.
-
Redistribute the work: Stronger programmers in the team should take over the critical parts of the code.
-
Enforce stricter integration workflow: Appoint an integrator (typically, the strongest programmer). His/her job is to maintain the integrated version of the code. He/she should not accept any code that breaks the existing product or is not up to the acceptable quality standard. It is up to others to submit acceptable code to the integrator. Note that if the integrator rejected your code unreasonably, you can still earn marks for that code. You are allowed to submit such 'rejected' code for grading. They can earn marks based on the quality of the code.
If you have very unreliable or totally disengaged team members :
- Re-allocate to others any mission-critical work allocated to that person so that such team members cannot bring down the entire team.
- However, do not leave out such team members from project communications. Always keep them in the loop so that they can contribute any time they wish to.
- Furthermore, evaluate them sincerely and fairly during peer evaluations so that they do get the grade their work deserves, no more, no less.
- Be courteous to such team members too. Some folks have genuine problems that prevent them from contributing more although they may not be able tell you the reasons. Just do your best for the project and assume everyone else is doing their best too, although their best may be lower than yours.
Why I’m not allowed to use my favorite tool/framework/language etc.?
We have chosen a basic set of tools after considering ease of learning, availability, typical-ness, popularity, migration path to other tools, etc. There are many reasons for limiting your choices:
Pedagogical reasons:
- Sometimes 'good enough', not necessarily the best, tools are a better fit for beginners: Most bleeding edge, most specialized, or most sophisticated tools are not suitable for a beginner course. After mastering our toolset, you will find it easy to upgrade to such high-end tools by yourself. We do expect you to eventually (after this module) migrate to better tools and, having learned more than one tool, to attain a more general understanding about a family of tools.
- We want you to learn to thrive under given conditions: As a professional Software Engineer, you must learn to be productive in any given tool environment, rather than insist on using your preferred tools. It is usually in small companies doing less important work that you get to chose your own toolset. Bigger companies working on mature products often impose some choices on developers, such as the project management tool, code repository, IDE, language etc. For example, Google used SVN as their revision control software until very recently, long after SVN fell out of popularity among developers. Sometimes this is due to cost reasons (tool licensing cost), and sometimes due to legacy reasons (because the tool is already entrenched in their code base).
While programming in school is often a solo sport, programming in the industry is a team sport. As we are training you to become professional software engineers, it is important to get over the psychological hurdle of needing to satisfy individual preferences and get used to making the best of a given environment.
Practical reasons:
- Some of the topics are tightly coupled to tools. Allowing more tools means tutors need to learn more tools, which increases their workload.
- We provide learning resources for tools. e.g. 'Git guides'. Allowing more tools means we need to produce more resources.
- When all students use the same tool, the collective expertise of the tool is more, increasing the opportunities for you to learn from each others.
Meanwhile, feel free to share with peers your experience of using other tools.