Week 2 [Jan 21]
-
Note that module announcements will be posted in in this issue tracker aka forum, and cross-posted on IVLE.
- Reason for using issue tracker for announcements/discussions: It allows you to post responses to announcements, and is a tool from the SE world
- You are encouraged to watch that repo to get alerts when new issues/comments are posted

- You are encouraged to help others in the forum (e.g., share tips, help with technical problems). We consider such sharing when giving out
A+grades and when recruiting tutors.
-
You are encouraged to ask module-related questions in the forum so that the discussion can benefit the whole class, instead of asking tutors directly.
- It is also safer to ask module-related questions here because there are subtle variations between semesters and there is a slight risk that a tutor's answer is outdated.
-
We have a Slack channel, that you can use for your own project related communications or some minor quick clarifications.
[W2.1] SE Intro
Can explain pros and cons of software engineering
Software Engineering: Software Engineering is the application of a systematic, disciplined, quantifiable approach to the development, operation, and maintenance of software" -- IEEE Standard Glossary of Software Engineering Terminology
The following description of the Joys of the Programming Craft was taken from Chapter 1 of the famous book
Why is programming fun? What delights may its practitioner expect as his reward?
First is the sheer joy of making things. As the child delights in his mud pie, so the adult enjoys building things, especially things of his own design. I think this delight must be an image of God's delight in making things, a delight shown in the distinctness and newness of each leaf and each snowflake.
Second is the pleasure of making things that are useful to other people. Deep within, we want others to use our work and to find it helpful. In this respect the programming system is not essentially different from the child's first clay pencil holder "for Daddy's office."
Third is the fascination of fashioning complex puzzle-like objects of interlocking moving parts and watching them work in subtle cycles, playing out the consequences of principles built in from the beginning. The programmed computer has all the fascination of the pinball machine or the jukebox mechanism, carried to the ultimate.
Fourth is the joy of always learning, which springs from the nonrepeating nature of the task. In one way or another the problem is ever new, and its solver learns something: sometimes practical, sometimes theoretical, and sometimes both.
Finally, there is the delight of working in such a tractable medium. The programmer, like the poet, works only slightly removed from pure thought-stuff. He builds his castles in the air, from air, creating by the exertion of the imagination. Few media of creation are so flexible, so easy to polish and rework, so readily capable of realizing grand conceptual structures....
Yet the program construct, unlike the poet's words, is real in the sense that it moves and works, producing visible outputs separate from the construct itself. It prints results, draws pictures, produces sounds, moves arms. The magic of myth and legend has come true in our time. One types the correct incantation on a keyboard, and a display screen comes to life, showing things that never were nor could be.
Programming then is fun because it gratifies creative longings built deep within us and delights sensibilities we have in common with all men.
Not all is delight, however, and knowing the inherent woes makes it easier to bear them when they appear.
First, one must perform perfectly. The computer resembles the magic of legend in this respect, too. If one character, one pause, of the incantation is not strictly in proper form, the magic doesn't work. Human beings are not accustomed to being perfect, and few areas of human activity demand it. Adjusting to the requirement for perfection is, I think, the most difficult part of learning to program.
Next, other people set one's objectives, provide one's resources, and furnish one's information. One rarely controls the circumstances of his work, or even its goal. In management terms, one's authority is not sufficient for his responsibility. It seems that in all fields, however, the jobs where things get done never have formal authority commensurate with responsibility. In practice, actual (as opposed to formal) authority is acquired from the very momentum of accomplishment.
The dependence upon others has a particular case that is especially painful for the system programmer. He depends upon other people's programs. These are often maldesigned, poorly implemented, incompletely delivered (no source code or test cases), and poorly documented. So he must spend hours studying and fixing things that in an ideal world would be complete, available, and usable.
The next woe is that designing grand concepts is fun; finding nitty little bugs is just work. With any creative activity come dreary hours of tedious, painstaking labor, and programming is no exception.
Next, one finds that debugging has a linear convergence, or worse, where one somehow expects a quadratic sort of approach to the end. So testing drags on and on, the last difficult bugs taking more time to find than the first.
The last woe, and sometimes the last straw, is that the product over which one has labored so long appears to be obsolete upon (or before) completion. Already colleagues and competitors are in hot pursuit of new and better ideas. Already the displacement of one's thought-child is not only conceived, but scheduled.
This always seems worse than it really is. The new and better product is generally not available when one completes his own; it is only talked about. It, too, will require months of development. The real tiger is never a match for the paper one, unless actual use is wanted. Then the virtues of reality have a satisfaction all their own.
Of course the technological base on which one builds is always advancing. As soon as one freezes a design, it becomes obsolete in terms of its concepts. But implementation of real products demands phasing and quantizing. The obsolescence of an implementation must be measured against other existing implementations, not against unrealized concepts. The challenge and the mission are to find real solutions to real problems on actual schedules with available resources.
This then is programming, both a tar pit in which many efforts have floundered and a creative activity with joys and woes all its own. For many, the joys far outweigh the woes....
 |
 |
The Mythical Man-Month: Essays on Software Engineering is a book on software engineering and project management by Fred Brooks, whose central theme is that "adding manpower to a late software project makes it later". This idea is known as Brooks's law, and is presented along with the second-system effect and advocacy of prototyping.
Compare Software Engineering with Civil Engineering in terms of how work products in CE (i.e. buildings) differ from those of SE (i.e. software).
| Buildings | Software |
|---|---|
| Visible, tangible | Invisible, intangible |
| Wears out over time | Does not wear out |
| Change is limited by physical restrictions (e.g. difficult to remove a floor from a high rise building) | Change is not limited by such restrictions. Just change the code and recompile. |
| Creating an exact copy of a building is impossible. Creating a near copy is almost as costly as creating the original. | Any number of exact copies can be made with near zero cost. |
| Difficult to move. | Easily delivered from one place to another. |
| Many low-skilled workers following tried-and-tested procedures. | No low-skilled workers involved. Workers have more freedom to follow their own procedures. |
| Easier to assure quality (just follow accepted procedure). | Not easy to assure quality. |
| Majority of the work force has to be on location. | Can be built by people who are not even in the same country. |
| Raw materials are costly, costly equipment required. | Almost free raw materials and relatively cheap equipment. |
| Once construction is started, it is hard to do drastic changes to the design. | Building process is very flexible. Drastic design changes can be done, although costly |
| A lot of manual and menial labor involved. | Most work involves highly-skilled labor. |
| Generally robust. E.g. removing a single brick is unlikely to destroy a building. | More fragile than buildings. A single misplaced semicolon can render the whole system useless. |
Comment on this statement: Building software is cheaper and easier than building bridges (all we need is a PC!).
Depends on the size of the software. Manpower required for software is very costly. On the other hand, we can create a very valuable software (e.g. an iPhone application that can make million dollars in a month) with a just a PC and a few days of work!
Justify this statement: Coding is still a ‘design’ activity, not a ‘manufacturing’ activity. You may use a comparison (or an analogy) of Software engineering versus Civil Engineering to argue this point.
Arguments to support this statement:
- If coding is a manufacturing activity, we should be able to do it using robotic machines (just like in the car industry) or low-skilled laborers (like in the construction industry).
- If coding is a manufacturing activity, we wouldn’t be changing it so much after we code software. But if the code is in fact a ‘design’, yes, we would fiddle with it until we get it right.
- Manufacturing is the process of building a finished product based on the design. Code is the design. Manufacturing is what is done by the compiler (fully automated).
However, the type of ‘design’ that occurs during coding is at a much lower level than the ‘design’ that occurs before coding.
List some (at least three each) pros and cons of Software Engineering compared to other traditional Engineering careers.
- a. Need for perfection when developing software
- b. Requiring some amount of tedious, painstaking labor
- c. Ease of copying and transporting software makes it difficult to keep track of versions
- d. High dependence on others
- e. Seemingly never ending effort required for testing and debugging software
- f. Fast moving industry making our work obsolete quickly
(c)
[W2.2] RCS: Basics & Git history
Can explain revision control
Revision control is the process of managing multiple versions of a piece of information. In its simplest form, this is something that many people do by hand: every time you modify a file, save it under a new name that contains a number, each one higher than the number of the preceding version.
Manually managing multiple versions of even a single file is an error-prone task, though, so software tools to help automate this process have long been available. The earliest automated revision control tools were intended to help a single user to manage revisions of a single file. Over the past few decades, the scope of revision control tools has expanded greatly; they now manage multiple files, and help multiple people to work together. The best modern revision control tools have no problem coping with thousands of people working together on projects that consist of hundreds of thousands of files.
Revision control software will track the history and evolution of your project, so you don't have to. For every change, you'll have a log of who made it; why they made it; when they made it; and what the change was.
Revision control software makes it easier for you to collaborate when you're working with other people. For example, when people more or less simultaneously make potentially incompatible changes, the software will help you to identify and resolve those conflicts.
It can help you to recover from mistakes. If you make a change that later turns out to be an error, you can revert to an earlier version of one or more files. In fact, a really good revision control tool will even help you to efficiently figure out exactly when a problem was introduced.
It will help you to work simultaneously on, and manage the drift between, multiple versions of your project. Most of these reasons are equally valid, at least in theory, whether you're working on a project by yourself, or with a hundred other people.
-- [adapted from
bryan-mercurial-guide
Mercurial: The Definitive Guide by Bryan O'Sullivan retrieved on 2012/07/11
RCS : Revision Control Software are the software tools that automate the process of Revision Control i.e. managing revisions of software artifacts.
Revision: A revision (some seem to use it interchangeably with version while others seem to distinguish the two -- here, let us treat them as the same, for simplicity) is a state of a piece of information at a specific time that is a result of some changes to it e.g., if you modify the code and save the file, you have a new revision (or a version) of that file.
Revision control is also known as Version Control Software (VCS), and a few other names.
Revision Control Software
In the context of RCS, what is a Revision? Give an example.
A revision (some seem to use it interchangeably with version while others seem to distinguish the two -- here, let us treat them as the same, for simplicity) is a state of a piece of information at a specific time that is a result of some changes to it. For example, take a file containing program code. If you modify the code and save the file, you have a new revision (or a version) of that file.
- a. Help a single user manage revisions of a single file
- b. Help a developer recover from a incorrect modification to a code file
- c. Makes it easier for a group of developers to collaborate on a project
- d. Manage the drift between multiple versions of your project
- e. Detect when multiple developers make incompatible changes to the same file
- f. All of them are benefits of RCS
f
Suppose You are doing a team project with Tom, Dick, and Harry but those three have not even heard the term RCS. How do you explain RCS to them as briefly as possible, using the project as an example?
Can explain repositories
Repository (repo for short): The database of the history of a directory being tracked by an RCS software (e.g. Git).
The repository is the database where the meta-data about the revision history are stored. Suppose you want to apply revision control on files in a directory called ProjectFoo. In that case you need to set up a repo (short for repository) in ProjectFoo directory, which is referred to as the working directory of the repo. For example, Git uses a hidden folder named .git inside the working directory.
You can have multiple repos in your computer, each repo revision-controlling files of a different working directly, for examples, files of different projects.
In the context of RCS, what is a repo?
Can create a local Git repo
Soon you are going to take your first step in using Git. If you would like to see a quick overview of the full Git landscape before jumping in, watch the video below.
Install SourceTree which is Git + a GUI for Git. If you prefer to use Git via the command line (i.e., without a GUI), you can install Git instead.
Suppose you want to create a repository in an empty directory things. Here are the steps:
Windows: Click File → Clone/New…. Click on Create button.
Mac: New... → Create New Repository.
Enter the location of the directory (Windows version shown below) and click Create.
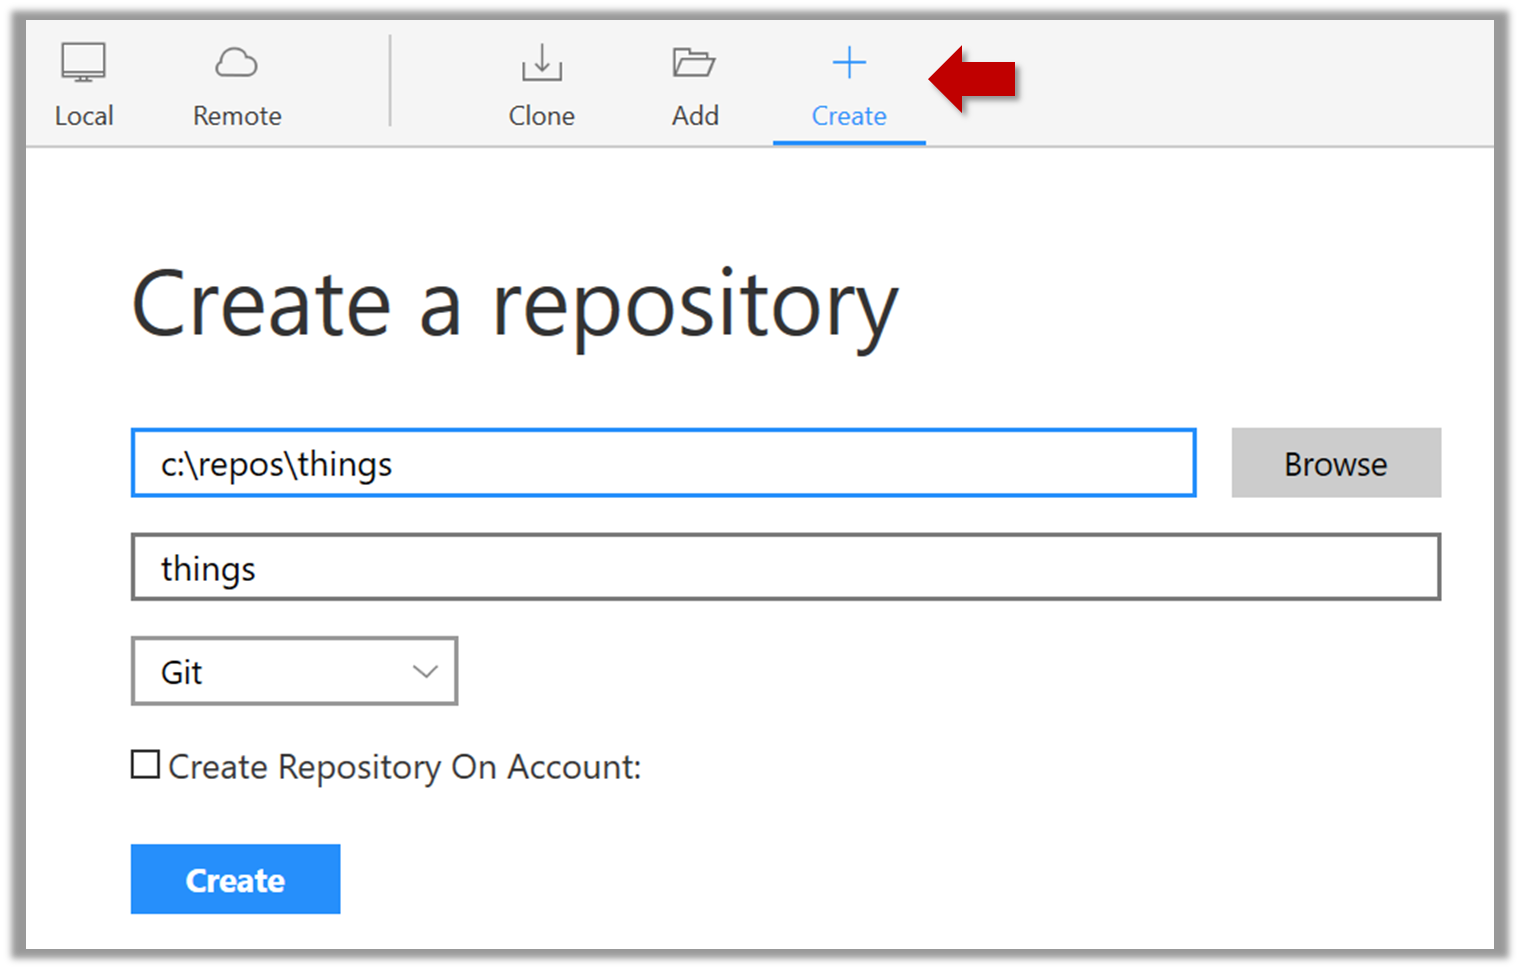
Go to the things folder and observe how a hidden folder .git has been created.
Note: If you are on Windows, you might have to configure Windows Explorer to show hidden files.
Open a Git Bash Terminal.
If you installed SourceTree, you can click the Terminal button to open a GitBash terminal.
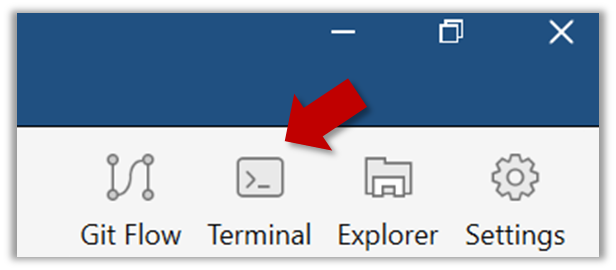
Navigate to the things directory.
Use the command git init which should initialize the repo.
$ git init
Initialized empty Git repository in c:/repos/things/.git/
You can use the command ls -a to view all files, which should show the .git directory that was created by the previous command.
$ ls -a
.  ..  .git
You can also use the git status command to check the status of the newly-created repo. It should respond with something like the bellow
git status
# On branch master
#
# Initial commit
#
nothing to commit (create/copy files and use "git add" to track)
Can explain saving history
Tracking and Ignoring
In a repo, we can specify which files to track and which files to ignore. Some files such as temporary log files created during the build/test process should not be revision-controlled.
Staging and Committing
Committing saves a snapshot of the current state of the tracked files in the revision control history. Such a snapshot is also called a commit (i.e. the noun).
When ready to commit, we first stage the specific changes we want to commit. This intermediate step allows us to commit only some changes while saving other changes for a later commit.
Identifying Points in History
Each commit in a repo is a recorded point in the history of the project that is uniquely identified by an auto-generated hash e.g. a16043703f28e5b3dab95915f5c5e5bf4fdc5fc1.
We can tag a specific commit with a more easily identifiable name e.g. v1.0.2
Can commit using Git
Create an empty repo.
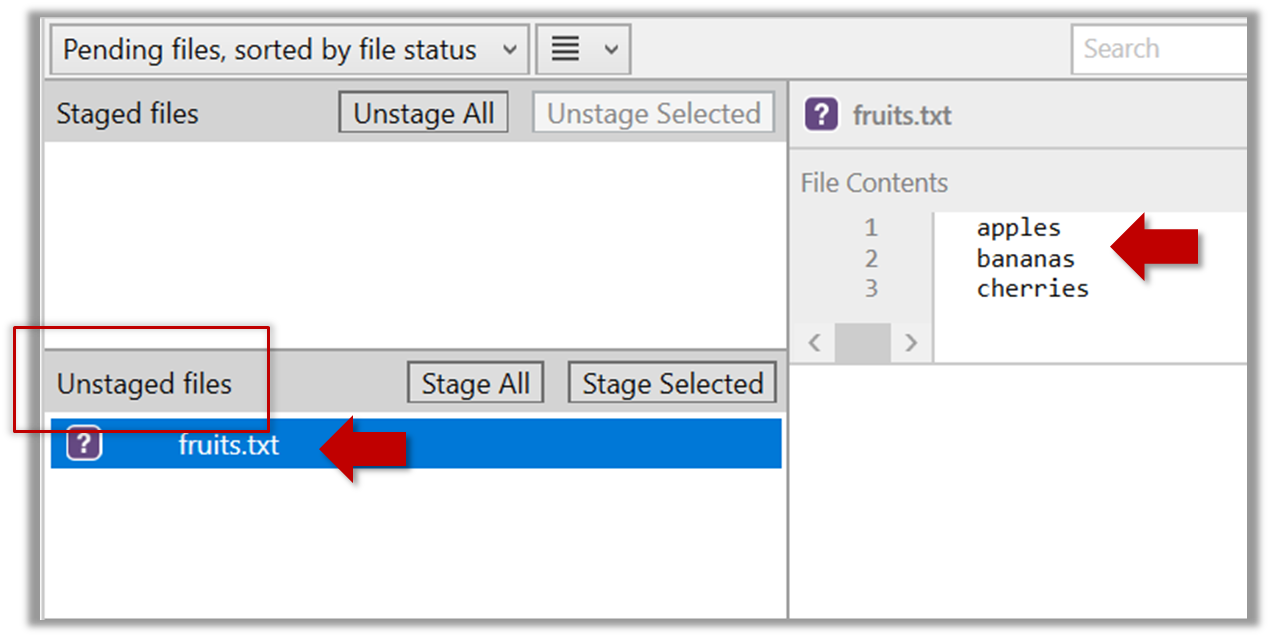
Create a file named fruits.txt in the working directory and add some dummy text to it.
Working directory: The directory the repo is based in is called the working directory.
Observe how the file is detected by Git.
The file is shown as ‘unstaged’
You can use the git status command to check the status of the working directory.
git status
# On branch master
#
# Initial commit
#
# Untracked files:
#   (use "git add <file>..." to include in what will be committed)
#
#   a.txt
nothing added to commit but untracked files present (use "git add" to track)
Although git has detected the file in the working directory, it will not do anything with the file unless you tell it to. Suppose we want to commit the current state of the file. First, we should stage the file.
Commit: Saving the current state of the working folder into the Git revision history.
Stage: Instructing Git to prepare a file for committing.
Select the fruits.txt and click on the Stage Selected button
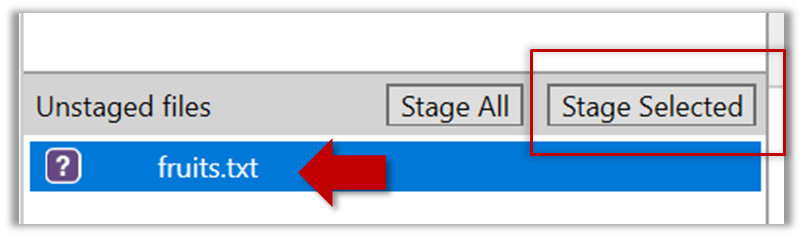
fruits.txt should appear in the Staged files panel now.
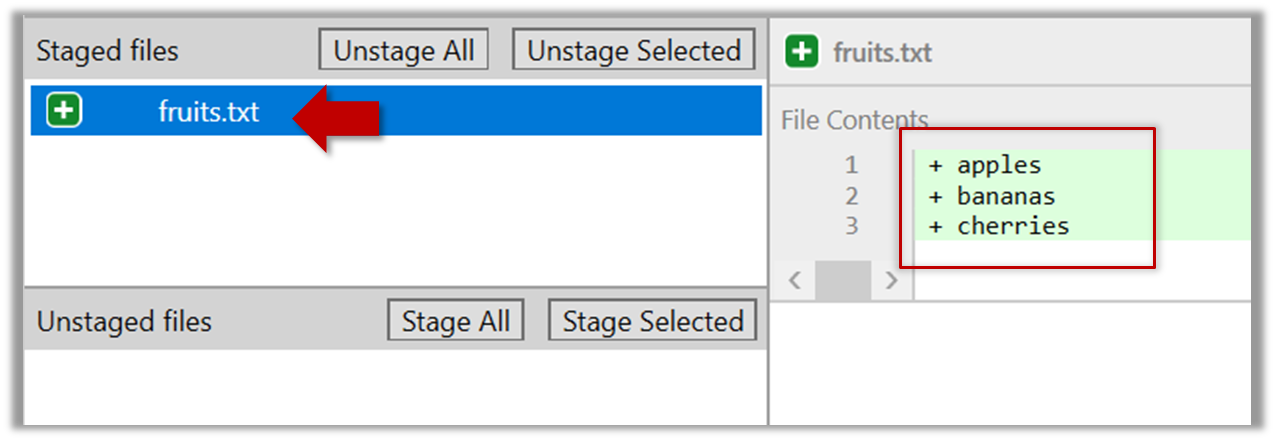
You can use the stage or the add command (they are synonyms, add is the more popular choice) to stage files.
git add fruits.txt
git status
# On branch master
#
# Initial commit
#
# Changes to be committed:
#   (use "git rm --cached <file>..." to unstage)
#
#       new file:   fruits.txt
#
Now, you can commit the staged version of fruits.txt
Click the Commit button, enter a commit message e.g. add fruits.txt in to the text box, and click Commit
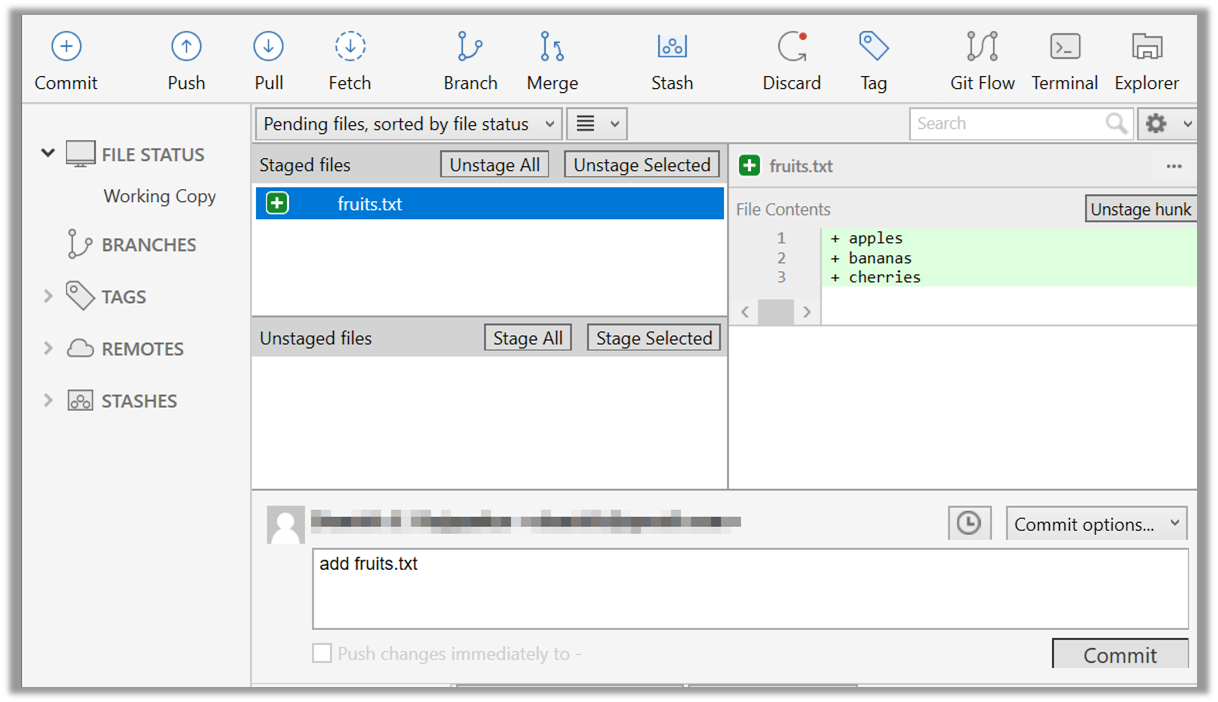
Use the commit command to commit. The -m switch is used to specify the commit message.
git commit -m "add fruits.txt"
You can use the log command to see the commit history
git log
commit 8fd30a6910efb28bb258cd01be93e481caeab846
Author: … < … @... >
Date:   Wed Jul 5 16:06:28 2017 +0800

  Add fruits.txt
Note the existence of something called the master branch. Git allows you to have multiple branches (i.e. it is a way to evolve the content in parallel) and Git creates a default branch named master on which the commits go on by default.
Do some changes to fruits.txt (e.g. add some text and delete some text). Stage the changes, and commit the changes using the same steps you followed before. You should end up with something like this.
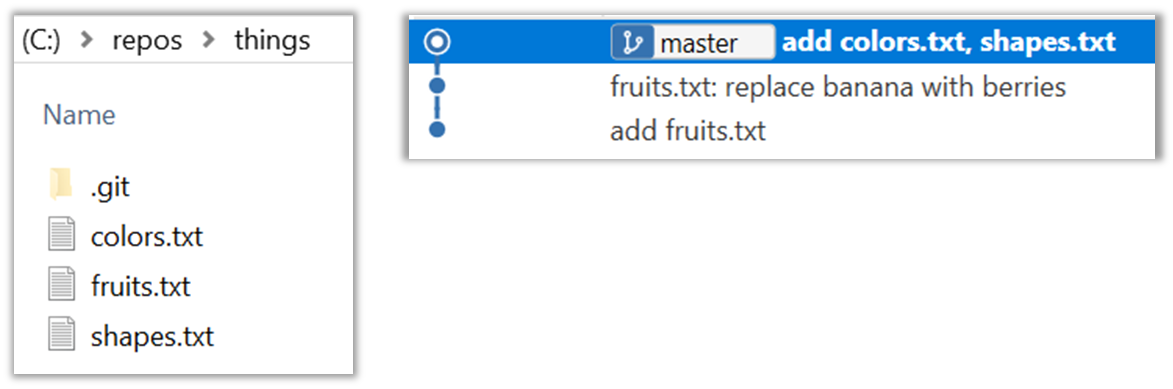
Next, add two more files colors.txt and shapes.txt to the same working directory. Add a third commit to record the current state of the working directory.
- Try Git is an online simulation/tutorial of Git basics. You can try its first few steps to solidify what you learned in this LO.
Can set Git to ignore files
Add a file names temp.txt to the things repo you created. Suppose we don’t want this file to be revision controlled by Git. Let’s instruct Git to ignore temp.txt
The file should be currently listed under Unstaged files. Right-click it and choose Ignore…. Choose Ignore exact filename(s) and click OK.
Observe that a file named .gitignore has been created in the working directory root and has the following line in it.
temp.txt
Create a file named .gitignore in the working directory root and add the following line in it.
temp.txt
The .gitignore file tells Git which files to ignore when tracking revision history. That file itself can be either revision controlled or ignored.
- To version control it (the more common choice – which allows you to track how the
.gitignorefile changed over time), simply commit it as you would commit any other file. - To ignore it, follow the same steps we followed above when we set Git to ignore the
temp.txtfile.
Can explain using history
To see what changed between two points of the history, you can ask the RCS tool to diff the two commits in concern.
To restore the state of the working directory at a point in the past, you can checkout the commit in concern. i.e., we can traverse the history of the working directory simply by checking out the commits we are interested in.
RCS : Revision Control Software are the software tools that automate the process of Revision Control i.e. managing revisions of software artifacts.
Can load a specific version of a Git repo
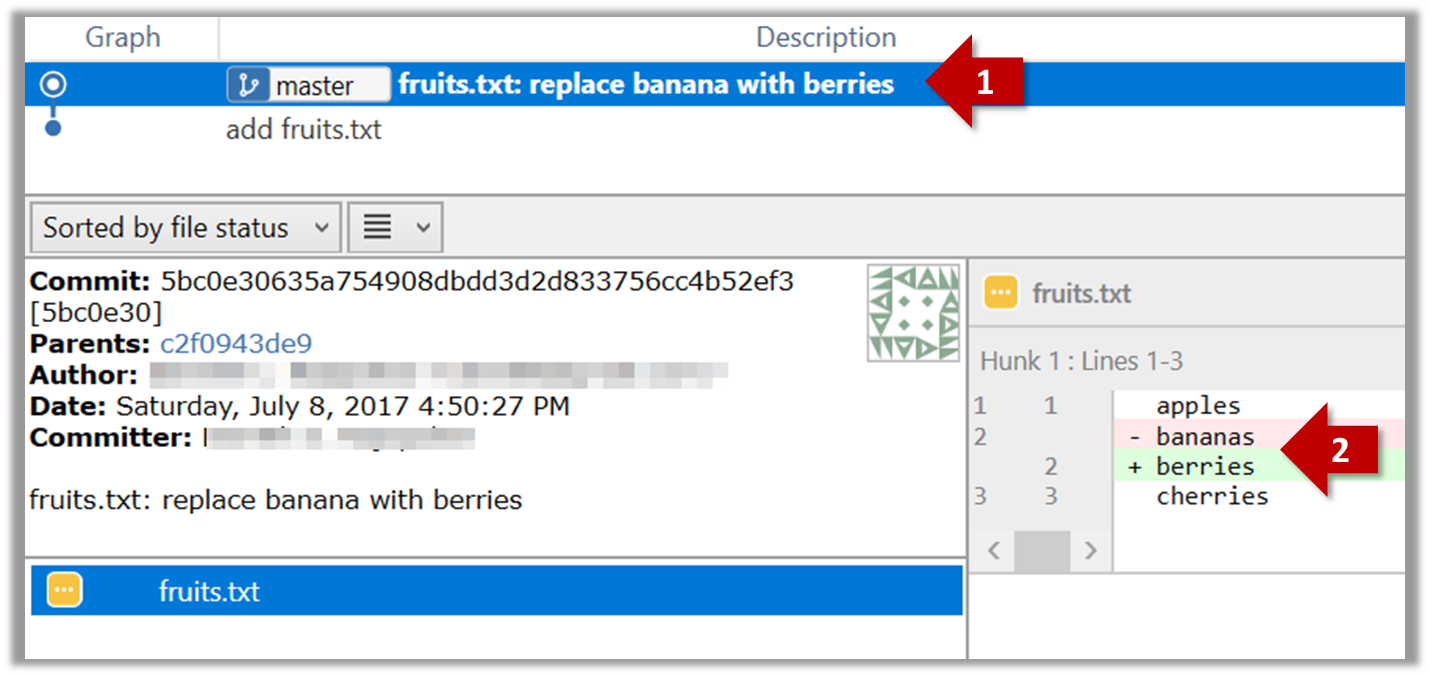
Git can show you what changed in each commit.
To see which files changed in a commit, click on the commit. To see what changed in a specific file in that commit, click on the file name.
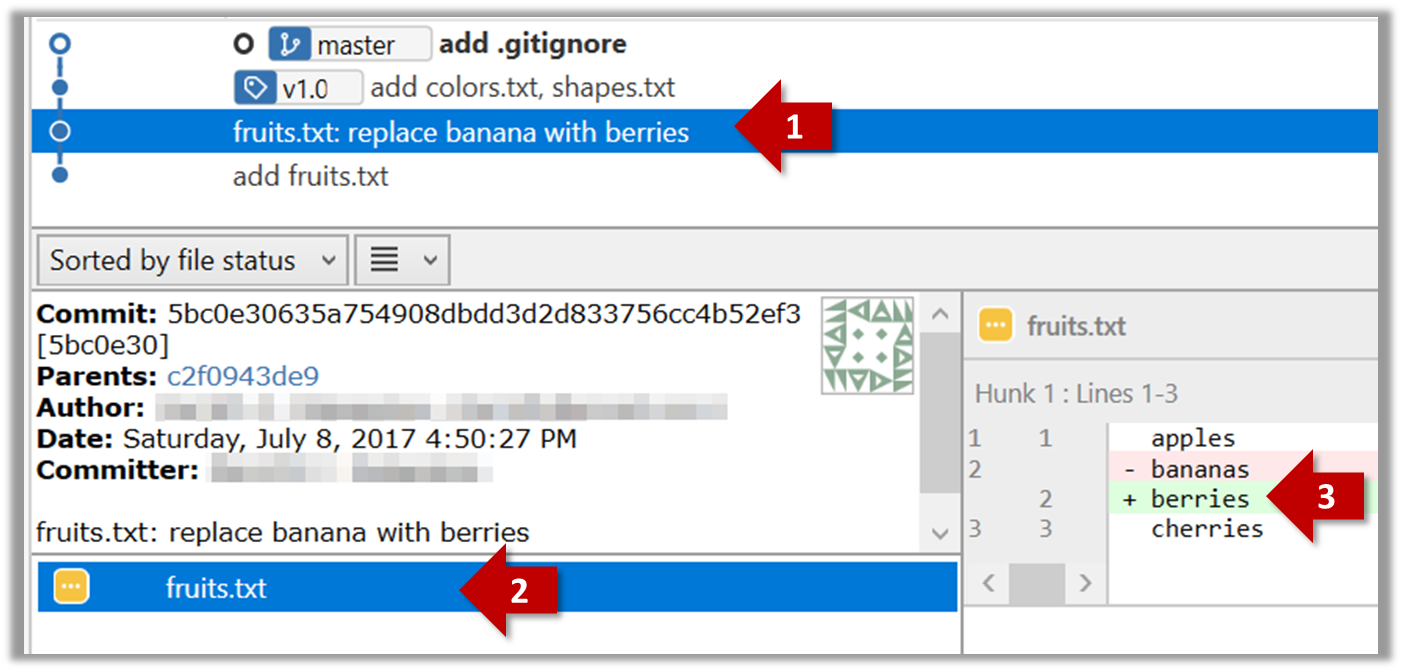
git show < part-of-commit-hash >
Example:
git show 251b4cf
commit 5bc0e30635a754908dbdd3d2d833756cc4b52ef3
Author: … < … >
Date:   Sat Jul 8 16:50:27 2017 +0800

    fruits.txt: replace banana with berries

diff --git a/fruits.txt b/fruits.txt
index 15b57f7..17f4528 100644
--- a/fruits.txt
+++ b/fruits.txt
@@ -1,3 +1,3 @@
 apples
-bananas
+berries
 cherries
Git can also show you the difference between two points in the history of the repo.
Select the two points you want to compare using Ctrl+Click.
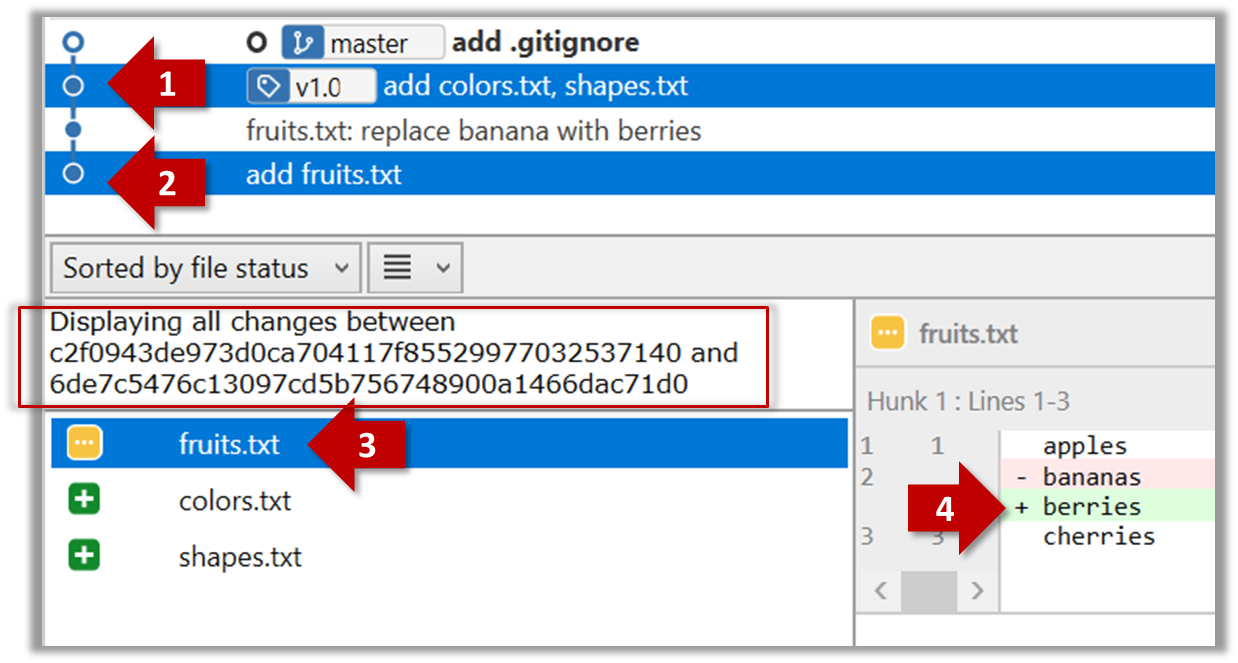
The same method can be used to compare the current state of the working directory (which might have uncommitted changes) to a point in the history.
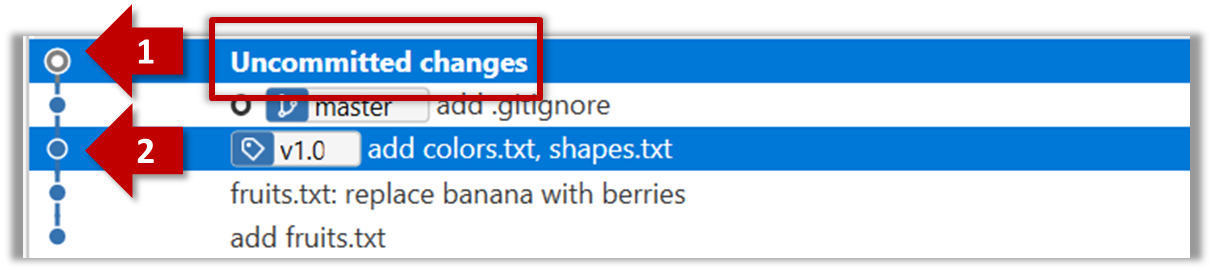
The diff command can be used to view the differences between two points of the history.
git diff: shows the changes (uncommitted) since the last commitgit diff 0023cdd..fcd6199: shows the changes between the points indicated by by commit hashesgit diff v1.0..HEAD: shows changes that happened from the commit tagged asv1.0to the most recent commit.
Git can load a specific version of the history to the working directory. Note that if you have uncommitted changes in the working directory, you need to
Tools → Git and GitHub →
You can use the git's stash feature to temporarily shelve (or stash) changes you've made to your working copy so that you can work on something else, and then come back and re-apply the stashed changes later on. -- adapted from this
Follow this article from SourceTree creators. Note the GUI shown in the article is slightly outdated but you should be able to map it to the current GUI.
Follow this article from Atlassian.
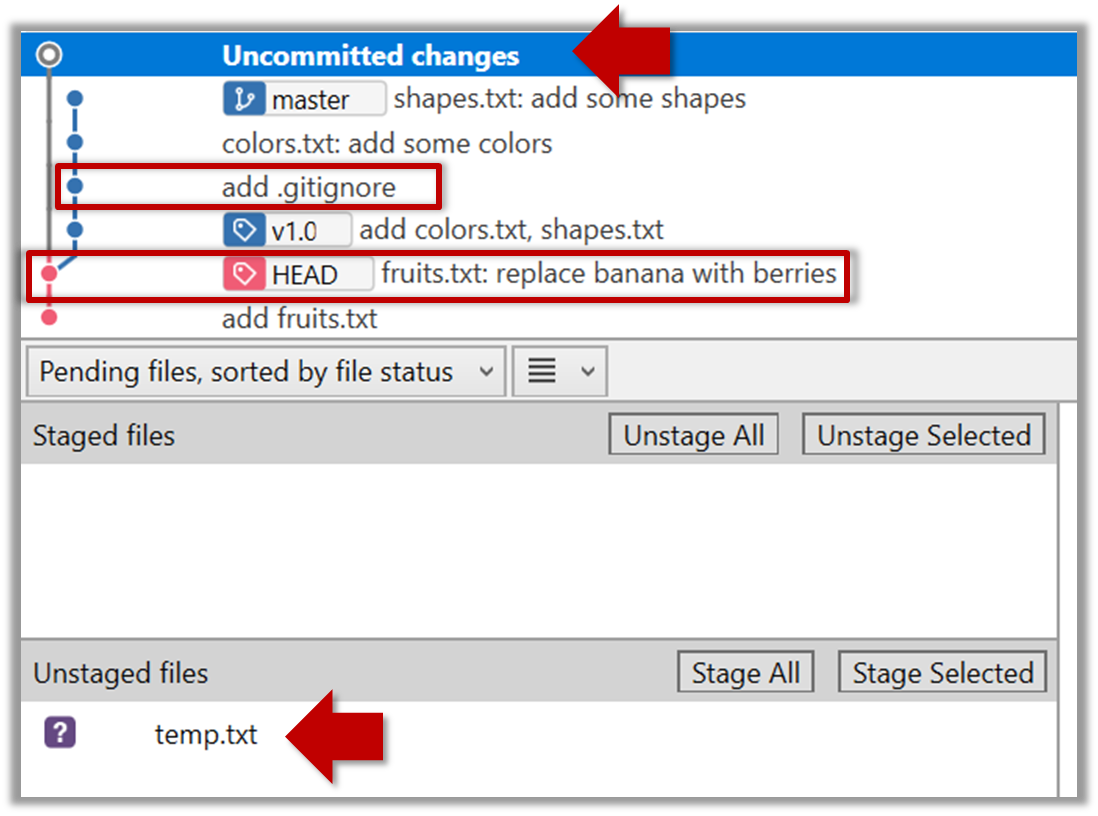
Double-click the commit you want to load to the working directory, or right-click on that commit and choose Checkout....
Click OK to the warning about ‘detached HEAD’ (similar to below).

The specified version is now loaded to the working folder, as indicated by the HEAD label. HEAD is a reference to the currently checked out commit.
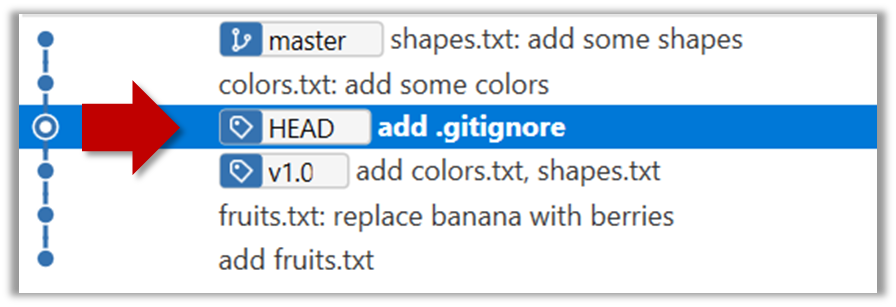
If you checkout a commit that come before the commit in which you added the .gitignore file, Git will now show ignored fiels as ‘unstaged modifications’ because at that stage Git hasn’t been told to ignore those files.
To go back to the latest commit, double-click it.
Use the checkout <commit-identifier> command to change the working directory to the state it was in at a specific past commit.
git checkout v1.0: loads the state as at commit taggedv1.0git checkout 0023cdd: loads the state as at commit with the hash0023cddgit checkout HEAD~2: loads the state that is 2 commits behind the most recent commit
For now, you can ignore the warning about ‘detached HEAD’.
Use the checkout <branch-name> to go back to the most recent commit of the current branch (the default branch in git is named master)
git checkout master
Can tag commits using Git
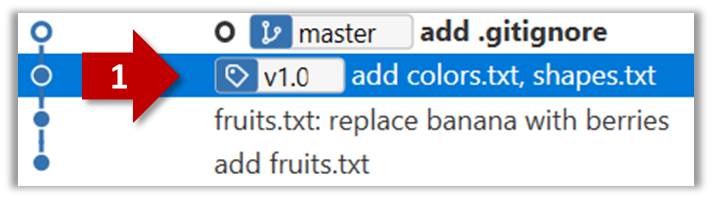
Let's tag a commit in a local repo you have (e.g. the sampelrepo-things repo)
Right-click on the commit (in the graphical revision graph) you want to tag and choose Tag…
Specify the tag name e.g. v1.0 and click Add Tag.
The added tag will appear in the revision graph view.
To add a tag to the current commit as v1.0,
git tag –a v1.0
To view tags
git tag
To learn how to add a tag to a past commit, go to the ‘Git Basics – Tagging’ page of the git-scm book and refer the ‘Tagging Later’ section.
Can use Git to stash files
You can use the git's stash feature to temporarily shelve (or stash) changes you've made to your working copy so that you can work on something else, and then come back and re-apply the stashed changes later on. -- adapted from this
Follow this article from SourceTree creators. Note the GUI shown in the article is slightly outdated but you should be able to map it to the current GUI.
Follow this article from Atlassian.
[W2.3] RCS: Communicating with a remote repo
Can explain remote repositories
Remote repositories are copies of a repo that are hosted on remote computers. They are especially useful for sharing the revision history of a codebase among team members of a multi-person project. They can also serve as a remote backup of your code base.
You can clone a remote repo onto your computer which will create a copy of a remote repo on your computer, including the version history as the remote repo.
You can push new commits in your clone to the remote repo which will copy the new commits onto the remote repo. Note that pushing to a remote repo requires you to have write-access to it.
You can pull from the remote repos to receive new commits in the remote repo. Pulling is used to sync your local repo with latest changes to the remote repo.
While it is possible to set up your own remote repo on a server, an easier option is to use a remote repo hosting service such as GitHub or BitBucket.
A fork is a remote copy of a remote repo. If there is a remote repo that you want to push to but you do not have write access to it, you can fork the remote repo, which gives you your own remote repo that you can push to.
A pull request is mechanism for contributing code to a remote repo. It is a formal request sent to the maintainers of the repo asking them to pull your new code to their repo.
Here is a scenario that includes all the concepts introduced above (click on the slide to advance the animation):
Can clone a remote repo
Clone the sample repo samplerepo-things to your computer.
Note that the URL of the Github project is different form the URL you need to clone a repo in that Github project. e.g.
Github project URL: https://github.com/se-edu/samplerepo-things
Git repo URL: https://github.com/se-edu/samplerepo-things.git (note the .git at the end)
File → Clone / New… and provide the URL of the repo and the destination directory.
You can use the clone command to clone a repo.
Follow instructions given here.
Can pull changes from a repo
Clone the sample repo as explained in
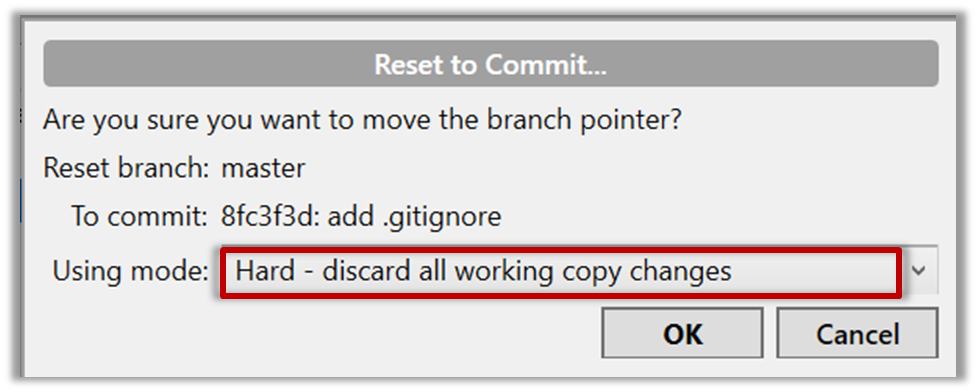
Delete the last two commits to simulate cloning the repo 2 commits ago.
Clone
Can clone a remote repo
Clone the sample repo samplerepo-things to your computer.
Note that the URL of the Github project is different form the URL you need to clone a repo in that Github project. e.g.
Github project URL: https://github.com/se-edu/samplerepo-things
Git repo URL: https://github.com/se-edu/samplerepo-things.git (note the .git at the end)
File → Clone / New… and provide the URL of the repo and the destination directory.
You can use the clone command to clone a repo.
Follow instructions given here.
Right-click the target commit (i.e. the commit that is 2 commits behind the tip) and choose Reset current branch to this commit.

Choose the Hard - … option and click OK.
This is what you will see.
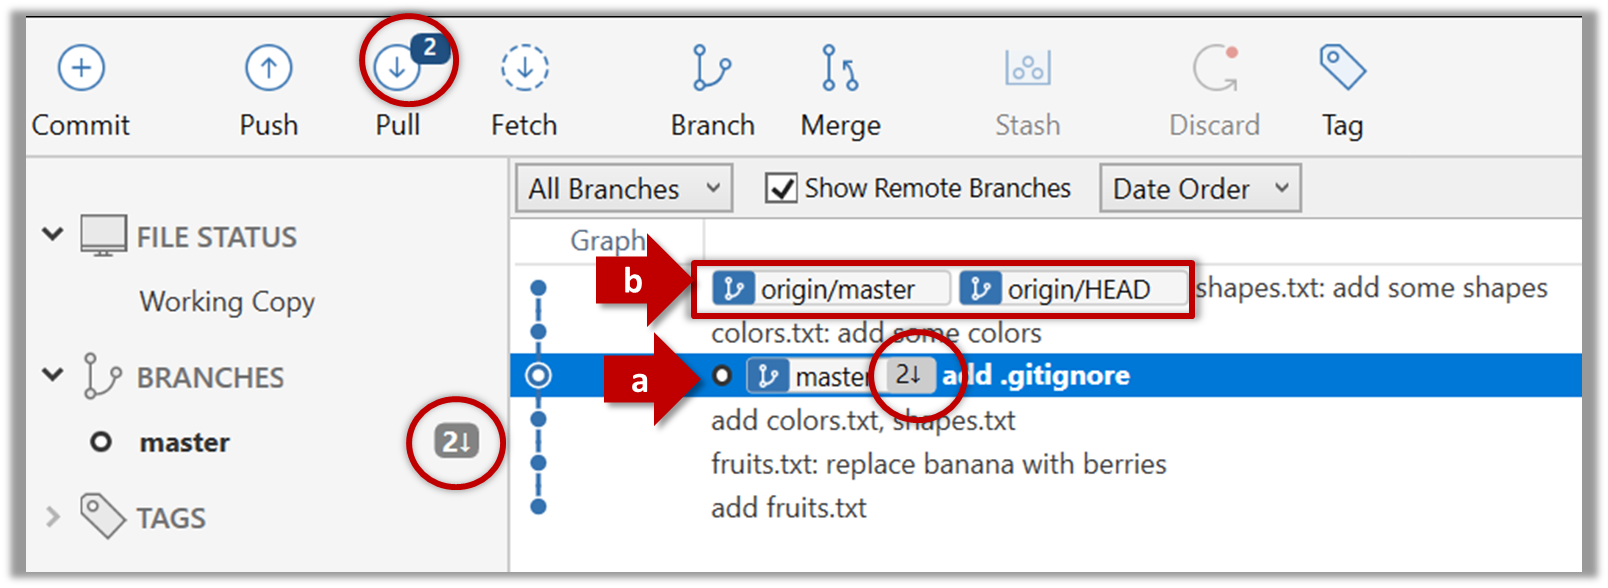
Note the following (cross refer the screenshot above):
Arrow marked as a: The local repo is now at this commit, marked by the master label.
Arrow marked as b: origin/master label shows what is the latest commit in the master branch in the remote repo.
Use the reset command to delete commits at the tip of the revision history.
git reset --hard HEAD~2
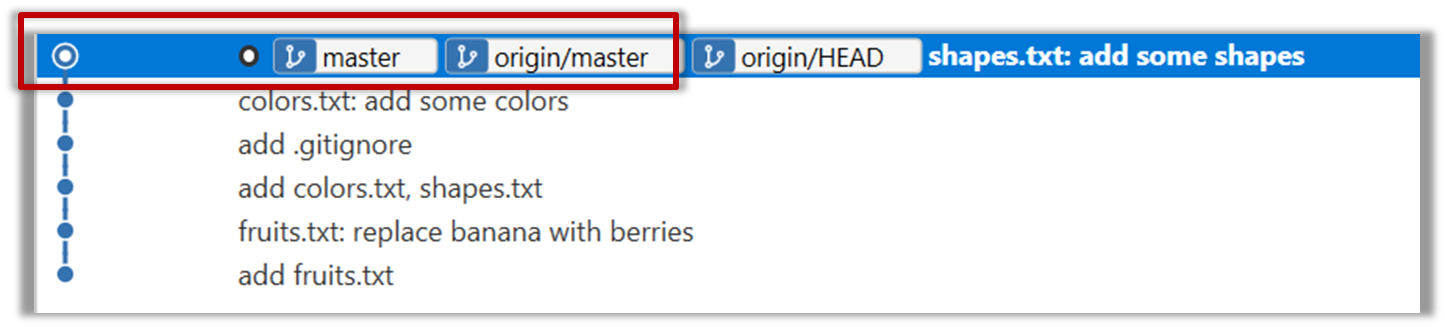
Now, your local repo state is exactly how it would be if you had cloned the repo 2 commits ago, as if somebody has added two more commits to the remote repo since you cloned it. To get those commits to your local repo (i.e. to sync your local repo with upstream repo) you can do a pull.
Click the Pull button in the main menu, choose origin and master in the next dialog, and click OK.
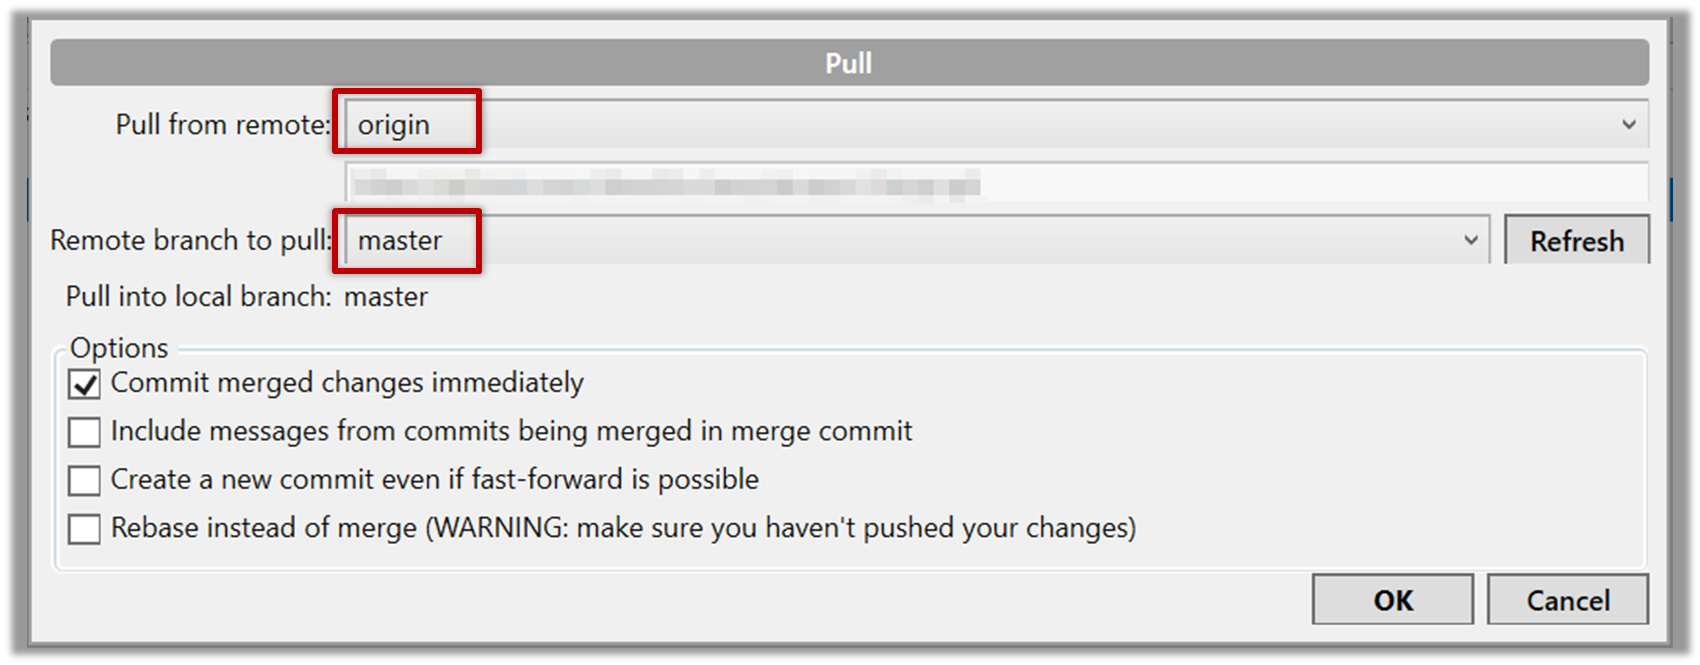
Now you should see something like this where master and origin/master are both pointing the same commit.
git pull origin
Can push to a remote repo
-
Create a GitHub account if you don't have one yet.
-
Fork the samplerepo-things to your GitHub account:
Navigate to the on GitHub and click on the
 button on the top-right corner.
 -
Clone the fork (not the original) to your computer.
-
Create some commits in your repo.
-
Push the new commits to your fork on GitHub
Click the Push button on the main menu, ensure the settings are as follows in the next dialog, and click the Push button on the dialog.
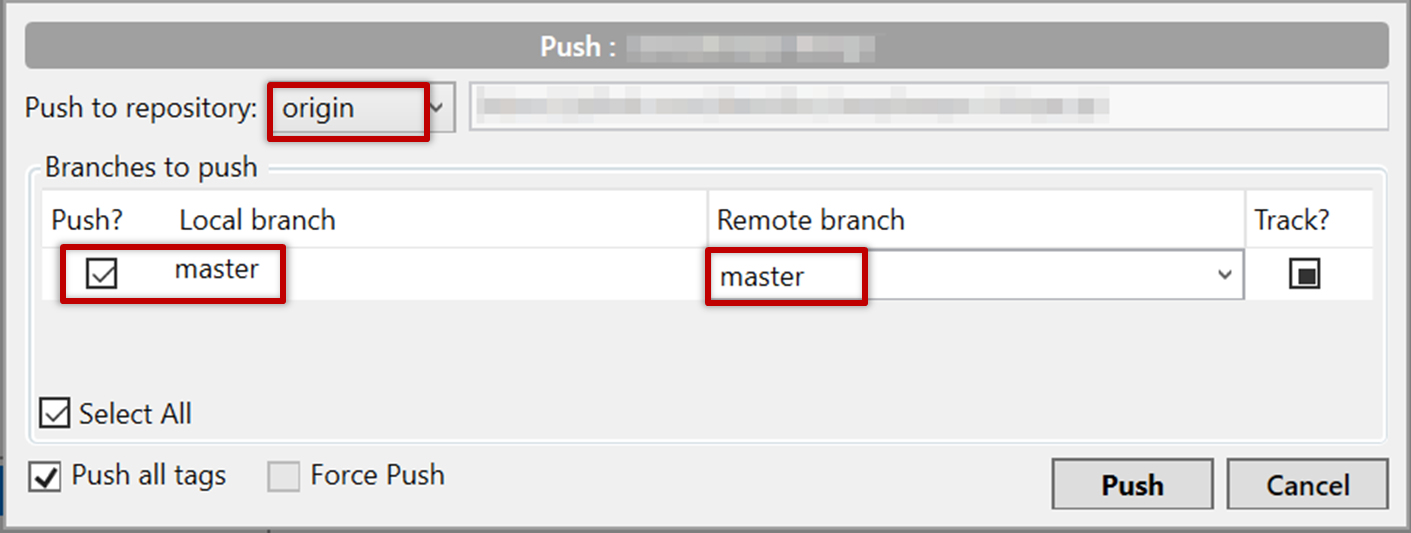
Use the command git push origin master. Enter Github username and password when prompted.
To push an existing local repo into a new remote repo on GitHub, first you need to create an empty remote repo on GitHub.
-
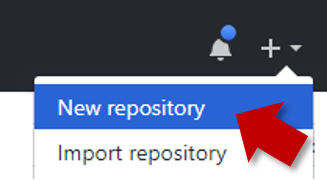
Login to your GitHub account and choose to create a new Repo.
-
In the next screen, provide a name for your repo but keep the
Initialize this repo ...tick box unchecked.
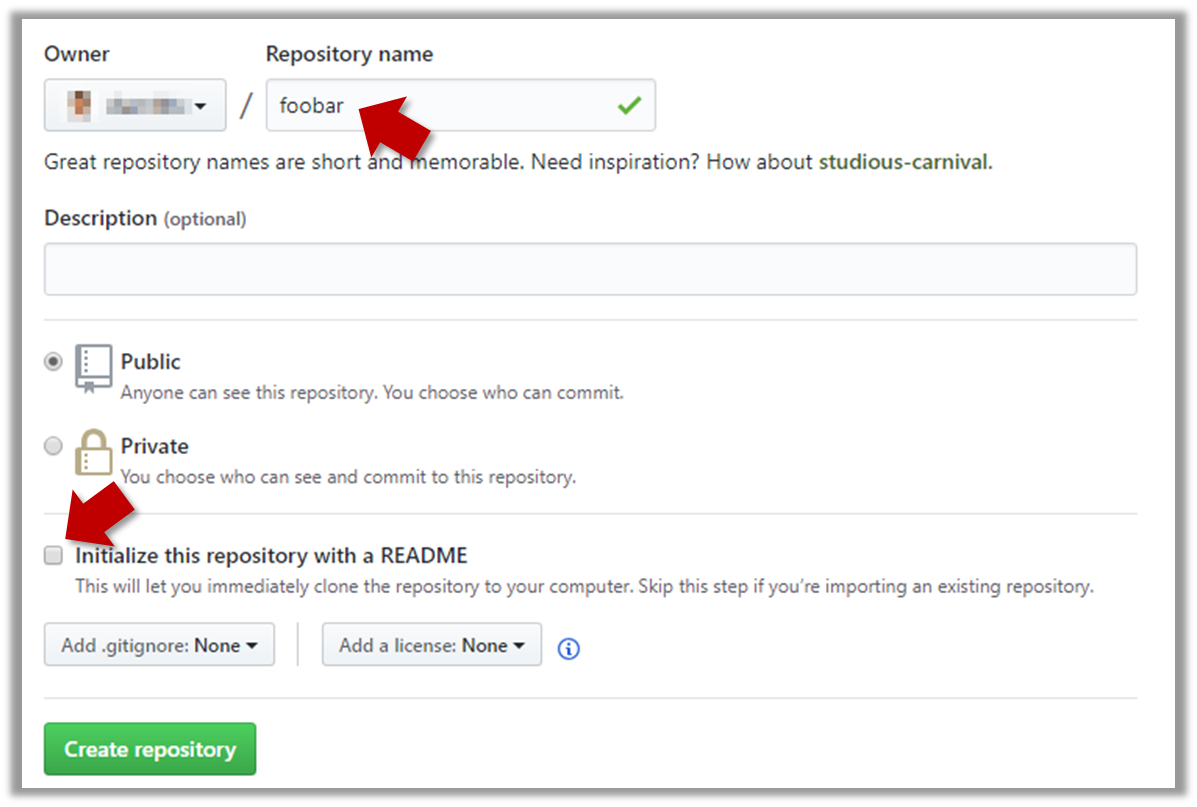
-
Note the URL of the repo. It will be of the form
https://github.com/{your_user_name}/{repo_name}.git
e.g.,https://github.com/johndoe/foobar.git
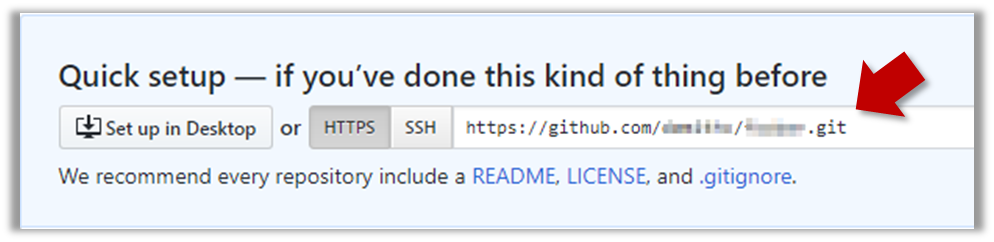
Next, you can push the existing local repo to the new remote repo as follows:
- Open the local repo in SourceTree.
- Choose
Repository→Repository Settingsmenu option. - Add a new remote to the repo with the following values.
Remote name: the name you want to assign to the remote repo. RecommendedoriginURL/path: the URL of your repo (ending in.git) that you collected earlier.Username: your GitHub username
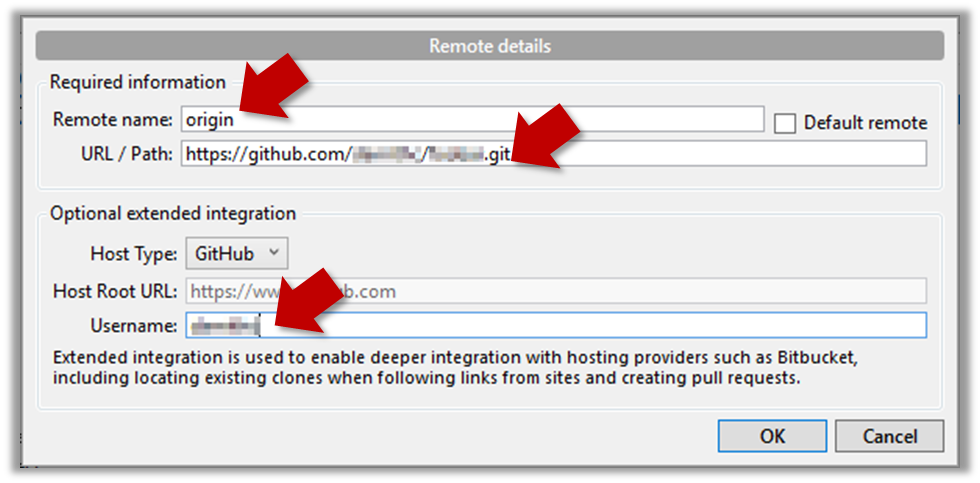
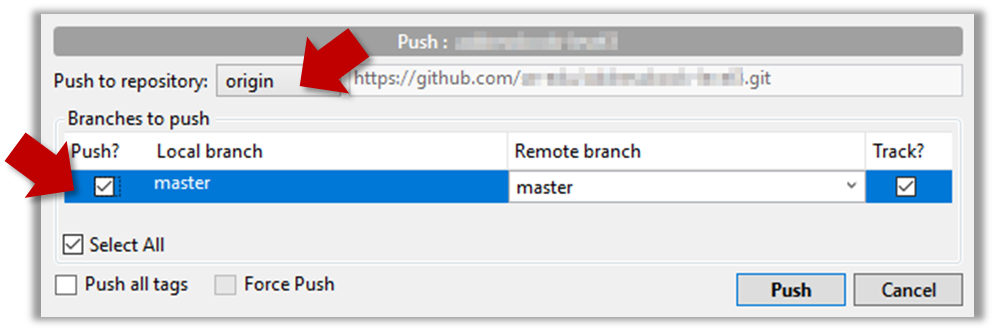
- Now you can push your repo to the new remote the usual way.
- Navigate to the folder containing the local repo.
- Set the new remote repo as a remote of the local repo.
command:git remote add {remote_name} {remote_repo_url}
e.g.,git remote add origin https://github.com/johndoe/foobar.git - Push to the new remote the usual way. You can use the
-uflag to inform Git that you wish totrack the branch.
e.g.,git push -u origin master
[W2.4] IDEs: Basic features
Can explain IDEs
Professional software engineers often write code using Integrated Development Environments (IDEs). IDEs support all development-related work within the same tool.
An IDE generally consists of:
- A source code editor that includes features such as syntax coloring, auto-completion, easy code navigation, error highlighting, and code-snippet generation.
- A compiler and/or an interpreter (together with other build automation support) that facilitates the compilation/linking/running/deployment of a program.
- A debugger that allows the developer to execute the program one step at a time to observe the run-time behavior in order to locate bugs.
- Other tools that aid various aspects of coding e.g. support for automated testing, drag-and-drop construction of UI components, version management support, simulation of the target runtime platform, and modeling support.
Examples of popular IDEs:
- Java: Eclipse, Intellij IDEA, NetBeans
- C#, C++: Visual Studio
- Swift: XCode
- Python: PyCharm
Some Web-based IDEs have appeared in recent times too e.g., Amazon's Cloud9 IDE.
Some experienced developers, in particular those with a UNIX background, prefer lightweight yet powerful text editors with scripting capabilities (e.g. Emacs) over heavier IDEs.
- a. Compiling
- b. Syntax error highlighting
- c. Debugging
- d. Code navigation e.g., to navigate from a method call to the method implementation
- e. Simulation e.g., run a mobile app in a simulator
- f. Code analysis e.g. to find unreachable code
- g. Reverse engineering design/documentation e.g. generate diagrams from code
- h. Visual programming e.g. Write programs using ‘drag and drop’ actions instead of typing code
- i. Syntax assistance e.g., show hints as you type
- j. Code generation e.g., to generate the code required by simply specifying which component/structure you want to implement
- k. Extension i.e., ability add more functionality to the IDE using plugins
All.
Explanation: While all of these features may not be present in some IDEs, most do have these features in some form or other.
Can navigate code effectively using IDE features
Some useful navigation shortcuts:
- Quickly locate a file by name.
- Go to the definition of a method from where it is used.
- Go back to the previous location.
- View the documentation of a method from where the method is being used, without navigating to the method itself.
- Find where a method/field is being used.
[W2.5] IDEs: Intermediate features
Can explain debugging
Debugging is the process of discovering defects in the program. Here are some approaches to debugging:
-
Bad -- By inserting temporary print statements: This is an ad-hoc approach in which print statements are inserted in the program to print information relevant to debugging, such as variable values. e.g.
Exiting process() method, x is 5.347. This approach is not recommended due to these reasons.- Incurs extra effort when inserting and removing the print statements.
- Unnecessary program modifications increases the risk of introducing errors into the program.
- These print statements, if not promptly removed, may even appear unexpectedly in the production version.
-
Bad -- By manually tracing through the code: Otherwise known as ‘eye-balling’, this approach doesn't have the cons of the previous approach, but it too is not recommended (other than as a 'quick try') due to these reasons:
- It is difficult, time consuming, and error-prone technique.
- If you didn't spot the error while writing code, you might not spot the error when reading code too.
-
Good -- Using a debugger: A debugger tool allows you to pause the execution, then step through one statement at a time while examining the internal state if necessary. Most IDEs come with an inbuilt debugger. This is the recommended approach for debugging.
Can step through a program using a debugger
This video (from LaunchCode) gives a pretty good explanation of how to use the Intellij IDEA debugger.
- Intellij IDEA Documentation: Debugging Basics - Can be used as a reference document when you want to recall how to use a debugging feature.
Can use some useful IDE productivity shortcuts
[W2.6] OOP: Classes & Objects
Can describe OOP at a higher level
Object-Oriented Programming (OOP) is a programming paradigm. A programming paradigm guides programmers to analyze programming problems, and structure programming solutions, in a specific way.
Programming languages have traditionally divided the world into two parts—data and operations on data. Data is static and immutable, except as the operations may change it. The procedures and functions that operate on data have no lasting state of their own; they’re useful only in their ability to affect data.
This division is, of course, grounded in the way computers work, so it’s not one that you can easily ignore or push aside. Like the equally pervasive distinctions between matter and energy and between nouns and verbs, it forms the background against which we work. At some point, all programmers—even object-oriented programmers—must lay out the data structures that their programs will use and define the functions that will act on the data.
With a procedural programming language like C, that’s about all there is to it. The language may offer various kinds of support for organizing data and functions, but it won’t divide the world any differently. Functions and data structures are the basic elements of design.
Object-oriented programming doesn’t so much dispute this view of the world as restructure it at a higher level. It groups operations and data into modular units called objects and lets you combine objects into structured networks to form a complete program. In an object-oriented programming language, objects and object interactions are the basic elements of design.
Some other examples of programming paradigms are:
| Paradigm | Programming Languages |
|---|---|
| Procedural Programming paradigm | C |
| Functional Programming paradigm | F#, Haskel, Scala |
| Logic Programming paradigm | Prolog |
Some programming languages support multiple paradigms.
Java is primarily an OOP language but it supports limited forms of functional programming and it can be used to (although not recommended) write procedural code. e.g. se-edu/addressbook-level1
JavaScript and Python support functional, procedural, and OOP programming.
A) Choose the correct statements
- a. OO is a programming paradigm
- b. OO guides us in how to structure the solution
- c. OO is mainly an abstraction mechanism
- d. OO is a programming language
- e. OO is modeled after how the objects in real world work
B) Choose the correct statements
- a. Java and C++ are OO languages
- b. C language follows the Functional Programming paradigm
- c. Java can be used to write procedural code
- d. Prolog follows the Logic Programming paradigm
A) (a)(b)(c)(e)
Explanation: While many languages support the OO paradigm, OO is not a language itself.
B) Choose the correct statement
(a)(b)(c)(d)
Explanation: C follows the procedural paradigm. Yes, we can write procedural code using OO languages e.g., AddressBook-level1.
OO is a higher level mechanism than the procedural paradigm.
True.
Explanation: Procedural languages work at simple data structures (e.g., integers, arrays) and functions level. Because an object is an abstraction over data+related functions, OO works at a higher level.
Can describe how OOP relates to the real world
Every object has both state (data) and behavior (operations on data). In that, they’re not much different from ordinary physical objects. It’s easy to see how a mechanical device, such as a pocket watch or a piano, embodies both state and behavior. But almost anything that’s designed to do a job does, too. Even simple things with no moving parts such as an ordinary bottle combine state (how full the bottle is, whether or not it’s open, how warm its contents are) with behavior (the ability to dispense its contents at various flow rates, to be opened or closed, to withstand high or low temperatures).
It’s this resemblance to real things that gives objects much of their power and appeal. They can not only model components of real systems, but equally as well fulfill assigned roles as components in software systems.
Object Oriented Programming (OOP) views the world as a network of interacting objects.
A real world scenario viewed as a network of interacting objects:
You are asked to find out the average age of a group of people Adam, Beth, Charlie, and Daisy. You take a piece of paper and pen, go to each person, ask for their age, and note it down. After collecting the age of all four, you enter it into a calculator to find the total. And then, use the same calculator to divide the total by four, to get the average age. This can be viewed as the objects You, Pen, Paper, Calculator, Adam, Beth, Charlie, and Daisy interacting to accomplish the end result of calculating the average age of the four persons. These objects can be considered as connected in a certain network of certain structure.
OOP solutions try to create a similar object network inside the computer’s memory – a sort of a virtual simulation of the corresponding real world scenario – so that a similar result can be achieved programmatically.
OOP does not demand that the virtual world object network follow the real world exactly.
Our previous example can be tweaked a bit as follows:
- Use an object called
Mainto represent your role in the scenario. - As there is no physical writing involved, we can replace the
PenandPaperwith an object calledAgeListthat is able to keep a list of ages.
Every object has both state (data) and behavior (operations on data).
| Object | Real World? | Virtual World? | Example of State (i.e. Data) | Examples of Behavior (i.e. Operations) |
|---|---|---|---|---|
| Adam | Name, Date of Birth | Calculate age based on birthday | ||
| Pen | - | Ink color, Amount of ink remaining | Write | |
| AgeList | - | Recorded ages | Give the number of entries, Accept an entry to record | |
| Calculator | Numbers already entered | Calculate the sum, divide | ||
| You/Main | Average age, Sum of ages | Use other objects to calculate |
Every object has an interface and an implementation.
Every real world object has:
- an interface that other objects can interact with
- an implementation that supports the interface but may not be accessible to the other object
The interface and implementation of some real-world objects in our example:
- Calculator: the buttons and the display are part of the interface; circuits are part of the implementation.
- Adam: In the context of our 'calculate average age' example, the interface of Adam consists of requests that adam will respond to, e.g. "Give age to the nearest year, as at Jan 1st of this year" "State your name"; the implementation includes the mental calculation Adam uses to calculate the age which is not visible to other objects.
Similarly, every object in the virtual world has an interface and an implementation.
The interface and implementation of some virtual-world objects in our example:
Adam: the interface might have a methodgetAge(Date asAt); the implementation of that method is not visible to other objects.
Objects interact by sending messages.
Both real world and virtual world object interactions can be viewed as objects sending message to each other. The message can result in the sender object receiving a response and/or the receiving object’s state being changed. Furthermore, the result can vary based on which object received the message, even if the message is identical (see rows 1 and 2 in the example below).
Examples:
| World | Sender | Receiver | Message | Response | State Change |
|---|---|---|---|---|---|
| Real | You | Adam | "What is your name?" | "Adam" | - |
| Real | as above | Beth | as above | "Beth" | - |
| Real | You | Pen | Put nib on paper and apply pressure | Makes a mark on your paper | Ink level goes down |
| Virtual | Main | Calculator (current total is 50) | add(int i): int i = 23 | 73 | total = total + 23 |
Consider the following real-world scenario.
Tom read a Software Engineering textbook (he has been assigned to read the book) and highlighted some of the text in it.
Explain the following statements about OOP using the above scenario as an example.
- Object Oriented Programming (OOP) views the world as a network of interacting objects.
- Every object has both state (data) and behavior (operations on data).
- Every object has an interface and an implementation.
- Objects interact by sending messages.
- OOP does not demand that the virtual world object network follow the real world exactly.
[1] Object Oriented Programming (OOP) views the world as a network of interacting objects.
Interacting objects in the scenario: Tom, SE Textbook (Book for short), Text, (possibly) Highlighter
💡 objects usually match nouns in the description
[2]Every object has both state (data) and behavior (operations on data).
| Object | Examples of state | Examples of behavior |
|---|---|---|
Tom |
memory of the text read | read |
Book |
title | show text |
Text |
font size | get highlighted |
[3] Every object has an interface and an implementation.
- Interface of an object consists of how other objects interact with it i.e., what other objects can do to that object
- Implementation consist of internals of the object that facilitate the interactions but not visible to other objects.
| Object | Examples of interface | Examples of implementation |
|---|---|---|
Tom |
receive reading assignment | understand/memorize the text read, remember the reading assignment |
Book |
show text, turn page | how pages are bound to the spine |
Text |
read | how characters/words are connected together or fixed to the book |
[4] Objects interact by sending messages.
Examples:
Tomsends messageturn pageto theBookTomsends messageshow textto theBook. When theBookshows theText,Tomsends the messagereadto theTextwhich returns the text content toTom.Tomsends messagehighlightto theHighlighterwhile specifying whichTextto highlight. Then theHighlightersends the messagehighlightto the specifiedText.
[5] OOP does not demand that the virtual world object network follow the real world exactly.
Examples:
- A virtual world simulation of the above scenario can omit the
Highlighterobject. Instead, we can teachTextto highlight themselves when requested.
Can explain the relationship between classes and objects
Writing an OOP program is essentially writing instructions that the computer uses to,
- create the virtual world of object network, and
- provide it the inputs to produce the outcome we want.
A class contains instructions for creating a specific kind of objects. It turns out sometimes multiple objects have the same behavior because they are of the same kind. Instructions for creating a one kind (or ‘class’) of objects can be done once and that same instructions can be used to
Classes and objects in an example scenario
Consider the example of writing an OOP program to calculate the average age of Adam, Beth, Charlie, and Daisy.
Instructions for creating objects Adam, Beth, Charlie, and Daisy will be very similar because they are all of the same kind : they all represent ‘persons’ with the same interface, the same kind of data (i.e. name, DoB, etc.), and the same kind of behavior (i.e. getAge(Date), getName(), etc.). Therefore, we can have a class called Person containing instructions on how to create Person objects and use that class to instantiate objects Adam, Beth, Charlie, and Daisy.
Similarly, we need classes AgeList, Calculator, and Main classes to instantiate one each of AgeList, Calculator, and Main objects.
| Class | Objects |
|---|---|
Person |
objects representing Adam, Beth, Charlie, Daisy |
AgeList |
an object to represent the age list |
Calculator |
an object to do the calculations |
Main |
an object to represent you who manages the whole operation |
Consider the following scenario. If you were to simulate this in an OOP program, what are the classes and the objects you would use?
| Class | Objects |
|---|---|
Customer |
john |
Book |
LoTR, GoT |
Cheque |
checqueJohnGave |
Cashier |
peter |
Assume you are writing a CLI program called CityConnect for storing and querying distances between cities. The behavior is as follows:
Welcome to CityConnect!

Enter command: addroute Clementi BuonaVista 12
Route from Clementi to BuonaVista with distance 12km added

Enter command: getdistance Clementi BuonaVista
Distance from Clementi to BuonaVista is 12

Enter command: getdistance Clementi JurongWest
No route exists from Clementi to JurongWest!

Enter command: addroute Clementi JurongWest 24
Route from Clementi to JurongWest with distance 24km added

Enter command: getdistance Clementi JurongWest
Distance from Clementi to JurongWest is 24

Enter command: exit
What classes would you have in your code if you write your program based on the OOP paradigm?
One class you can have is Route
Can explain the abstraction aspect of OOP
The concept of Objects in OOP is an
Abstraction is a technique for dealing with complexity. It works by establishing a level of complexity we are interested in, and suppressing the more complex details below that level.
We can deal with a Person object that represents the person Adam and query the object for Adam's age instead of dealing with details such as Adam’s date of birth (DoB), in what format the DoB is stored, the algorithm used to calculate the age from the DoB, etc.
Can explain the encapsulation aspect of OOP
Encapsulation protects an implementation from unintended actions and from inadvertent access.
-- Object-Oriented Programming with Objective-C, Apple
An object is an encapsulation of some data and related behavior in two aspects:
1. The packaging aspect: An object packages data and related behavior together into one self-contained unit.
2. The information hiding aspect: The data in an object is hidden from the outside world and are only accessible using the object's interface.
Choose the correct statements
- a. An object is an encapsulation because it packages data and behavior into one bundle.
- b. An object is an encapsulation because it lets us think in terms of higher level concepts such as Students rather than student-related functions and data separately.
Don't confuse encapsulation with abstraction.
Choose the correct statement
(a)
Explanation: The second statement should be: An object is an abstraction encapsulation because it lets ...
Can define Java classes
As you know,
- Defining a class creates a new object type with the same name.
- Every object belongs to some object type; that is, it is an instance of some class.
- A class definition is like a template for objects: it specifies what attributes the objects have and what methods can operate on them.
- The
newoperator instantiates objects, that is, it creates new instances of a class. - The methods that operate on an object type are defined in the class for that object.
Here's a class called Time, intended to represent a moment in time. It has three attributes and no methods.
public class Time {
    private int hour;
    private int minute;
    private int second;
}
You can give a class any name you like. The Java convention is to use
The code should be in a file whose name matches the class e.g., the Time class should be in a file named Time.java.
When a class is public (e.g., the Time class in the above example) it can be used in other classes. But the private (e.g., the hour, minute and second attributes of the Time class) can only be accessed from inside the Time class.
Constructos
The syntax for
- The name of the constructor is the same as the name of the class.
- The keyword
staticis omitted. - Do not return anything. A constructor returns the created object by default.
When you invoke new, Java creates the object and calls your constructor to initialize the instance variables. When the constructor is done, new returns a reference to the new object.
Here is an example constructor for the Time class:
public Time() {
    hour = 0;
    minute = 0;
    second = 0;
}
This constructor does not take any arguments. Each line initializes an instance variable to zero (which in this example means midnight).
Now you can create Time objects.
Time time = new Time();
Like other methods, constructors can be overloaded, which means you can provide multiple constructors with different parameters.
You can add another constructor to the Time class to allow creating Time objects that are initialized to a specific time:
public Time(int h, int m, int s) {
    hour = h;
    minute = m;
    second = s;
}
Here's how you can invoke the new constructor:
Time justBeforeMidnight = new Time(11, 59, 59);
this keyword
The this keyword is a reference variable in Java that refers to the current object. You can use this the same way you use the name of any other object. For example, you can read and write the instance variables of this, and you can pass this as an argument to other methods. But you do not declare this, and you can’t make an assignment to it.
In the following version of the constructor, the names and types of the parameters are the same as the instance variables (parameters don’t have to use the same names, but that’s a common style). As a result, the parameters shadow (or hide) the instance variables, so the keyword this is necessary to tell them apart.
public Time(int hour, int minute, int second) {
    this.hour = hour;
    this.minute = minute;
    this.second = second;
}
this can be used to refer to a constructor of a class within the same class too.
In this example the constructor Time() uses the this keyword to call its own overloaded constructor Time(int, int, int)
public Time() {
    this(0, 0, 0); // call the overloaded constructor
}

public Time(int hour, int minute, int second) {
    // ...
}
Instance methods
You can add methods to a class which can then be used from the objects of that class. These instance methods do not have the static keyword in the method signature. Instance methods can access attributes of the class.
Here's how you can add a method to the Time class to get the number of seconds passed till midnight.
public int secondsSinceMidnight() {
    return hour*60*60 + minute*60 + second;
}
Here's how you can use that method.
Time t = new Time(0, 2, 5);
System.out.println(t.secondsSinceMidnight() + " seconds since midnight!");
Define a Circle class so that the code given below produces the given output. The nature of the class is a follows:
- Attributes(all
private):int x,int y: represents the location of the circledouble radius: the radius of the circle
- Constructors:
Circle(): initializesx,y,radiusto 0Circle(int x, int y, double radius): initializes the attributes to the given values
- Methods:
getArea():int
Returns the area of the circle as anintvalue (notdouble). Calculated as 2xPIx(radius)2
💡 You can convert todoubleto anintusing(int)e.g.,x = (int)2.25givesxthe value2.
💡 You can useMath.PIto get the value of Pi
💡 You can useMath.pow()to raise a number to a specific power e.g.,Math.pow(3, 2)calculates 32
public class Main {
    public static void main(String[] args) {
        Circle c = new Circle();

        System.out.println(c.getArea());
        c = new Circle(1, 2, 5);
        System.out.println(c.getArea());

    }
}
0
78
- Put the
Circleclass in a file calledCircle.java
Partial solution:
public class Circle {
    private int x;
    // ...

    public Circle(){
        this(0, 0, 0);
    }

    public Circle(int x, int y, double radius){
        this.x = x;
        // ...
    }

    public int getArea(){
        double area = Math.PI * Math.pow(radius, 2);
        return (int)area;
    }

}
Can define getters and setters
As the instance variables of Time are private, you can access them from within the Time class only. To compensate, you can provide methods to access attributes:
public int getHour() {
    return hour;
}

public int getMinute() {
    return minute;
}

public int getSecond() {
    return second;
}
Methods like these are formally called “accessors”, but more commonly referred to as getters. By convention, the method that gets a variable named something is called getSomething.
Similarly, you can provide setter methods to modify attributes of a Time object:
public void setHour(int hour) {
    this.hour = hour;
}

public void setMinute(int minute) {
    this.minute = minute;
}

public void setSecond(int second) {
    this.second = second;
}
Consider the Circle class below:
public class Circle {
    private int x;
    private int y;
    private double radius;

    public Circle(){
        this(0, 0, 0);
    }

    public Circle(int x, int y, double radius){
        this.x = x;
        this.y = y;
        this.radius = radius;
    }

    public int getArea(){
        double area = Math.PI * Math.pow(radius, 2);
        return (int)area;
    }

}
Update it as follows so that code given below produces the given output.
- Add getter/setter methods for all three attributes
- Update the setters and constructors such that if the radius supplied is negative, the code automatically set the radius to 0 instead.
public class Main {
    public static void main(String[] args) {
        Circle c = new Circle(1,2, 5);

        c.setX(4);
        c.setY(5);
        c.setRadius(6);
        System.out.println("x      : " + c.getX());
        System.out.println("y      : " + c.getY());
        System.out.println("radius : " + c.getRadius());
        System.out.println("area   : " + c.getArea());

        c.setRadius(-5);
        System.out.println("radius : " + c.getRadius());
        c = new Circle(1, 1, -4);
        System.out.println("radius : " + c.getRadius());

    }
}
x      : 4
y      : 5
radius : 6.0
area   : 113
radius : 0.0
radius : 0.0
Partial solution:
public Circle(int x, int y, double radius){
    setX(x);
    setY(y);
    setRadius(radius);
}

public void setRadius(double radius) {
    this.radius = Math.max(radius, 0);
}
Can explain class-level members
While all objects of a class has the same attributes, each object has its own copy of the attribute value.
All Person objects have the Name attribute but the value of that attribute varies between Person objects.
However, some attributes are not suitable to be maintained by individual objects. Instead, they should be maintained centrally, shared by all objects of the class. They are like ‘global variables’ but attached to a specific class. Such variables whose value is shared by all instances of a class are called class-level attributes.
The attribute totalPersons should be maintained centrally and shared by all Person objects rather than copied at each Person object.
Similarly, when a normal method is being called, a message is being sent to the receiving object and the result may depend on the receiving object.
Sending the getName() message to Adam object results in the response "Adam" while sending the same message to the Beth object gets the response "Beth".
However, there can be methods related to a specific class but not suitable for sending message to a specific object of that class. Such methods that are called using the class instead of a specific instance are called class-level methods.
The method getTotalPersons() is not suitable to send to a specific Person object because a specific object of the Person class should not know about the total number of Person objects.
Class-level attributes and methods are collectively called class-level members (also called static members sometimes because some programming languages use the keyword static to identify class-level members). They are to be accessed using the class name rather than an instance of the class.
Which of these are suitable as class-level variables?
- a. system: multi-player Pac Man game, Class:
Player, variable:totalScore - b. system: eLearning system, class:
Course, variable:totalStudents - c. system: ToDo manager, class:
Task, variable:totalPendingTasks - d. system: any, class:
ArrayList, variable:total(i.e., total items in a givenArrayListobject)
(c)
Explanation: totalPendingTasks should not be managed by individual Task objects and therefore suitable to be maintained as a class-level variable. The other variables should be managed at instance level as their value varies from instance to instance. e.g., totalStudents for one Course object will differ from totalStudents of another.
Can use class-level members
The content below is an extract from -- Java Tutorial, with slight adaptations.
When a number of objects are created from the same class blueprint, they each have their own distinct copies of instance variables. In the case of a Bicycle class, the instance variables are gear, and speed. Each Bicycle object has its own values for these variables, stored in different memory locations.
Sometimes, you want to have variables that are common to all objects. This is accomplished with the static modifier. Fields that have the static modifier in their declaration are called static fields or class variables. They are associated with the class, rather than with any object. Every instance of the class shares a class variable, which is in one fixed location in memory. Any object can change the value of a class variable, but class variables can also be manipulated without creating an instance of the class.
Suppose you want to create a number of Bicycle objects and assign each a serial number, beginning with 1 for the first object. This ID number is unique to each object and is therefore an instance variable. At the same time, you need a field to keep track of how many Bicycle objects have been created so that you know what ID to assign to the next one. Such a field is not related to any individual object, but to the class as a whole. For this you need a class variable, numberOfBicycles, as follows:
public class Bicycle {

    private int gear;
    private int speed;

    // an instance variable for the object ID
    private int id;

    // a class variable for the number of Bicycle objects instantiated
    private static int numberOfBicycles = 0;
        ...
}
Class variables are referenced by the class name itself, as in Bicycle.numberOfBicycles This makes it clear that they are class variables.
The Java programming language supports static methods as well as static variables. Static methods, which have the static modifier in their declarations, should be invoked with the class name, without the need for creating an instance of the class, as in ClassName.methodName(args)
The static modifier, in combination with the final modifier, is also used to define constants. The final modifier indicates that the value of this field cannot change.For example, the following variable declaration defines a constant named PI, whose value is an approximation of pi (the ratio of the circumference of a circle to its diameter):
static final double PI = 3.141592653589793;
Here is an example with class-level variables and class-level methods:
public class Bicycle {

    private int gear;
    private int speed;

    private int id;

    private static int numberOfBicycles = 0;


    public Bicycle(int startSpeed, int startGear) {
        gear = startGear;
        speed = startSpeed;

        numberOfBicycles++;
        id = numberOfBicycles;
    }

    public int getID() {
        return id;
    }

    public static int getNumberOfBicycles() {
        return numberOfBicycles;
    }

    public int getGear(){
        return gear;
    }

    public void setGear(int newValue) {
        gear = newValue;
    }

    public int getSpeed() {
        return speed;
    }

    // ...

}
💡 Explanation of System.out.println(...):
outis a class-level public attribute of theSystemclass.printlnis a instance level method of theoutobject.
Consider the Circle class below:
public class Circle {
    private int x;
    private int y;
    private double radius;

    public Circle(){
        this(0, 0, 0);
    }

    public Circle(int x, int y, double radius){
        setX(x);
        setY(y);
        setRadius(radius);
    }

    public int getX() {
        return x;
    }

    public void setX(int x) {
        this.x = x;
    }

    public int getY() {
        return y;
    }

    public void setY(int y) {
        this.y = y;
    }

    public double getRadius() {
        return radius;
    }

    public void setRadius(double radius) {
        this.radius = Math.max(radius, 0);
    }

    public int getArea(){
        double area = Math.PI * Math.pow(radius, 2);
        return (int)area;
    }
}
Update it as follows so that code given below produces the given output.
- Add a class-level
getMaxRadiusmethod that returns the maximum radius that has been used in allCircleobjects created thus far.
public class Main {
    public static void main(String[] args) {
        Circle c = new Circle();
        System.out.println("max radius used so far : " + Circle.getMaxRadius());
        c = new Circle(0, 0, 10);
        System.out.println("max radius used so far : " + Circle.getMaxRadius());
        c = new Circle(0, 0, -15);
        System.out.println("max radius used so far : " + Circle.getMaxRadius());
        c.setRadius(12);
        System.out.println("max radius used so far : " + Circle.getMaxRadius());
    }
}
max radius used so far : 0.0
max radius used so far : 10.0
max radius used so far : 10.0
max radius used so far : 12.0
You can use a static variable maxRadius to track the maximum value used for the radius attribute so far.
Partial solution:
public void setRadius(double radius) {
    this.radius = Math.max(radius, 0);
    if (maxRadius < this.radius){
        // ...
    }
}
Can explain the meaning of enumerations
An Enumeration is a fixed set of values that can be considered as a data type. An enumeration is often useful when using a regular data type such as int or String would allow invalid values to be assigned to a variable. You are recommended to enumeration types any time you need to represent a fixed set of constants.
Suppose you want a variable to store the priority of something. There are only three priority levels: high, medium, and low. You can declare the variable as of type int and use only values 2, 1, and 0 to indication the three priority levels. However, this opens the possibility of an invalid values such as 9 to be assigned to it. But if you define an enumeration type called Priority that has three values HIGH, MEDIUM, LOW only, a variable of type Priority will never be assigned an invalid value because the compiler is able to catch such an error.
Priority: HIGH, MEDIUM, LOW
Can use Java enumerations
You can define an enum type by using the enum keyword. Because they are constants, the names of an enum type's fields are in uppercase letters e.g., FLAG_SUCCESS.
Defining an enumeration to represent days of a week (code to be put in the Day.java file):
public enum Day {
    SUNDAY, MONDAY, TUESDAY, WEDNESDAY,
    THURSDAY, FRIDAY, SATURDAY
}
Some examples of using the Day enumeration defined above:
Day today = Day.MONDAY;
Day[] holidays = new Day[]{Day.SATURDAY, Day.SUNDAY};

switch (today) {
case SATURDAY:
case SUNDAY:
    System.out.println("It's the weekend");
    break;
default:
    System.out.println("It's a week day");
}
Note that while enumerations are usually a simple set of fixed values, Java enumerations can have behaviors too, as explained in this tutorial from -- Java Tutorial
Define an enumeration named Priority. Add the missing describe method to the code below so that it produces the output given.
public class Main {

    // Add your method here

    public static void main(String[] args) {
        describe("Red", Priority.HIGH);
        describe("Orange", Priority.MEDIUM);
        describe("Blue", Priority.MEDIUM);
        describe("Green", Priority.LOW);
    }
}
Red indicates high priority
Orange indicates medium priority
Blue indicates medium priority
Green indicates low priority
Use a switch statement to select between possible values for Priority.
    public static void describe(String color, Priority p) {
        switch (p) {
            case LOW:
                System.out.println(color + " indicates low priority");
                break;
            // ...
        }
    }
Code for the enumeration is given below:
public enum Priority {
    HIGH, MEDIUM, LOW
}
Tutorial selection and seating arrangement
- CS2113 students: As you don't have a confirmed tutorial yet, attend any CS2113 session that is convenient.
- CS2113T students: Attend the tutorial pre-allocated to you.
- Team forming will be done in the following week. You are free to sit with anyone this week.
Show evidence of learning the topics assigned for the week
-
Starting with topics at level, share/discuss/demo evidence of (as directed by the tutor) weekly topics.
-
Suggested minimal achievements for the tutorial:
- Set up AddressBook-level1 in IntelliJ
- Use the IDE to navigate code efficiently
- Set up a local repo and do some commits
Policy on tech help
Do not expect your tutor to code or debug for you. We strongly discourage tutors from giving technical help directly to their own teams because we want to train you in troubleshooting tech problems yourselves. Allowing direct tech help from tutors transfers the troubleshooting responsibility to tutors.
It is ok to ask for help from classmates even for assignments, even from other teams, as long as you don't copy from others and submit as your own. It doesn't matter who is helping you as long as you are learning from it.
We encourage you to give tech help to each other, but do it in a way that the other person learns from it.
Related: [Admin: Appendix D: Getting Help]

Learning Management System: This module website is the main source of information for the module. In addition, we use LumiNUS for lecture webcasts and for admin matters (e.g., announcements, file submissions, grade book, ...).
Collaboration platform: You are required to use GitHub as the hosting and collaboration platform of your project (i.e., to hold the Code repository, Issue Tracker, etc.). See Appendix E for more info on how to setup and use GitHub for your project.
Communication: Keeping a record of communications among your team can help you, and us, in many ways. We encourage you to do at least some of the project communication in written medium (e.g., GitHub Issue Tracker) to practice how to communicate technical things in written form.
- Instead of the LumiNUS forum, we encourage you to post your questions/suggestions in this github/nusCS2113-AY1819S2/forum.
- You can use our slack channel https://nus-cs2113-ay1819s2.slack.com for team communications. You need to join the slack channel (you'll need to use an email address ending in
@nus.edu.sg,@comp.nus.edu.sgor@u.nus.edu) to start using this channel). - Note that slack is useful for quick chats while issue tracker is useful for longer-running conversations.
- You are encouraged to use channels with a wider audience (i.e., the GitHub issue tracker) for module-related communication as much as possible, rather than private channels such as private slack/FB messages or direct emails. Rationale: more classmates can benefit from the discussions.
IDE: You are recommended to use Intellij IDEA for module-related programming work. You may use the community edition (free) or the ultimate edition (free for students). While the use of Intellij is not compulsory, note that module materials are optimized for Intellij. Use other IDEs at your own risk.
Revision control: You are required to use Git. Other revision control software are not allowed.
The recommended GUI client for Git is SourceTree (which comes bundled with Git), but you may use any other, or none.
Analyzing code authorship: We use a custom-built tool called RepoSense for extracting code written by each person.
In previous semesters we asked students to annotate all their code using special @@author tags so that we can extract each student's code for grading. This semester, we are trying out a tool called RepoSense that is expected to reduce the need for such tagging, and also make it easier for you to see (and learn from) code written by others.
1. View the current status of code authorship data:
- The report generated by the tool is available at Project Code Dashboard. The feature that is most relevant to you is the Code Panel (shown on the right side of the screenshot above). It shows the code attributed to a given author. You are welcome to play around with the other features (they are still under development and will not be used for grading this semester).
- Click on your name to load the code attributed to you (based on Git blame/log data) onto the code panel on the right.
- If the code shown roughly matches the code you wrote, all is fine and there is nothing for you to do.
2. If the code does not match:
-
Here are the possible reasons for the code shown not to match the code you wrote:
- the git username in some of your commits does not match your GitHub username (perhaps you missed our instructions to set your Git username to match GitHub username earlier in the project, or GitHub did not honor your Git username for some reason)
- the actual authorship does not match the authorship determined by git blame/log e.g., another student touched your code after you wrote it, and Git log attributed the code to that student instead
-
In those cases,
- Install RepoSense (see the Getting Started section of the RepoSense User Guide)
- Use the two methods described in the RepoSense User Guide section Configuring a Repo to Provide Additional Data to RepoSense to provide additional data to the authorship analysis to make it more accurate.
- If you add a
config.jsonfile to your repo (as specified by one of the two methods),- Please use the template json file given in the module website so that your display name matches the name we expect it to be.
- If your commits have multiple author names, specify all of them e.g.,
"authorNames": ["theMyth", "theLegend", "theGary"] - Update the line
config.jsonin the.gitignorefile of your repo as/config.jsonso that it ignores theconfig.jsonproduced by the app but not the_reposense/config.json.
- If you add
@@authorannotations, please follow the guidelines below:
Adding @@author tags indicate authorship
-
Mark your code with a
//@@author {yourGithubUsername}. Note the double@.
The//@@authortag should indicates the beginning of the code you wrote. The code up to the next//@@authortag or the end of the file (whichever comes first) will be considered as was written by that author. Here is a sample code file://@@author johndoe method 1 ... method 2 ... //@@author sarahkhoo method 3 ... //@@author johndoe method 4 ... -
If you don't know who wrote the code segment below yours, you may put an empty
//@@author(i.e. no GitHub username) to indicate the end of the code segment you wrote. The author of code below yours can add the GitHub username to the empty tag later. Here is a sample code with an emptyauthortag:method 0 ... //@@author johndoe method 1 ... method 2 ... //@@author method 3 ... method 4 ... -
The author tag syntax varies based on file type e.g. for java, css, fxml. Use the corresponding comment syntax for non-Java files.
Here is an example code from an xml/fxml file.<!-- @@author sereneWong --> <textbox> <label>...</label> <input>...</input> </textbox> ... -
Do not put the
//@@authorinside java header comments.
👎/** * Returns true if ... * @@author johndoe */👍
//@@author johndoe
/**
  * Returns true if ...
  */
What to and what not to annotate
-
Annotate both functional and test code There is no need to annotate documentation files.
-
Annotate only significant size code blocks that can be reviewed on its own e.g., a class, a sequence of methods, a method.
Claiming credit for code blocks smaller than a method is discouraged but allowed. If you do, do it sparingly and only claim meaningful blocks of code such as a block of statements, a loop, or an if-else statement.- If an enhancement required you to do tiny changes in many places, there is no need to annotate all those tiny changes; you can describe those changes in the Project Portfolio page instead.
- If a code block was touched by more than one person, either let the person who wrote most of it (e.g. more than 80%) take credit for the entire block, or leave it as 'unclaimed' (i.e., no author tags).
- Related to the above point, if you claim a code block as your own, more than 80% of the code in that block should have been written by yourself. For example, no more than 20% of it can be code you reused from somewhere.
- 💡 GitHub has a blame feature and a history feature that can help you determine who wrote a piece of code.
-
Do not try to boost the quantity of your contribution using unethical means such as duplicating the same code in multiple places. In particular, do not copy-paste test cases to create redundant tests. Even repetitive code blocks within test methods should be extracted out as utility methods to reduce code duplication. Individual members are responsible for making sure code attributed to them are correct. If you notice a team member claiming credit for code that he/she did not write or use other questionable tactics, you can email us (after the final submission) to let us know.
-
If you wrote a significant amount of code that was not used in the final product,
- Create a folder called
{project root}/unused - Move unused files (or copies of files containing unused code) to that folder
- use
//@@author {yourGithubUsername}-unusedto mark unused code in those files (note the suffixunused) e.g.
//@@author johndoe-unused
method 1 ...
method 2 ...
Please put a comment in the code to explain why it was not used.
- Create a folder called
-
If you reused code from elsewhere, mark such code as
//@@author {yourGithubUsername}-reused(note the suffixreused) e.g.//@@author johndoe-reused method 1 ... method 2 ... -
You can use empty
@@authortags to mark code as not yours when RepoSense attribute the to you incorrectly.-
Code generated by the IDE/framework, should not be annotated as your own.
-
Code you modified in minor ways e.g. adding a parameter. These should not be claimed as yours but you can mention these additional contributions in the Project Portfolio page if you want to claim credit for them.
-
- After you are satisfied with the new results (i.e., results produced by running RepoSense locally), push the
config.jsonfile you added and/or the annotated code to your repo. We'll use that information the next time we run RepoSense (we run it at least once a week). - If you choose to annotate code, please annotate code chunks not smaller than a method. We do not grade code snippets smaller than a method.
- If you encounter any problem when doing the above or if you have questions, please post in the forum.
We recommend you ensure your code is RepoSense-compatible by v1.3
The high-level learning outcome of the project (and to a large degree, the entire module):
Accordingly, the module project is structured to resemble an intermediate stage of a non-trivial real-life software project. In this project you will,
- conceptualize and implement enhancements to a given product, and,
- have it ready to be continued by future developers.
In this semester, we are going to enhance an AddressBook application.

This product is meant for users who can type fast, and prefer typing over mouse/voice commands. Therefore, Command Line Interface (CLI) is the primary mode of input.
Relevant: [
- Recommendation-CLI-First: As per Constraint-Typing-Preferred, the input to the app needs to be primarily CLI. The GUI can be used to give visual feedback to the user rather than to collect input. While we don't prohibit non-CLI inputs, note that such inputs will reduce the suitability of the product to target users, which will be graded under the product design criterion.
Some suggestions:- Give keyboard alternatives to mouse/GUI inputs, if any.
- Regular typing is usually faster than using key combinations. Design the app in a way that you can do stuff faster by typing compared to mouse actions or key combinations.
-
One-shot commands are faster overmulti-step commands . If you provide a multi-step command to help new users, you can also provide a one-shot equivalent for regular/expert users. Reason: We want the user to be able to accomplish tasks faster using CLI than a GUI; having to enter commands part-by-part will slow down the user.
project expectations
Project Direction
-
[Direction 1] Optimize AddressBook for a more specific target user group:
An AddressBook,
- for users in a specific profession e.g. doctors, salesmen, teachers, etc.
- based on the nature/scale of contacts e.g. huge number of contacts (for HR admins, user group admins), mostly incomplete contacts, highly volatile contact details, contacts become inactive after a specific period (e.g. contract employees)
- based on what users do with the contacts e.g. organize group events, share info, do business, do analytics
-
[Direction 2] Morph AddressBook into a different product: Given that AddressBook is a generic app that manages a type of elements (i.e. contacts), you can use it as a starting point to create an app that manages something else.
This is a high-risk high-reward option because morphing requires extra work but a morphed product may earn more marks than an optimized product of similar complexity.An app to manage,
- Bookmarks of websites
- Tasks/Schedule
- Location info
- Thing to memorize i.e. flash cards, trivia
- Forum posts, news feeds, Social media feeds
- Online projects or issue trackers that the user is interested in
- Emails, possibly from different accounts
- Multiple types of related things e.g. Contacts and Tasks (if Tasks are allocated to Contacts)
For either direction, you need to define a target user profile and a value proposition:
-
Target user profile: Define a very specific target user profile.
💡 We require you to narrow down the target user profile as opposed to trying to make it as general as possible. Here is an example direction of narrowing down target user: anybody → teachers → university teachers → tech savvy university teachers → CS2113/T instructors.
Be careful not to contradict given project constraints when defining the user profile e.g. the target user should still prefer typing over mouse actions.
It is expected that your product will be optimized for the chosen target users i.e., add features that are especially/only applicable for target users (to make the app especially attractive to them). w.r.t. the example above, there can be features that are applicable to CS2113/T instructors only, such as the ability to navigate to a student's project on GitHub
💡 Your project will be graded based on how well the features match the target user profile and how well the features fit-together.- It is an opportunity to exercise your product design skills because optimizing the product to a very specific target user requires good product design skills.
- It minimizes the overlap between features of different teams which can cause plagiarism issues. Furthermore, higher the number of other teams having the same features, less impressive your work becomes especially if others have done a better job of implementing that feature.
- Value proposition: Define a clear value proposition (what problem does the product solve? how does it make the the user's life easier?) that matches the target user profile.
Individual Expectations
[Individual] Expectations on Features
- You are expected to add at least one feature to the product.
- One big feature can earn you more marks than multiple small features. Reason: When grading your work for depth and completeness, only your biggest feature you will be considered.
- At lest one feature should be end-user visible and end-user testable. Reason: If your feature cannot be identified and tested by the testers, we will not be able to give marks for the quality assurance of that feature.
- The features should fit with the rest of the software (and the target user profile) and should have the consent of the team members. You will lose marks if you go 'rogue' and add features that don't fit with the product.
- Add a new feature
- Enhance an existing features in a major way e.g. make the command syntax more user friendly and closer to natural language
- A major redesign of the GUI e.g. make it work like a chat application (note: chat is a form of CLI)
- Integrate with online services e.g. Google contacts, Facebook, GitHub, etc.
Here are some examples of different enhancements and the grade the student is likely to earn for the relevant parts of the project grade.
- Example 1 (Expected grade:
A) : Add support for undo/redo - Example 2 (Expected grade:
B) : Add support for viewing history
- Although we prefer one big feature over multiple small features, it is fine to do small features at first to build up confidence before you start a big feature.
Here is a non-exhaustive list of minor enhancements:
- Support more fields e.g. Birthday
- Load a different page instead of the default Google search page e.g. Google Maps page or Twitter page
- Multiple panels e.g. an additional panel to show recently accessed items
- Marking some items as favorites
- Ability to search by labels
- Ability to specify colors for labels
- Support different themes for the Look & Feel dark, light, etc.
- Sort items
We strongly recommend that you contribute to multiple (preferably, all) aspects of the project e.g. write backend code, frontend code, test code, user documentation, and developer documentation. If you limit yourself to certain aspects only, you will lose marks allocated for the aspects you did not do.
In particular, you are required to divide work based on features rather than components:
- By the
end of this project each team member is expected to have implemented at least one feature end-to-end, doing required changes in almost all components. Reason: to encourage you to learn all components of the software, instead of limiting yourself to just one/few components. - Nevertheless, you are still expected to divide the components of the product among team members so that each team member is in charge of one or more components. While others will be modifying those components as necessary for the features they are implementing, your role as the in charge of a component is to guide others modifying that component (reason: you are supposed to be the most knowledgeable about that component) and protect that component from degrading e.g., you can review others' changes to your component and suggest possible changes.
[Individual] Expectations on Code
- Based on past experience, it is possible for a feature consisting of ~300-500 LoC of code to earn full marks provided the feature does well in all grading criteria.
[Individual] Expectations on Documentation
- You are expected to write user documentation and developer documentation for your features.
- The objective is to showcase your ability to write the two types of documentation. If the documentation for your features is not enough to meet that objective, or does not reach the following minimal requirement, you can make up the shortfall by documenting 'proposed' features and alternative designs/implementations.
- Contribution to the user guide: 1 page
- Contribution to the developer guide: 3 pages
- You are expected to showcase your ability to use the various UML diagrams (at least 2 types). As mentioned in the previous point, if the documentation of your features doesn't give you enough opportunities to do so e.g., your features only required minor updates to existing diagrams, you are expected to create those opportunities yourself by documenting proposed features or alternative designs. Evaluators will not be able to give you marks unless there is sufficient evidence of your documentation skills.
- You are recommended to, but not required to, update all existing AB-4 documentation to match your product. However, all diagrams that are included in the part of documentation claimed as done by you should be updated to match the current product.
[Individual] Expectations on Testing
- There is no requirement for a minimum coverage level. Note that in a production environment you are often required to have at least 90% of the code covered by tests. In this project, it can be less. The less coverage you have, the higher the risk of regression bugs, which will cost marks if not fixed before the final submission.
- You must write some tests so that we can evaluate your ability to write tests.
- How much of each type of testing should you do? We expect you to decide. You learned different types of testing and what they try to achieve. Based on that, you should decide how much of each type is required. Similarly, you can decide to what extent you want to automate tests, depending on the benefits and the effort required.
[Individual] Expectations on Teamwork
Team-tasks are the tasks that someone in the team has to do. Marks allocated to team-tasks will be divided among team members based on how much each member contributed to those tasks.
Here is a non-exhaustive list of team-tasks:
- Necessary general code enhancements e.g.,
- Work related to renaming the product
- Work related to changing the product icon
- Morphing the product into a different product
- Setting up the GitHub, Travis, AppVeyor, etc.
- Maintaining the issue tracker
- Release management
- Updating user/developer docs that are not specific to a feature e.g. documenting the target user profile
- Incorporating more useful tools/libraries/frameworks into the product or the project workflow (e.g. automate more aspects of the project workflow using a GitHub plugin)
Roles indicate aspects you are in charge of and responsible for. E.g., if you are in charge of documentation, you are the person who should allocate which parts of the documentation is to be done by who, ensure the document is in right format, ensure consistency etc.
This is a non-exhaustive list; you may define additional roles.
- Team lead: Responsible for overall project coordination.
- Documentation (short for ‘in charge of documentation’): Responsible for the quality of various project documents.
- Testing: Ensures the testing of the project is done properly and on time.
- Code quality: Looks after code quality, ensures adherence to coding standards, etc.
- Deliverables and deadlines: Ensure project deliverables are done on time and in the right format.
- Integration: In charge of versioning of the code, maintaining the code repository, integrating various parts of the software to create a whole.
- Scheduling and tracking: In charge of defining, assigning, and tracking project tasks.
- [Tool ABC] expert: e.g. Intellij expert, Git expert, etc. Helps other team member with matters related to the specific tool.
- In charge of[Component XYZ]: e.g. In charge of
Model,UI,Storage, etc. If you are in charge of a component, you are expected to know that component well, and review changes done to that component in v1.3-v1.4.
Please make sure each of the important roles are assigned to one person in the team. It is OK to have a 'backup' for each role, but for each aspect there should be one person who is unequivocally the person responsible for it.
Team Expectations
- Preserve product integrity: i.e. ensure,
- features fit together to form a cohesive product,
- documentation follows a consistent style and presents a cohesive picture to the reader, and
- final project demo presents a cohesive picture to the audience.
- Maintain product quality: i.e. prevent breaking other parts of the product as it evolves. Note that bugs local to a specific feature will be counted against the author of that feature. However, if a new enhancement breaks the entire product, the whole team will have to share the penalty.
- Manage the project smoothly: i.e. ensure workflow, code maintenance, integration, releases, etc. are done smoothly.
Your project should comply with the following constraints. Reason: to increase comparability among projects and to maximize applicability of module learning outcomes in the project.
-
Constraint-Brownfield: The final product should be a result of evolving/enhancing/morphing the given code base. However, you are allowed to replace all existing code with new code, as long as it is done incrementally. e.g. one feature/component at a time
Reason: To ensure your code has a decent quality level from the start. -
Constraint-Typing-Preferred: The product should be targeting users who can type fast and prefer typing over other means of input.
Reason: to increase comparability of products, and to make feature evaluation easier for peer evaluators. -
Constraint-Single-User: The product should be for a single user i.e. (not a multi-user product).
Reason: multi-user systems are hard to test, which is unfair for peer testers who will be graded based on the number of bugs they find. Furthermore, the _Constraint-Typing-Preferred unlikely to fit a multi-user product -
Constraint-Incremental: The product needs to be developed incrementally over the project duration. While it is fine to do less in some weeks and more in other weeks, a reasonably consistent delivery rate is expected. For example, it is not acceptable to do the entire project over the recess week and do almost nothing for the remainder of the semester. Reasons: 1. To simulate a real project where you have to work on a code base over a long period, possibly with breaks in the middle. 2. To learn how to deliver big features in small increments.
-
Constraint-Human-Editable-File: The data should be stored locally and should be in a human editable text file.
Reason: To allow advanced users to manipulate the data by editing the data file. -
Constraint-No-DBMS: Do not use a
DBMS to store data.
Reason: Using a DBMS to store data will reduce the room to apply OOP techniques to manage data. It is true that most real world systems use a DBMS, but given the small size of this project, we need to optimize it for CS2113/T module learning outcomes; covering DBMS-related topics will have to be left to database modules or level 3 project modules. -
Constraint-OO: The software should follow the Object-oriented paradigm.
Reason: For you to practice using OOP in a non-trivial project. -
Constraint-Platform-Independent: The software should work on the Windows, Linux, and OS-X platforms. Even if you are unable to manually test the app on all three platforms, consciously avoid using OS-dependent libraries and OS-specific features.
Reason: Peer testers should be able to use any of these platforms. -
Constraint-Portable: The software should work without requiring an installer. Reason: We do not want to install all your projects on our testing machines when we test them for grading.
-
Constraint-No-Remote-Server: The software should not depend on your own remote server. Reason: Anyone should be able to use/test your app any time, even after the semester is over.
-
Constraint-External-Software: The use of third-party frameworks/libraries is allowed but only if they,
- are free, open-source, and have permissive license terms (E.g., trial version of libraries that require purchase after N days are not allowed).
- do not require any installation by the user of your software.
- do not violate other constraints.
and is subjected to prior approval by the teaching team.
Reason: We will not allow third-party software that can interfere with the learning objectives of the module.Please post in the forum your request to use a third-party libraries before you start using the library. Once a specific library has been approved for one team, other teams may use it without requesting permission again.
Reason: The whole class should know which external software are used by others so that they can do the same if they wish to.
In addition, you are strongly encouraged to follow these recommendations as they can help increase your project score.
-
Recommendation-Security-Features: It is OK to use security features like login, provided you think through the solution completely e.g., having a login functionality to secure the application, but saving the password in clear text is no good, and can cost you marks in "Quality of feature(s)".
-
Recommendation-Minimal-Network: It is OK to use a reliable public API e.g., Google search but we recommend that you have a fallback mechanism (e.g., able to load data using a data file if the network is down). Reason: During the mass peer-testing session the network access can be intermittent due to high load. If your feature cannot be tested due to lack of Internet, that will have to be counted as a major bug, to be fair to those whose app is being tested and bugs found being penalized.
If you use NUS data (e.g., scrape data from an NUS website), please work with NUS IT directly to get their approval first. Even well-intentioned use of NUS data without approval can get you into serious trouble (has happened before). The teaching team will not be able to get approval for you as the use of NUS data is not a module requirement. -
Recommendation-Testability: Avoid implementing hard-to-test (both for manual testing as well as automated testing) features or features that make your product hard-to-test. Reason: testability is a grading criterion. If you choose to implement such a feature, you will need to spend an extra effort to reach an acceptable level of testability. Here are some examples of features that are hard-to-test:
- Features that depend heavily on remote APIs: Those APIs can block your access if they mistake your automated tests as a bot attack. Some remote APIs require setting up accounts, keys, login etc, that will irritate the testers of your product and give a low rating to the testability of your work.
- Audio-related features: The peer testing of your product is done under exam conditions where it is not appropriate to play audio.
- Recommendation-CLI-First: As per Constraint-Typing-Preferred, the input to the app needs to be primarily CLI. The GUI can be used to give visual feedback to the user rather than to collect input. While we don't prohibit non-CLI inputs, note that such inputs will reduce the suitability of the product to target users, which will be graded under the product design criterion.
Some suggestions:- Give keyboard alternatives to mouse/GUI inputs, if any.
- Regular typing is usually faster than using key combinations. Design the app in a way that you can do stuff faster by typing compared to mouse actions or key combinations.
-
One-shot commands are faster overmulti-step commands . If you provide a multi-step command to help new users, you can also provide a one-shot equivalent for regular/expert users. Reason: We want the user to be able to accomplish tasks faster using CLI than a GUI; having to enter commands part-by-part will slow down the user.
If you are not sure if your product complies with a certain constraint/recommendation, please seek clarification by posting in the forum (preferred) or emailing the supervisor.

To expedite your project implementation, you will be given some sample code (AddressBook-Level1 to AddressBook-Level4, shown as AB1 to AB4 in the diagram above). You can use AB1 to AB3 to ramp up your tech skills in preparation for the project. AB4 is the version you will use as the starting point for your final project. Some of the work you do in AB1 to AB3 can be ported over to AB4 and can be used to claim credit in the final project.
Given below is the high-level timeline of the project.
| Week | Stage | Activities |
|---|---|---|
| 3 | inception | Decide on a overall project direction (user profile, problem addressed, societal impact, optimize or morph?). |
| 4 | mid-v1.0 | Decide on requirements (user stories, use cases, non-functional requirements). |
| 5 | v1.0 | Conceptualize product and document it as a user guide(draft), draft a rough project plan. |
| 6 | mid-v1.1 | Set up project repo, start moving UG and DG to the repo, attempt to do local-impact changes to the code base. |
| 7 | v1.1 | Update UG and DG in the repo, attempt to do global-impact changes to the code base. |
| 8 | mid-v1.2 | Adjust project schedule/rigor as needed, start proper milestone management. |
| 9 | v1.2 | Move code towards v2.0 in small steps, start documenting design/implementation details in DG. |
| 10 | mid-v1.3 | Complete a draft of the DG and seek feedback from your tutor. Continue to enhance features. Make code RepoSense-compatible. Try doing a proper release. |
| 11 | v1.3 | Release as a jar file, release updated user guide, peer-test released products, verify code authorship. Seek code quality comments from your tutor |
| 12 | mid-v1.4 | Tweak as per peer-testing results, draft Project Portfolio Page, practice product demo. |
| 13 | v1.4 | Final tweaks to docs/product, release product, demo product, evaluate peer projects. |
More details of each stage is provided elsewhere is this website.
These are some of the main principles underlying the module structure.
The software product you build is a side effect only. You are the product of this module. This means,
- We may not take the most efficient route to building the software product. We take the route that allows you to learn the most.
- Building a software product that is unique, creative, and shiny is not our priority (although we try to do a bit of that too). Learning to take pride in, and discovering the joy of, high quality software engineering work is our priority.
Following from that, we evaluate you on not just how much you've done, but also, how well you've done those things. Here are some of the aspects in which we focus on:
|
We appreciate ... |
But we value more ... |
|
Ability to deal with low-level details |
Ability to abstract over details, generalize, see the big picture |
|
A drive to learn latest and greatest technologies |
Ability to make the best of given tools |
|
Ability to find problems that interest you and solve them |
Ability to solve the given problem to the best of your ability |
|
Ability to burn the midnight oil to meet a deadline |
Ability to schedule work so that the need for 'last minute heroics' is minimal |
|
Preference to do things you like or things you are good at |
Ability to buckle down and deliver on important things that you don't necessarily like or aren't good at |
|
Ability to deliver desired end results |
Ability to deliver in a way that shows how well you delivered (i.e. visibility of your work) |
We learn together, NOT compete against each other.
You are not in a competition. Our grading is not forced on a bell curve.
Learn from each other. That is why we open-source your submissions.
Teach each other, even those in other teams. Those who do it well can become tutors next time.
Continuously engage, NOT last minute heroics.
We want to train you to do software engineering in a steady and repeatable manner that does not require 'last minute heroics'.
In this module, last minute heroics will not earn you a good project grade, and last minute mugging will not earn you a good exam grade.
Where you reach at the end matters, NOT what you knew at the beginning.
When you start the module, some others in the class may appear to know a lot more than you. Don't let that worry you. The final grade depends on what you know at the end, not what you knew to begin with. All marks allocated to intermediate deliverables are within the reach of everyone in the class irrespective of their prior knowledge.
Why you force me to visit a separate website instead of using LumiNUS?

We have a separate website because some of the module information does not fit into the structure imposed by LumiNUS.
On a related note, keep in mind that 'hunting and gathering' of relevant information is one of the skills you need to survive 'in the wild'. Do not always expect all relevant materials to appear 'magically' in some kind of 'work bin'.
Why so much self-study?

Self-study is a critical survival skill in SE industry. Lectures will show you the way, but absorbing content is to be done at your own pace, by yourself. In this module, we still tell you what content to study and also pass most of the content to you. After you graduate, you have to decide what to study and find your own content too.