Week 5 [Feb 11]
- Complete the graded exercise
Project Preparation: 2 KLoC - Achieve
Project Milestone v1.0
[W5.1] Can use Generics in Java
Can explain Java Generics
Given below is an extract from the -- Java Tutorial, with some adaptations.
You can use polymorphism to write code that can work with multiple types, but that approach has some shortcomings.
Consider the following Box class. It can be used only for storing Integer objects.
public class BoxForIntegers {
    private Integer x;

    public void set(Integer x) {
        this.x = x;
    }
    public Integer get() {
        return x;
    }
}
To store String objects, another similar class is needed, resulting in the duplication of the entire class. As you can see, if you need to store many different types of objects, you could end up writing many similar classes.
public class BoxForString {
    private String x;

    public void set(String x) {
        this.x = x;
    }
    public String get() {
        return x;
    }
}
One solution for this problem is to use polymorphism i.e., write the Box class to store Object objects.
public class Box {
    private Object x;

    public void set(Object x) {
        this.x = x;
    }
    public Object get() {
        return x;
    }
}
The problem with this solution is, since its methods accept or return an Object, you are free to pass in whatever you want, provided that it is not one of the primitive types. There is no way to verify, at compile time, how the class is used. One part of the code may place an Integer in the box and expect to get Integers out of it, while another part of the code may mistakenly pass in a String, resulting in a runtime error.
Generics enable types (classes and interfaces) to be parameters when defining classes, interfaces and methods. Much like the more familiar formal parameters used in method declarations, type parameters provide a way for you to re-use the same code with different inputs. The difference is that the inputs to formal parameters are values, while the inputs to type parameters are types.
A generic Box class allows you to define what type of elements will be put in the Box. For example, you can instantiate a Box object to keep Integer elements so that any attempt to put a non-Integer object in that Box object will result in a compile error.
Can use Java Generics
This section includes extract from the -- Java Tutorial, with some adaptations.
The definition of a generic class includes a type parameter section, delimited by angle brackets (<>). It specifies the type parameters (also called type variables) T1, T2, ..., and Tn. A generic class is defined with the following format:
class name<T1, T2, ..., Tn> { /* ... */ }
Here is a generic Box class. The class declaration Box<T> introduces the type variable, T, which is also used inside the class to refer to the same type.
Using Object as the type:
public class Box {
    private Object x;

    public void set(Object x) {
        this.x = x;
    }

    public Object get() {
        return x;
    }
}
A generic Box using type parameter T:
public class Box<T> {
    private T x;

    public void set(T x) {
        this.x = x;
    }

    public T get() {
        return x;
    }
}
As you can see, all occurrences of Object are replaced by T.
To reference the generic Box class from within your code, you must perform a generic type invocation, which replaces T with some concrete value, such as Integer. It is similar to an ordinary method invocation, but instead of passing an argument to a method, you are passing a type argument enclosed within angle brackets — e.g., <Integer> or <String, Integer> — to the generic class itself. Note that in some cases you can omit the type parameter i.e., <> if the type parameter can be inferred from the context.
Using the generic Box class to store Integer objects:
Box<Integer> integerBox;
integerBox = new Box<>(); // type parameter omitted as it can be inferred
integerBox.set(Integer.valueOf(4));
Integer i = integerBox.get(); // returns an Integer
Box<Integer> integerBox;simply declares thatintegerBoxwill hold a reference to a "Box of Integer", which is howBox<Integer>is read.integerBox = new Box<>();instantiates aBox<Integer>class. Note the<>(an empty pair of angle brackets, also called the diamond operator) between the class name and the parenthesis.
The compiler is able to check for type errors when using generic code.
The code below will fail because it creates a Box<String> and then tries to pass Double objects into it.
Box<String> stringBox = new Box<>();
stringBox.set(Double.valueOf(5.0)); //compile error!
A generic class can have multiple type parameters.
The generic OrderedPair class, which implements the generic Pair interface:
public interface Pair<K, V> {
    public K getKey();
    public V getValue();
}
public class OrderedPair<K, V> implements Pair<K, V> {

    private K key;
    private V value;

    public OrderedPair(K key, V value) {
        this.key = key;
        this.value = value;
    }

    public K getKey()	{ return key; }
    public V getValue() { return value; }
}
The following statements create two instantiations of the OrderedPair class:
Pair<String, Integer> p1 = new OrderedPair<>("Even", 8);
Pair<String, String>  p2 = new OrderedPair<>("hello", "world");
The code, new OrderedPair<String, Integer>, instantiates K as a String and V as an Integer. Therefore, the parameter types of OrderedPair's constructor are String and Integer, respectively.
A type variable can be any non-primitive type you specify: any class type, any interface type, any array type, or even another type variable.
By convention, type parameter names are single, uppercase letters. The most commonly used type parameter names are:
E- Element (used extensively by the Java Collections Framework)K- KeyN- NumberT- TypeV- ValueS,U,Vetc. - 2nd, 3rd, 4th types
[W5.2] Can use Java Collections
Can explain the Collections framework
This section uses extracts from the -- Java Tutorial, with some adaptations.
A collection — sometimes called a container — is simply an object that groups multiple elements into a single unit. Collections are used to store, retrieve, manipulate, and communicate aggregate data.
Typically, collections represent data items that form a natural group, such as a poker hand (a collection of cards), a mail folder (a collection of letters), or a telephone directory (a mapping of names to phone numbers).
The collections framework is a unified architecture for representing and manipulating collections. It contains the following:
-
Interfaces: These are abstract data types that represent collections. Interfaces allow collections to be manipulated independently of the details of their representation.
Example: theList<E>interface can be used to manipulate list-like collections which may be implemented in different ways such asArrayList<E>orLinkedList<E>. -
Implementations: These are the concrete implementations of the collection interfaces. In essence, they are reusable data structures.
Example: theArrayList<E>class implements theList<E>interface while theHashMap<K, V>class implements theMap<K, V>interface. -
Algorithms: These are the methods that perform useful computations, such as searching and sorting, on objects that implement collection interfaces. The algorithms are said to be polymorphic: that is, the same method can be used on many different implementations of the appropriate collection interface.
Example: thesort(List<E>)method can sort a collection that implements theList<E>interface.
A well-known example of collections frameworks is the C++ Standard Template Library (STL). Although both are collections frameworks and the syntax look similar, note that there are important philosophical and implementation differences between the two.
The following list describes the core collection interfaces:
-
Collection— the root of the collection hierarchy. A collection represents a group of objects known as its elements. The Collection interface is the least common denominator that all collections implement and is used to pass collections around and to manipulate them when maximum generality is desired. Some types of collections allow duplicate elements, and others do not. Some are ordered and others are unordered. The Java platform doesn't provide any direct implementations of this interface but provides implementations of more specific subinterfaces, such asSetandList. Also see theCollectionAPI. -
Set— a collection that cannot contain duplicate elements. This interface models the mathematical set abstraction and is used to represent sets, such as the cards comprising a poker hand, the courses making up a student's schedule, or the processes running on a machine. Also see theSetAPI. -
List— an ordered collection (sometimes called a sequence).Lists can contain duplicate elements. The user of aListgenerally has precise control over where in the list each element is inserted and can access elements by their integer index (position). Also see theListAPI. -
Queue— a collection used to hold multiple elements prior to processing. Besides basicCollectionoperations, aQueueprovides additional insertion, extraction, and inspection operations. Also see theQueueAPI. -
Map— an object that maps keys to values. AMapcannot contain duplicate keys; each key can map to at most one value. Also see theMapAPI. -
Others:
Deque,SortedSet,SortedMap
ArrayList Class
Can use the ArrayList class
The ArrayList class is a resizable-array implementation of the List interface. Unlike a normal array, an ArrayList can grow in size as you add more items to it. The example below illustrate some of the useful methods of the ArrayList class using an ArrayList of String objects.
import java.util.ArrayList;

public class ArrayListDemo {

    public static void main(String args[]) {
        ArrayList<String> items = new ArrayList<>();

        System.out.println("Before adding any items:" + items);

        items.add("Apple");
        items.add("Box");
        items.add("Cup");
        items.add("Dart");
        print("After adding four items: " + items);

        items.remove("Box"); // remove item "Box"
        print("After removing Box: " + items);

        items.add(1, "Banana"); // add "Banana" at index 1
        print("After adding Banana: " + items);

        items.add("Egg"); // add "Egg", will be added to the end
        items.add("Cup"); // add another "Cup"
        print("After adding Egg: " + items);

        print("Number of items: " + items.size());

        print("Index of Cup: " + items.indexOf("Cup"));
        print("Index of Zebra: " + items.indexOf("Zebra"));

        print("Item at index 3 is: " + items.get(2));

        print("Do we have a Box?: " + items.contains("Box"));
        print("Do we have an Apple?: " + items.contains("Apple"));

        items.clear();
        print("After clearing: " + items);
    }

    private static void print(String text) {
        System.out.println(text);
    }
}
Before adding any items:[]
After adding four items: [Apple, Box, Cup, Dart]
After removing Box: [Apple, Cup, Dart]
After adding Banana: [Apple, Banana, Cup, Dart]
After adding Egg: [Apple, Banana, Cup, Dart, Egg, Cup]
Number of items: 6
Index of Cup: 2
Index of Zebra: -1
Item at index 3 is: Cup
Do we have a Box?: false
Do we have an Apple?: true
After clearing: []
Add the missing methods to the class given below so that it produces the output given.
💡 Use an ArrayList to store the numbers.
public class Main {

    //TODO: add your methods here

    public static void main(String[] args) {
        System.out.println("Adding numbers to the list");
        addNumber(3);
        addNumber(8);
        addNumber(24);
        System.out.println("The total is: " + getTotal());
        System.out.println("8 in the list : " + isFound(8) );
        System.out.println("5 in the list : " + isFound(5) );
        removeNumber(8);
        System.out.println("The total is: " + getTotal());
    }

}
Adding numbers to the list
[3]
[3, 8]
[3, 8, 24]
The total is: 35
8 in the list : true
5 in the list : false
[3, 24]
The total is: 27
Partial solution:
import java.util.ArrayList;

public class Main {
    private static ArrayList<Integer> numbers = new ArrayList<>();

    private static void addNumber(int i) {
        numbers.add(Integer.valueOf(i));
        System.out.println(numbers);
    }

    // ...

}
This exercise continues from the TaskManager Level 1-3 exercises quoted above.
Enhance the TaskManager in the following ways:
- Use a suitable Collection class to store tasks, instead of using an array.
- Introduce a
done ncommand to mark the task at indexnas done.
Here is an example output:
Welcome to TaskManager-Level4!
Your task? todo read book
Tasks in the list: 1
Your task? deadline return book /by Friday
Tasks in the list: 2
Your task? print
Tasks:
[1] description: read book
is done? No
[2] description: return book
is done? No
do by: Friday
Your task? done 1
Tasks in the list: 2
Your task? print
Tasks:
[1] description: read book
is done? Yes
[2] description: return book
is done? No
do by: Friday
Your task?
Suggestions:
- Move the
isDonevariable to theTaskclass and provide asetDone(boolean)method.
public class Task {
    protected String description;
    protected boolean isDone;

    // ...

    public void setDone(boolean isDone){
        this.isDone = isDone;
    }
}
import java.util.ArrayList;
import java.util.List;
import java.util.Scanner;

public class Main {
    static Scanner in = new Scanner(System.in);
    static List<Task> tasks = new ArrayList<>();

    public static void main(String[] args) {
        // ...
    }

    private static void addTodo(String line) throws TaskManagerException {
        //...
        tasks.add(new Todo(description));
        //...
    }

    private static void markAsDone(String line) {
        int index = Integer.parseInt(line.substring("done".length()).trim());
        tasks.get(index - 1).setDone(true);
        System.out.println("Tasks in the list: " + tasks.size());
    }

    private static void printTasks() {
        // ...
        for (int i = 0; i < tasks.size(); i++) {
            System.out.println("[" + (i + 1) + "] " + tasks.get(i));
        }
    }
}
HashMap Class
Can use the HashMap class
HashMap is an implementation of the Map interface. It allows you to store a collection of key-value pairs. The example below illustrates how to use a HashMap<String, Point> to maintain a list of coordinates and their identifiers e.g., the identifier x1 is used to identify the point 0,0 where x1 is the key and 0,0 is the value.
import java.awt.Point;
import java.util.HashMap;
import java.util.Map;

public class HashMapDemo {
    public static void main(String[] args) {
        HashMap<String, Point> points = new HashMap<>();

        // put the key-value pairs in the HashMap
        points.put("x1", new Point(0, 0));
        points.put("x2", new Point(0, 5));
        points.put("x3", new Point(5, 5));
        points.put("x4", new Point(5, 0));

        // retrieve a value for a key using the get method
        print("Coordinates of x1: " + pointAsString(points.get("x1")));

        // check if a key or a value exists
        print("Key x1 exists? " + points.containsKey("x1"));
        print("Key x1 exists? " + points.containsKey("y1"));
        print("Value (0,0) exists? " + points.containsValue(new Point(0, 0)));
        print("Value (1,2) exists? " + points.containsValue(new Point(1, 2)));

        // update the value of a key to a new value
        points.put("x1", new Point(-1,-1));

        // iterate over the entries
        for (Map.Entry<String, Point> entry : points.entrySet()) {
            print(entry.getKey() + " = " + pointAsString(entry.getValue()));
        }

        print("Number of keys: " + points.size());
        points.clear();
        print("Number of keys after clearing: " + points.size());

    }

    public static String pointAsString(Point p) {
        return "[" + p.x + "," + p.y + "]";
    }

    public static void print(String s) {
        System.out.println(s);
    }
}
Coordinates of x1: [0,0]
Key x1 exists? true
Key x1 exists? false
Value (0,0) exists? true
Value (1,2) exists? false
x1 = [-1,-1]
x2 = [0,5]
x3 = [5,5]
x4 = [5,0]
Number of keys: 4
Number of keys after clearing: 0
The class given below keeps track of how many people signup to attend an event on each day of the week. Add the missing methods so that it produces the output given.
💡 Use an HashMap to store the number of entries for each day.
public class Main {
    private static HashMap<String, Integer> roster = new HashMap<>();

    //TODO: add your methods here

    public static void main(String[] args) {
        addToRoster("Monday"); // i.e., one person signed up for Monday
        addToRoster("Wednesday"); // i.e., one person signed up for Wednesday
        addToRoster("Wednesday"); // i.e., another person signed up for Wednesday
        addToRoster("Friday");
        addToRoster("Monday");
        printRoster();
    }

}
Monday => 2
Friday => 1
Wednesday => 2
Partial solution:
import java.util.HashMap;
import java.util.Map;

public class Main {
    private static HashMap<String, Integer> roster = new HashMap<>();

    private static void addToRoster(String day) {
        if (roster.containsKey(day)){
            Integer newValue = Integer.valueOf(roster.get(day).intValue() + 1);
            roster.put(day, newValue);
        } else {
            roster.put(day, Integer.valueOf(1));
        }
    }

    // ...
}
[W5.3] Can use some common documentation tools
Javadoc
Can explain JavaDoc
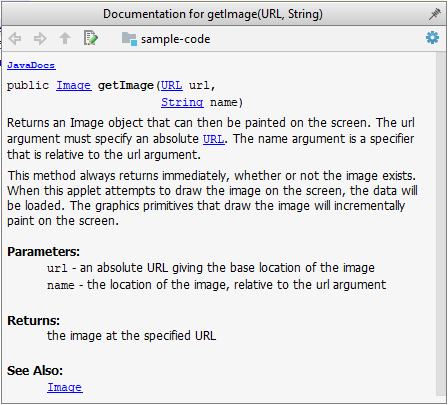
Javadoc is a tool for generating API documentation in HTML format from doc comments in source. In addition, modern IDEs use JavaDoc comments to generate explanatory tool tips.
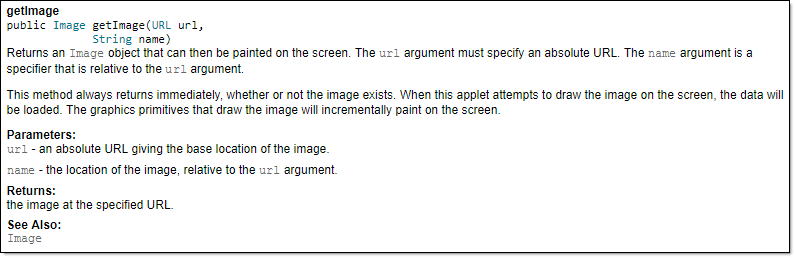
An example method header comment in JavaDoc format (adapted from Oracle's Java documentation)
/**
 * Returns an Image object that can then be painted on the screen.
 * The url argument must specify an absolute {@link URL}. The name
 * argument is a specifier that is relative to the url argument.
 * <p>
 * This method always returns immediately, whether or not the
 * image exists. When this applet attempts to draw the image on
 * the screen, the data will be loaded. The graphics primitives
 * that draw the image will incrementally paint on the screen.
 *
 * @param url an absolute URL giving the base location of the image
 * @param name the location of the image, relative to the url argument
 * @return the image at the specified URL
 * @see Image
 */
 public Image getImage(URL url, String name) {
        try {
            return getImage(new URL(url, name));
        } catch (MalformedURLException e) {
            return null;
        }
 }
Generated HTML documentation:
Tooltip generated by Intellij IDE:
Can write Javadoc comments
In the absence of more extensive guidelines (e.g., given in a coding standard adopted by your project), you can follow the two examples below in your code.
A minimal javadoc comment example for methods:
/**
 * Returns lateral location of the specified position.
 * If the position is unset, NaN is returned.
 *
 * @param x  X coordinate of position.
 * @param y Y coordinate of position.
 * @param zone Zone of position.
 * @return Lateral location.
 * @throws IllegalArgumentException  If zone is <= 0.
 */
public double computeLocation(double x, double y, int zone)
    throws IllegalArgumentException {
  ...
}
A minimal javadoc comment example for classes:
package ...

import ...

/**
 * Represents a location in a 2D space. A <code>Point</code> object corresponds to
 * a coordinate represented by two integers e.g., <code>3,6</code>
 */
public class Point{
    //...
}
- A short tutorial on writing JavaDoc comments -- from tutorialspoint.com
- A more detailed description --from Oracle
Markdown
Can explain Markdown
Markdown is a lightweight markup language with plain text formatting syntax.
Can write documents in Markdown format
- A tutorial on Mastering Markdown --from GitHub
AsciiDoc
Can explain AsciiDoc
AsciiDoc is similar to Markdown but has more powerful (but also more complex) syntax.
[W5.4] Regression testing of text UIs
Can explain testing
Testing: Testing is operating a system or component under specified conditions, observing or recording the results, and making an evaluation of some aspect of the system or component. –- source: IEEE
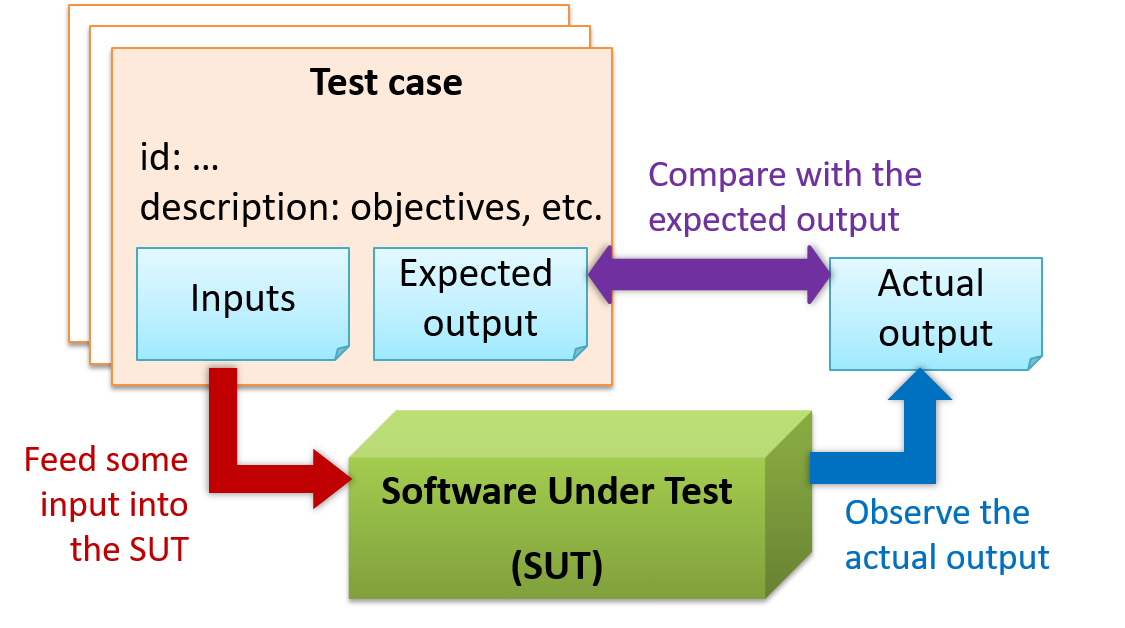
When testing, we execute a set of test cases. A test case specifies how to perform a test. At a minimum, it specifies the input to the software under test (SUT) and the expected behavior.
Example: A minimal test case for testing a browser:
- Input – Start the browser using a blank page (vertical scrollbar disabled). Then, load
longfile.htmllocated in thetest datafolder. - Expected behavior – The scrollbar should be automatically enabled upon loading
longfile.html.
Test cases can be determined based on the specification, reviewing similar existing systems, or comparing to the past behavior of the SUT.
A more elaborate test case can have other details such as those given below.
- A unique identifier : e.g. TC0034-a
- A descriptive name: e.g. vertical scrollbar activation for long web pages
- Objectives: e.g. to check whether the vertical scrollbar is correctly activated when a long web page is loaded to the browser
- Classification information: e.g. priority - medium, category - UI features
- Cleanup, if any: e.g. empty the browser cache.
For each test case we do the following:
- Feed the input to the SUT
- Observe the actual output
- Compare actual output with the expected output
A test case failure is a mismatch between the expected behavior and the actual behavior. A failure is caused by a defect (or a bug).
Example: In the browser example above, a test case failure is implied if the scrollbar remains disabled after loading longfile.html. The defect/bug causing that failure could be an uninitialized variable.
Here is another definition of testing:
Software testing consists of the dynamic verification that a program provides expected behaviors on a finite set of test cases, suitably selected from the usually infinite execution domain. -– source: Software Engineering Book of Knowledge V3
Some things to note (indicated by keywords in the above definition):
- Dynamic: Testing involves executing the software. It is not by examining the code statically.
- Finite: In most non-trivial cases there are potentially infinite test scenarios but resource constraints dictate that we can test only a finite number of scenarios.
- Selected: In most cases it is not possible to test all scenarios. That means we need to select what scenarios to test.
- Expected: Testing requires some knowledge of how the software is expected to behave.
Explain how the concepts of testing, test case, test failure, and defect are related to each other.
Can explain regression testing
When we modify a system, the modification may result in some unintended and undesirable effects on the system. Such an effect is called a regression.
Regression testing is re-testing the software to detect regressions. Note that to detect regressions, we need to retest all related components, even if they were tested before.
Regression testing is more effective when it is done frequently, after each small change. However, doing so can be prohibitively expensive if testing is done manually. Hence, regression testing is more practical when it is automated.
Regression testing is the automated re-testing of a software after it has been modified.
c.
Explanation: Regression testing need not be automated but automation is highly recommended.
Explain why and when you would do regression testing in a software project.
Can explain test automation
An automated test case can be run programmatically and the result of the test case (pass or fail) is determined programmatically. Compared to manual testing, automated testing reduces the effort required to run tests repeatedly and increases precision of testing (because manual testing is susceptible to human errors).
Side readings:
- [Quora post] What is the best way to avoid bugs
- [Quora post] Is automated testing relevant to startups?
Can semi-automate testing of CLIs
A simple way to semi-automate testing of a CLI(Command Line Interface) app is by using input/output re-direction.
- First, we feed the app with a sequence of test inputs that is stored in a file while redirecting the output to another file.
- Next, we compare the actual output file with another file containing the expected output.
Let us assume we are testing a CLI app called AddressBook. Here are the detailed steps:
-
Store the test input in the text file
input.txt.add Valid Name p/12345 valid@email.butNoPrefix add Valid Name 12345 e/valid@email.butPhonePrefixMissing -
Store the output we expect from the SUT in another text file
expected.txt.Command: || [add Valid Name p/12345 valid@email.butNoPrefix] Invalid command format: add Command: || [add Valid Name 12345 e/valid@email.butPhonePrefixMissing] Invalid command format: add -
Run the program as given below, which will redirect the text in
input.txtas the input toAddressBookand similarly, will redirect the output of AddressBook to a text fileoutput.txt. Note that this does not require any code changes toAddressBook.java AddressBook < input.txt > output.txt-
💡 The way to run a CLI program differs based on the language.
e.g., In Python, assuming the code is inAddressBook.pyfile, use the command
python AddressBook.py < input.txt > output.txt -
💡 If you are using Windows, use a normal command window to run the app, not a Power Shell window.
More on the >operator and the<operator. tangentialA CLI program takes input from the keyboard and outputs to the console. That is because those two are default input and output streams, respectively. But you can change that behavior using
<and>operators. For example, if you runAddressBookin a command window, the output will be shown in the console, but if you run it like this,java AddressBook > output.txtthe Operating System then creates a file
output.txtand stores the output in that file instead of displaying it in the console. No file I/O coding is required. Similarly, adding< input.txt(or any other filename) makes the OS redirect the contents of the file as input to the program, as if the user typed the content of the file one line at a time.Resources:
-
-
Next, we compare
output.txtwith theexpected.txt. This can be done using a utility such as WindowsFC(i.e. File Compare) command, Unixdiffcommand, or a GUI tool such as WinMerge.FC output.txt expected.txt
Note that the above technique is only suitable when testing CLI apps, and only if the exact output can be predetermined. If the output varies from one run to the other (e.g. it contains a time stamp), this technique will not work. In those cases we need more sophisticated ways of automating tests.
CLI App: An application that has a Command Line Interface. i.e. user interacts with the app by typing in commands.
[W5.5] Developer Testing: Basics
Can explain developer testing
Developer testing is the testing done by the developers themselves as opposed to professional testers or end-users.
Can explain the need for early developer testing
Delaying testing until the full product is complete has a number of disadvantages:
- Locating the cause of such a test case failure is difficult due to a large search space; in a large system, the search space could be millions of lines of code, written by hundreds of developers! The failure may also be due to multiple inter-related bugs.
- Fixing a bug found during such testing could result in major rework, especially if the bug originated during the design or during requirements specification i.e. a faulty design or faulty requirements.
- One bug might 'hide' other bugs, which could emerge only after the first bug is fixed.
- The delivery may have to be delayed if too many bugs were found during testing.
Therefore, it is better to do early testing, as hinted by the popular rule of thumb given below, also illustrated by the graph below it.
The earlier a bug is found, the easier and cheaper to have it fixed.

Such early testing of partially developed software is usually, and by necessity, done by the developers themselves i.e. developer testing.
Discuss pros and cons of developers testing their own code.
Pros:
- Can be done early (the earlier we find a bug, the cheaper it is to fix).
- Can be done at lower levels, for examples, at operation and class level (testers usually test the system at UI level).
- It is possible to do more thorough testing because developers know the expected external behavior as well as the internal structure of the component.
- It forces developers to take responsibility for their own work (they cannot claim that "testing is the job of the testers").
Cons:
- A developer may subconsciously test only situations that he knows to work (i.e. test it too 'gently').
- A developer may be blind to his own mistakes (if he did not consider a certain combination of input while writing code, it is possible for him to miss it again during testing).
- A developer may have misunderstood what the SUT is supposed to do in the first place.
- A developer may lack the testing expertise.
The cost of fixing a bug goes down as we reach the product release.
False. The cost goes up over time.
Explain why early testing by developers is important.
Can explain test drivers
A test driver is the code that ‘drives’ the
PayrollTest ‘drives’ the PayRoll class by sending it test inputs and verifies if the output is as expected.
public class PayrollTestDriver {
    public static void main(String[] args) throws Exception {

        //test setup
        Payroll p = new Payroll();

        //test case 1
        p.setEmployees(new String[]{"E001", "E002"});
        // automatically verify the response
        if (p.totalSalary() != 6400) {
            throw new Error("case 1 failed ");
        }

        //test case 2
        p.setEmployees(new String[]{"E001"});
        if (p.totalSalary() != 2300) {
            throw new Error("case 2 failed ");
        }

        //more tests...

        System.out.println("All tests passed");
    }
}
Can explain test automation tools
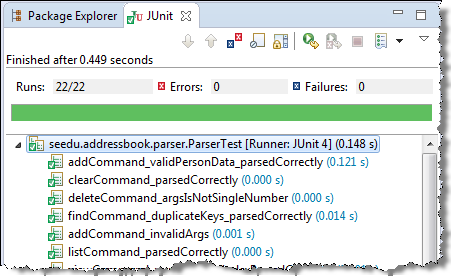
JUnit is a tool for automated testing of Java programs. Similar tools are available for other languages and for automating different types of testing.
This an automated test for a Payroll class, written using JUnit libraries.
@Test
public void testTotalSalary(){
    Payroll p = new Payroll();

    //test case 1
    p.setEmployees(new String[]{"E001", "E002"});
    assertEquals(6400, p.totalSalary());

    //test case 2
    p.setEmployees(new String[]{"E001"});
    assertEquals(2300, p.totalSalary());

    //more tests...
}
Most modern IDEs has integrated support for testing tools. The figure below shows the JUnit output when running some JUnit tests using the Eclipse IDE.
Can use simple JUnit tests
When writing JUnit tests for a class Foo, the common practice is to create a FooTest class, which will contain various test methods.
Suppose we want to write tests for the IntPair class below.
public class IntPair {
    int first;
    int second;

    public IntPair(int first, int second) {
        this.first = first;
        this.second = second;
    }

    public int intDivision() throws Exception {
        if (second == 0){
            throw new Exception("Divisor is zero");
        }
        return first/second;
    }

    @Override
    public String toString() {
        return first + "," + second;
    }
}
Here's a IntPairTest class to match.
import org.junit.Test;
import org.junit.Assert;

public class IntPairTest {

    @Test
    public void testStringConversion() {
        Assert.assertEquals("4,7", new IntPair(4, 7).toString());
    }

    @Test
    public void intDivision_nonZeroDivisor_success() throws Exception {
        Assert.assertEquals(2, new IntPair(4, 2).intDivision());
        Assert.assertEquals(0, new IntPair(1, 2).intDivision());
        Assert.assertEquals(0, new IntPair(0, 5).intDivision());
    }

    @Test
    public void intDivision_zeroDivisor_exceptionThrown() {
        try {
            Assert.assertEquals(0, new IntPair(1, 0).intDivision());
            Assert.fail(); // the test should not reach this line
        } catch (Exception e) {
            Assert.assertEquals("Divisor is zero", e.getMessage());
        }
    }
}
Notes:
- Each test method is marked with a
@Testannotation. - Tests use
Assert.assertEquals(expected, actual)methods to compare the expected output with the actual output. If they do not match, the test will fail. JUnit comes with other similar methods such asAssert.assertNullandAssert.assertTrue. - Java code normally use camelCase for method names e.g.,
testStringConversionbut when writing test methods, sometimes another convention is used:whatIsBeingTested_descriptionOfTestInputs_expectedOutcomee.g.,intDivision_zeroDivisor_exceptionThrown - There are several ways to verify the code throws the correct exception. The third test method in the example above shows one of the simpler methods. If the exception is thrown, it will be caught and further verified inside the
catchblock. But if it is not thrown as expected, the test will reachAssert.fail()line and will fail as a result. - The easiest way to run JUnit tests is to do it via the IDE. For example, in Intellij you can right-click the folder containing test classes and choose 'Run all tests...'
- Optionally, you can use static imports to avoid having to specify
Assert.everywhere.import static org.junit.Assert.assertEquals; //... @Test public void testStringConversion() { assertEquals("4,7", new IntPair(4, 7).toString()); }
JUnit 4 with IntelliJ: A quick introduction -- by DrBFraser
- JUnit cookbook - a short tutorial from JUnit creators
- JUnit tutorial - a more detailed tutorial from a developer Lars Vogel
- How to test private methods in Java? [ short answer ] [ long answer ]
Project Preparation: 2 KLoC
This task can earn you 3 participation marks, 2 mark for the individual component and 1 bonus mark for the team component. You can omit either one of them.
💡 When working with existing code, a safe approach is to change the code in very small steps, each resulting in a verifiable change without breaking the app. For example, when adding a new sort command, the first few steps can be,
- Teach the app to accept a
sortcommand but ignore it. - Next, teach the app to direct the
sortcommand to an existing command e.g.sortcommand simply invokes thelistcommand internally. - Add a
SortCommandclass but make it simply a copy of the the existingListCommand. Direct thesortcommand to the newSortCommand. - ...
💡 Note that you can reuse the code you write here in your final project, if applicable.
Individual component:
Requirements: Do an enhancement to [AddressBook - Level2] e.g. add a new command. It can be the same enhancement you did to AddressBook Level1 (at the 1KLoC milestone in week 3). The size of the enhancement does not matter but try to limit to one enhancement (rather than mix many enhancements). In addition,
- update the User Guide
- update existing tests and add new tests if necessary, for both JUnit tests and I/O tests
- follow the coding standard
- follow the OOP style
Optional but encouraged:
- Update the Developer Guide
Use topic id as W5 in your PR title. E.g., [W5][M11-1]John Doe
Submission: Create a PR against Addressbook-Level2. Try to make a clean PR (i.e. free of unrelated code modifications).
Team component:
The team component is to be done by all members, including those who didn't do the individual component.
-
Review PRs created by team members in the Individual Component above i.e. add review comments in the PR created against module repo. You can either give suggestions to improve, or ask questions to understand, the code written by the team member.
-
Requirements: Try to ensure that each PR reviewed by at least one team member and each team member's PR is reviewed by at least one other team member.
-
Submission: Just update PR created in the individual component by adding comments/commits to it.
Project Milestone: v1.0
Conceptualize product and document it as a user guide(draft), draft a rough project plan.
v1.0 Summary of Milestone
Here is a summary of items you need to deliver to reach v1.0 individual () and team () milestones. See sections below for more details of each item.
| Milestone | Minimum acceptable performance to consider as 'reached' |
|---|---|
| requirements documented | a draft of v2.0 requirements in some form |
| [optional] product survey documented | none |
| v2.0 conceptualized | a draft of v2.0 user guide in some form |
| feature releases planned | a rough feature release plan |
Reaching individual and team milestones are considered for grading the project management component of your project grade (expand the panel below for more info).
The deadline for reaching a milestone is the midnight before your tutorial e.g., if your tutorial is on Wednesday, you need to reach the milestone by Tuesday midnight.
Relevant: [
A. Process:
Evaluates: How well you did in project management related aspects of the project, as an individual and as a team
Based on: Supervisor observations of project milestones and GitHub data.
Milestones need to be reached the midnight before of the tutorial for it to be counted as achieved. To get a good grade for this aspect, achieve at least 60% of the recommended milestone progress.
Other criteria:
- Good use of GitHub milestones
- Good use of GitHub release mechanism
- Good version control, based on the repo
- Reasonable attempt to use the forking workflow
- Good task definition, assignment and tracking, based on the issue tracker
- Good use of buffers (opposite: everything at the last minute)
- Project done iteratively and incrementally (opposite: doing most of the work in one big burst)
B. Team-tasks:
Evaluates: How much did you contribute to team-tasks?
Based on: peer evaluations and tutor observations
Relevant: [
Here is a non-exhaustive list of team-tasks:
- Necessary general code enhancements e.g.,
- Work related to renaming the product
- Work related to changing the product icon
- Morphing the product into a different product
- Setting up the GitHub, Travis, AppVeyor, etc.
- Maintaining the issue tracker
- Release management
- Updating user/developer docs that are not specific to a feature e.g. documenting the target user profile
- Incorporating more useful tools/libraries/frameworks into the product or the project workflow (e.g. automate more aspects of the project workflow using a GitHub plugin)
v1.0 Documentation
- Developer Guide:
Have a draft of the requirements of your project, as described in
mid-v1.0 progress guide .
Decide on requirements (user stories, use cases, non-functional requirements).
💡 Given below are some guidance on the recommended progress at this point of the project (i.e., at week 4, which is the midway point of the milestone v1.0)
This is a good time to analyze requirements with a view to conceptualizing the next version of the product (i.e. v2.0).
-
Step 1 : Brainstorm user stories
Get together with your team members and
brainstorm foruser stories for the v2.0 of the product. Note that in the module project you will deliver only up to v1.4 but here you should consider up to v2.0 (i.e. beyond the module).-
It is ok to have more user stories than you can deliver in the project. Aim to create at least 30 user stories. Include all 'obvious' ones you can think of but also look for 'non obvious' ones that you think are likely to be missed by other teams.
-
Refer
[Textbook Specifying Requirements → UserStories → Usage → (section) Tips] for tips on how to use user stories in this task. -
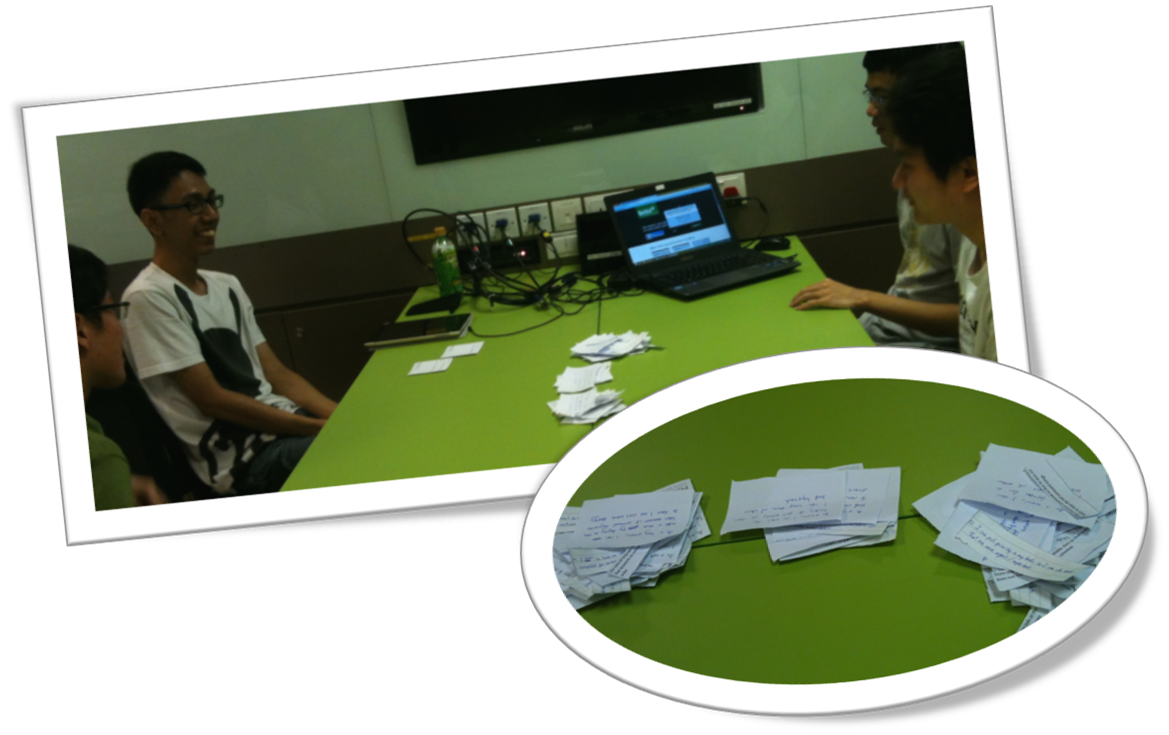
You can write each user story in a piece of paper (e.g. yellow sticky note, index card, or just pieces of paper about the size of a playing card). Alternatively you can use an online tool (some examples given in
[Textbook Specifying Requirements → UserStories → Usage → (panel) Tool Examples ] ). -
Note that you should not 'evaluate' the value of user stories while doing the above. Reason: an important aspect of brainstorming is not judging the ideas generated.
-
Requirements → Gathering Requirements →
Brainstorming: A group activity designed to generate a large number of diverse and creative ideas for the solution of a problem.
In a brainstorming session there are no "bad" ideas. The aim is to generate ideas; not to validate them. Brainstorming encourages you to "think outside the box" and put "crazy" ideas on the table without fear of rejection.
What is the key characteristic about brainstorming?
(b)
Requirements → Specifying Requirements → User Stories →
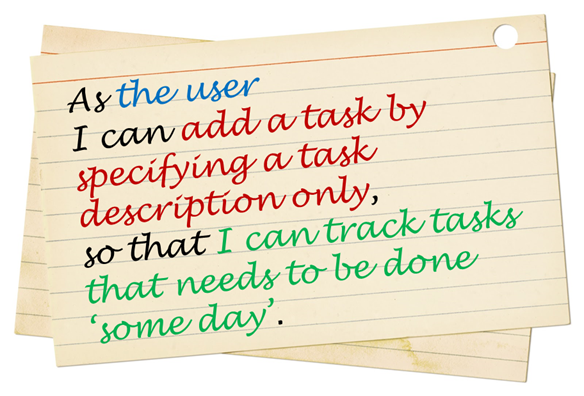
User story: User stories are short, simple descriptions of a feature told from the perspective of the person who desires the new capability, usually a user or customer of the system. [Mike Cohn]
A common format for writing user stories is:
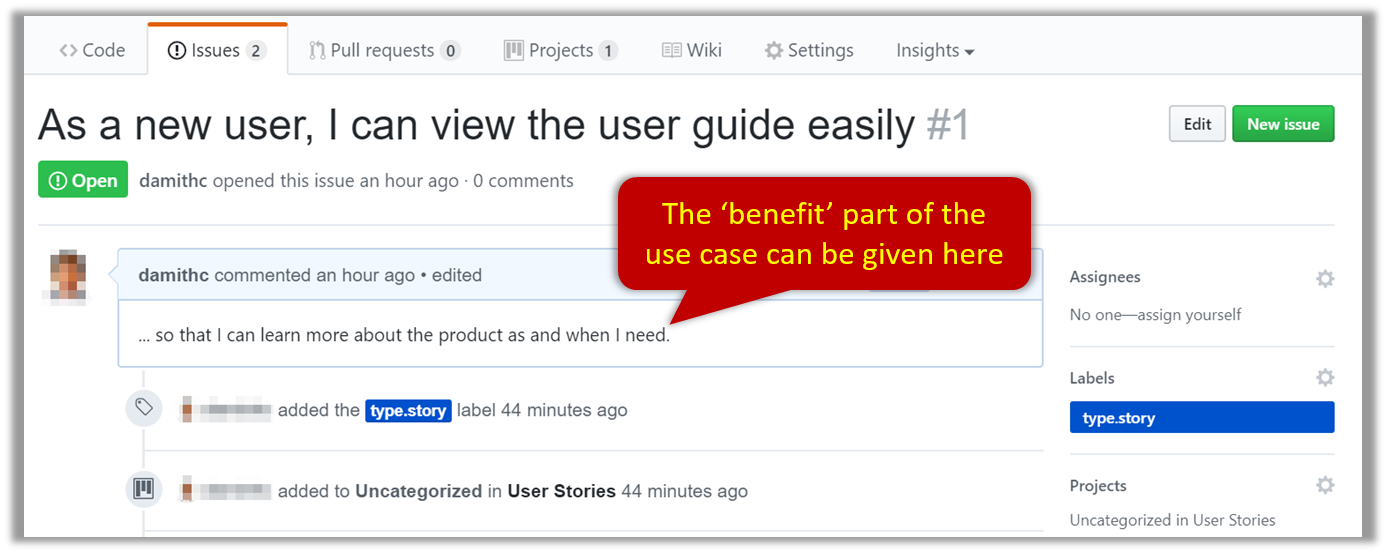
User story format: As a {user type/role} I can {function} so that {benefit}
Examples (from a Learning Management System):
- As a student, I can download files uploaded by lecturers, so that I can get my own copy of the files
- As a lecturer, I can create discussion forums, so that students can discuss things online
- As a tutor, I can print attendance sheets, so that I can take attendance during the class
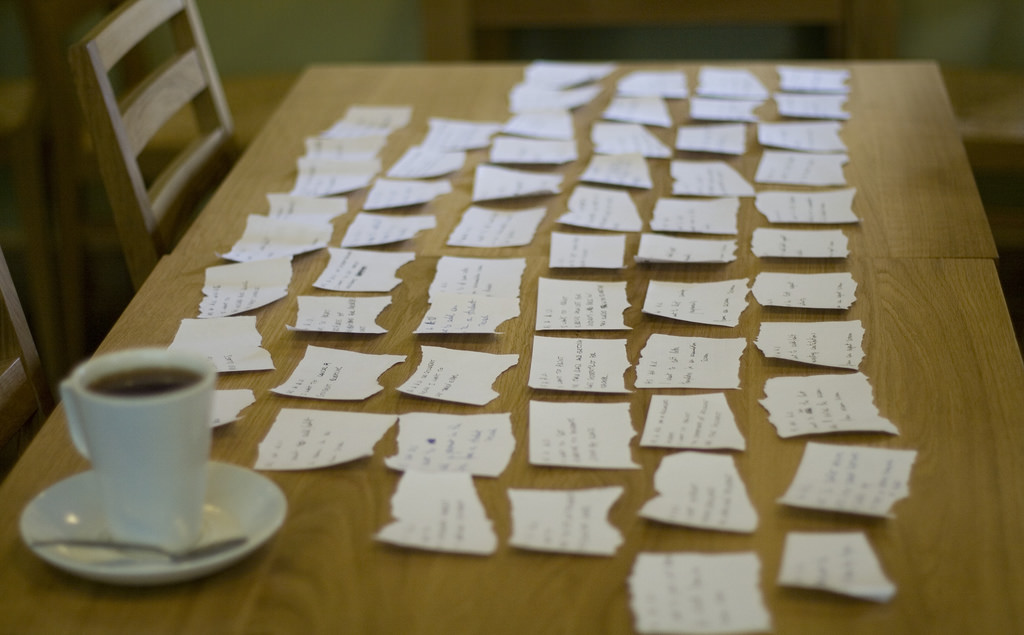
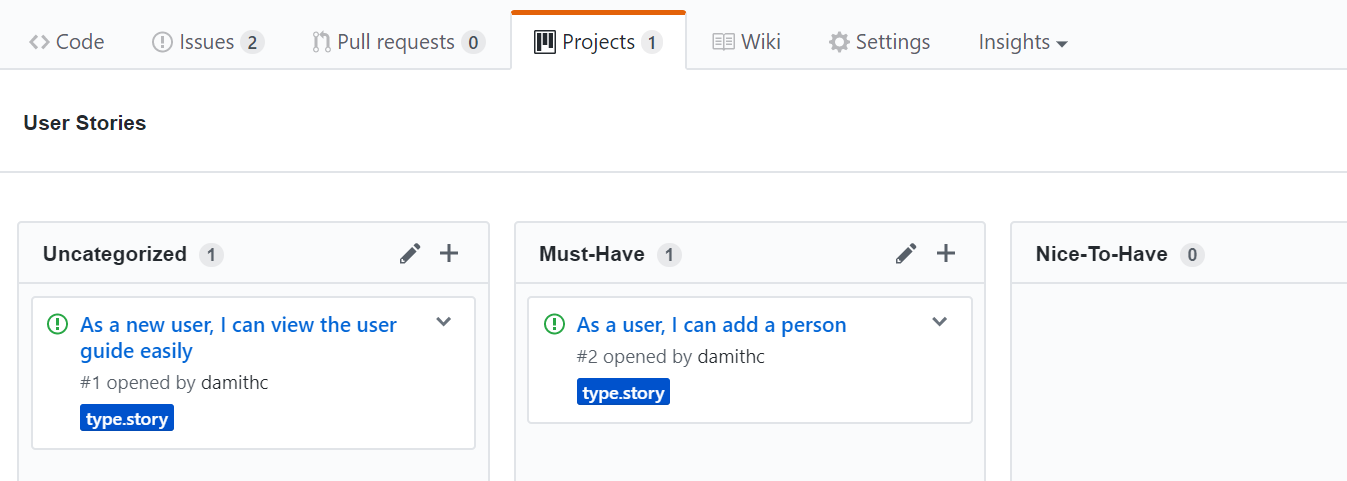
We can write user stories on index cards or sticky notes, and arrange on walls or tables, to facilitate planning and discussion. Alternatively, we can use a software (e.g., GitHub Project Boards, Trello, Google Docs, ...) to manage user stories digitally.
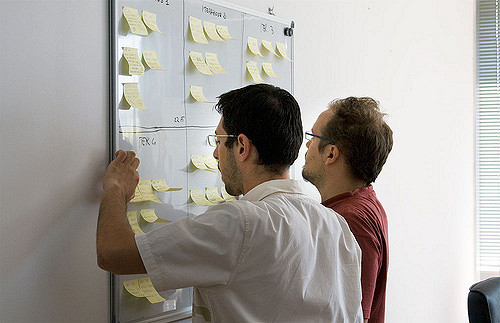
[credit: https://www.flickr.com/photos/jakuza/with/2726048607/]
[credit: https://commons.wikimedia.org/wiki/File:User_Story_Map_in_Action.png]
- a. They are based on stories users tell about similar systems
- b. They are written from the user/customer perspective
- c. They are always written in some physical medium such as index cards or sticky notes
- a. Reason: Despite the name, user stories are not related to 'stories' about the software.
- b.
- c. Reason: It is possible to use software to record user stories. When the team members are not co-located this may be the only option.
Critique the following user story taken from a software project to build an e-commerce website.
As a developer, I want to use Python to implement the software, so that we can resue existing Python modules.
Refer to the definition of a user story.
User story: User stories are short, simple descriptions of a feature told from the perspective of the person who desires the new capability, usually a user or customer of the system. [Mike Cohn]
This user story is not written from the perspective of the user/customer.
Bill wants you to build a Human Resource Management (HRM) system. He mentions that the system will help employees to view their own
Remember to follow the correct format when writing user stories.
User story format: As a {user type/role} I can {function} so that {benefit}
As an employee, I can view my leave balance, so that I can know how many leave days I have left.
Note: the {benefit} part may vary as it is not specifically mentioned in the question.
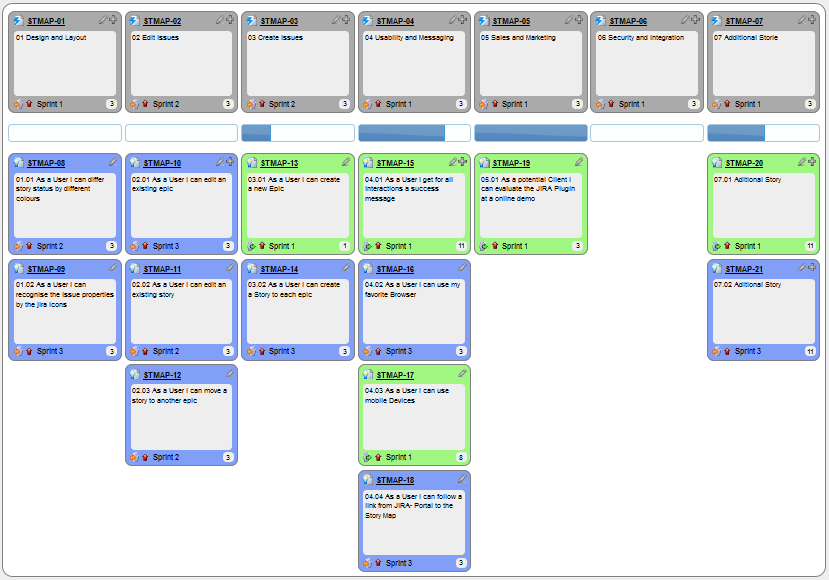
You can create issues for each of the user stories and use a GitHub Project Board to sort them into categories.
Example Project Board:
Example Issue to represent a user story:
A video on GitHub Project Boards:
Example Google Sheet for recording user stories:

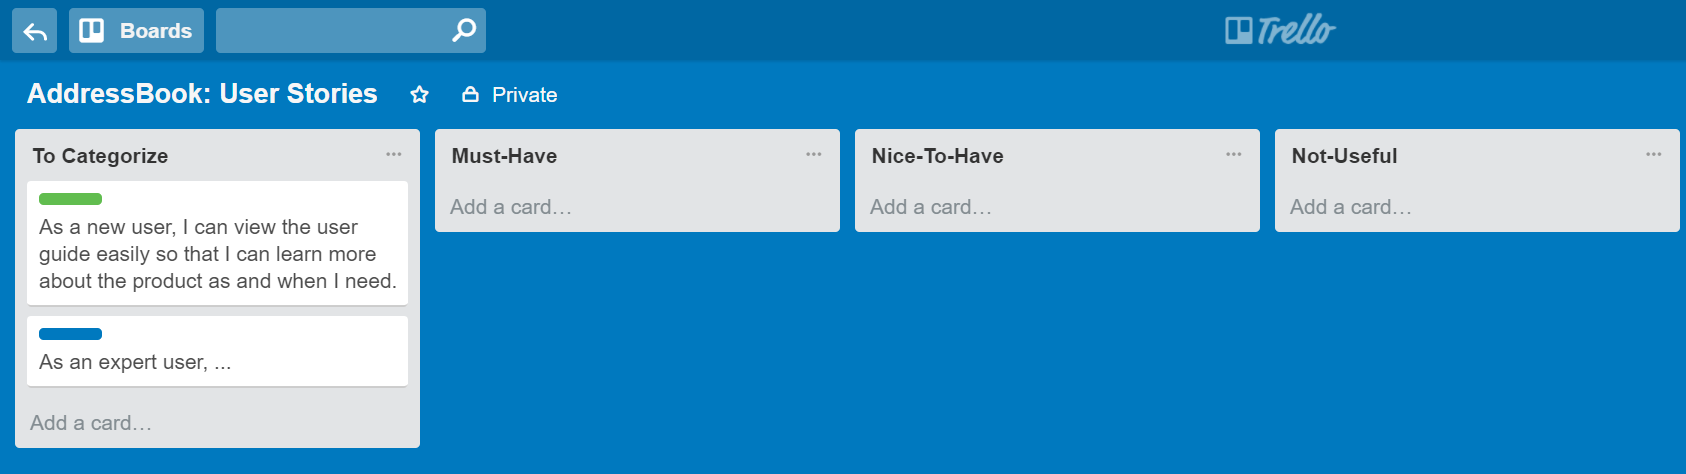
Example Trello Board for recording user stories:
Given their lightweight nature, user stories are quite handy for recording requirements during early stages of requirements gathering.
💡 Here are some tips for using user stories for early stages of requirement gathering:
- Define the target user:
Decide your target user's profile (e.g. a student, office worker, programmer, sales person) and work patterns (e.g. Does he work in groups or alone? Does he share his computer with others?). A clear understanding of the target user will help when deciding the importance of a user story. You can even give this user a name. e.g. Target user Jean is a university student studying in a non-IT field. She interacts with a lot of people due to her involvement in university clubs/societies. ... - Define the problem scope: Decide that exact problem you are going to solve for the target user. e.g. Help Jean keep track of all her school contacts
- Don't be too hasty to discard 'unusual' user stories:
Those might make your product unique and stand out from the rest, at least for the target users. - Don't go into too much details:
For example, consider this user story:As a user, I want to see a list of tasks that needs my attention most at the present time, so that I pay attention to them first.
When discussing this user story, don't worry about what tasks should be considered needs my attention most at the present time. Those details can be worked out later. - Don't be biased by preconceived product ideas:
When you are at the stage of identifying user needs, clear your mind of ideas you have about what your end product will look like. - Don't discuss implementation details or whether you are actually going to implement it:
When gathering requirements, your decision is whether the user's need is important enough for you to want to fulfil it. Implementation details can be discussed later. If a user story turns out to be too difficult to implement later, you can always omit it from the implementation plan.
💡 Recommended: You can use GitHub issue tracker to manage user stories, but for that you need to set up your team's GitHub organization, project fork, and issue tracker first. Instructions for doing those steps are in the panel below.
Organization setup
Please follow the organization/repo name format precisely because we use scripts to download your code or else our scripts will not be able to detect your work.
After receiving your team ID, one team member should do the following steps:
- Create a GitHub organization with the following details:
- Organization name :
CS2113-AY1819S2-TEAM_ID. e.g.CS2113-AY1819S2-M11-1 - Plan: Open Source ($0/month)
- Organization name :
- Add members to the organization:
- Create a team called
developersto your organization. - Add your team members to the developers team.
- Create a team called
Repo setup
Only one team member:
- Fork either Address Book Level 3 or Address Book Level 4 to your team org.
- Rename the forked repo as
main. This repo (let's call it the team repo) is to be used as the repo for your project. - Ensure the issue tracker of your team repo is enabled. Reason: our bots will be posting your weekly progress reports on the issue tracker of your team repo.
- Ensure your team members have the desired level of access to your team repo.
- Enable Travis CI for the team repo.
- Set up auto-publishing of docs. When set up correctly, your project website should be available via the URL
https://nus-cs2113-ay1819s2-{team-id}.github.io/maine.g.,https://cs2113-ay1819s2-w13-1.github.io/main/. This also requires you to enable the GitHub Pages feature of your team repo and configure it to serve the website from thegh-pagesbranch. - create a team PR for us to track your project progress: i.e., create a PR from your team repo
masterbranch to [nuscs2113-AY1819S2/addressbook-level4]masterbranch. PR name:[Team ID] Product Namee.g.,[T09-2] Contact List Pro. As you merge code to your team repo'smasterbranch, this PR will auto-update to reflect how much your team's product has progressed. In the PR description@mention the other team members so that they get notified when the tutor adds comments to the PR.
All team members:
- Watchthe
mainrepo (created above) i.e., go to the repo and click on thewatchbutton to subscribe to activities of the repo - Fork the
mainrepo to your personal GitHub account. - Clone the fork to your Computer.
- Recommended: Set it up as an Intellij project (follow the instructions in the Developer Guide carefully).
- Set up the developer environment in your computer. You are recommended to use JDK 9 for AB-4 as some of the libraries used in AB-4 have not updated to support Java 10 yet. JDK 9 can be downloaded from the Java Archive.
Note that some of our download scripts depend on the following folder paths. Please do not alter those paths in your project.
/src/main/src/test/docs
- Note: If you fork from Address Book Level 3, ensure that the folder structure is similar to the one in Address Book Level 4
Issue tracker setup
We recommend you configure the issue tracker of the main repo as follows:
- Delete existing labels and add the following labels.
💡 Issue type labels are useful from the beginning of the project. The other labels are needed only when you start implementing the features.
Issue type labels:
type.Epic: A big feature which can be broken down into smaller stories e.g. searchtype.Story: A user storytype.Enhancement: An enhancement to an existing storytype.Task: Something that needs to be done, but not a story, bug, or an epic. e.g. Move testing code into a new folder)type.Bug: A bug
Status labels:
status.Ongoing: The issue is currently being worked on. note: remove this label before closing an issue.
Priority labels:
priority.High: Must dopriority.Medium: Nice to havepriority.Low: Unlikely to do
Bug Severity labels:
severity.Low: A flaw that is unlikely to affect normal operations of the product. Appears only in very rare situations and causes a minor inconvenience only.severity.Medium: A flaw that causes occasional inconvenience to some users but they can continue to use the product.severity.High: A flaw that affects most users and causes major problems for users. i.e., makes the product almost unusable for most users.
-
Create following milestones :
v1.0,v1.1,v1.2,v1.3,v1.4, -
You may configure other project settings as you wish. e.g. more labels, more milestones
Project Schedule Tracking
In general, use the issue tracker (Milestones, Issues, PRs, Tags, Releases, and Labels) for assigning, scheduling, and tracking all noteworthy project tasks, including user stories. Update the issue tracker regularly to reflect the current status of the project. You can also use GitHub's Projects feature to manage the project, but keep it linked to the issue tracker as much as you can.
Using Issues:
During the initial stages (latest by the start of v1.2):
-
Record each of the user stories you plan to deliver as an issue in the issue tracker. e.g.
Title: As a user I can add a deadline
Description: ... so that I can keep track of my deadlines -
Assign the
type.*andpriority.*labels to those issues. -
Formalize the project plan by assigning relevant issues to the corresponding milestone.
From milestone v1.2:
-
Define project tasks as issues. When you start implementing a user story (or a feature), break it down to smaller tasks if necessary. Define reasonable sized, standalone tasks. Create issues for each of those tasks so that they can be tracked.e.g.
-
A typical task should be able to done by one person, in a few hours.
- Bad (reasons: not a one-person task, not small enough):
Write the Developer Guide - Good:
Update class diagram in the Developer Guide for v1.4
- Bad (reasons: not a one-person task, not small enough):
-
There is no need to break things into VERY small tasks. Keep them as big as possible, but they should be no bigger than what you are going to assign a single person to do within a week. eg.,
- Bad:
Implementing parser(reason: too big). - Good:
Implementing parser support for adding of floating tasks
- Bad:
-
Do not track things taken for granted. e.g.,
push code to reposhould not be a task to track. In the example given under the previous point, it is taken for granted that the owner will also (a) test the code and (b) push to the repo when it is ready. Those two need not be tracked as separate tasks. -
Write a descriptive title for the issue. e.g.
Add support for the 'undo' command to the parser- Omit redundant details. In some cases, the issue title is enough to describe the task. In that case, no need to repeat it in the issue description. There is no need for well-crafted and detailed descriptions for tasks. A minimal description is enough. Similarly, labels such as
prioritycan be omitted if you think they don't help you.
- Omit redundant details. In some cases, the issue title is enough to describe the task. In that case, no need to repeat it in the issue description. There is no need for well-crafted and detailed descriptions for tasks. A minimal description is enough. Similarly, labels such as
-
-
Assign tasks (i.e., issues) to the corresponding team members using the
assigneesfield. Normally, there should be some ongoing tasks and some pending tasks against each team member at any point. -
Optionally, you can use
status.ongoinglabel to indicate issues currently ongoing.
Using Milestones:
We recommend you do proper milestone management starting from v1.2. Given below are the conditions to satisfy for a milestone to be considered properly managed:
Planning a Milestone:
-
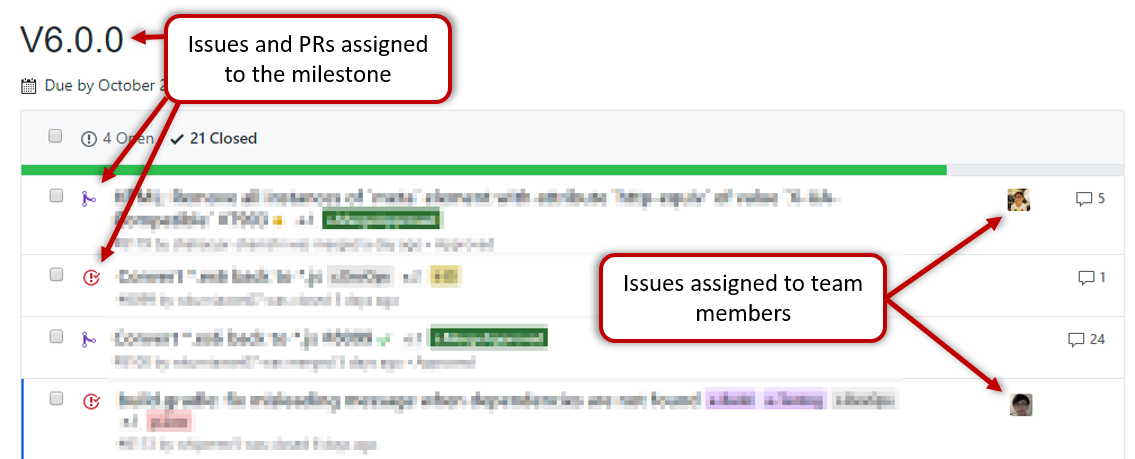
Issues assigned to the milestone, team members assigned to issues: Used GitHub milestones to indicate which issues are to be handled for which milestone by assigning issues to suitable milestones. Also make sure those issues are assigned to team members. Note that you can change the milestone plan along the way as necessary.
-
Deadline set for the milestones (in the GitHub milestone). Your internal milestones can be set earlier than the deadlines we have set, to give you a buffer.
Wrapping up a Milestone:
-
A working product tagged with the correct tag (e.g.
v1.2) and is pushed to the main repo
or a product release done on GitHub. A product release is optional for v1.2 but required from from v1.3. Click here to see an example release. -
All tests passing on Travis for the version tagged/released.
-
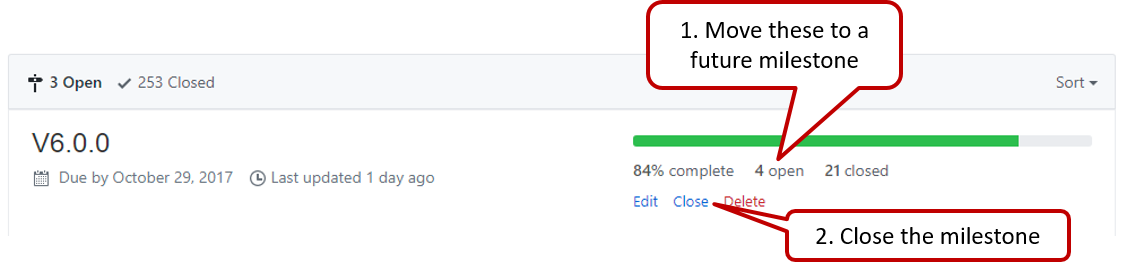
Milestone updated to match the product i.e. all issues completed and PRs merged for the milestone should be assigned to the milestone. Incomplete issues/PRs should be moved to a future milestone.
-
Milestone closed.
-
If necessary, future milestones are revised based on what you experienced in the current milestone e.g. if you could not finish all issues assigned to the current milestone, it is a sign that you overestimated how much you can do in a week, which means you might want to reduce the issues assigned to future milestones to match that observation.
As a user I can add a task by specifying a task description only, so that I can record tasks that need to be done ‘some day’.
As a user I can find upcoming tasks, so that I can decide what needs to be done soon.
As a user I can delete a task, so that I can get rid of tasks that I no longer care to track.
As a new user I can view more information about a particular command, so that I can learn how to use various commands.
As an advanced user I can use shorter versions of a command, so that type a command faster.
-
Step 2: Prioritize the user stories
Suggested workflow:
-
Take one user story at a time and get team member opinions about it.
-
Based on the team consensus, put the story (i.e. the piece of paper) onto one of these three piles:
Must-Have: The product will be practically useless to the target user without this feature.Nice-To-Have: The target user can benefit from this user story significantly but you are not certain if you'll have time to implement it.Not-Useful: No significant benefit to the target user, or does not fit into the product vision.
-
If using physical paper to record user stories: After all stories have been put in the above three piles, you can make a record of which stories are in the three piles.
-
-
Step 3: Document requirements of the product
Based on your user story categorization in the step above, given module requirements/constraints for the project, and the current state of the product, select which user stories you are likely to include in v2.0.
Document the following items using a convenient format (e.g., a GoogleDoc). Do not spend time on formatting the content nicely; reason: these will be ported to the actual Developer Guide in your project repo later.
💡 Some examples of these can be found in the AB4 Developer Guide.- Target user profile, value proposition, and
user stories : Update the target user profile and value proposition to match the project direction you have selected. Give a list of the user stories (and update/delete existing ones, if applicable), including priorities. This can include user stories considered but will not be included in the final product. -
Use cases : Give use cases (textual form) for a few representative user stories that need multiple steps to complete. e.g. Adding a tag to a person (assume the user needs to find the person first) -
Non-functional requirements :
Note: Many of the project constraints mentioned above are NFRs. You can add more. e.g. performance requirements, usability requirements, scalability requirements, etc. -
Glossary : Define terms that are worth defining. - [Optional]
Product survey : Explore a few similar/related products and describe your findings i.e. Pros, cons, (from the target user's point of view).
- Target user profile, value proposition, and
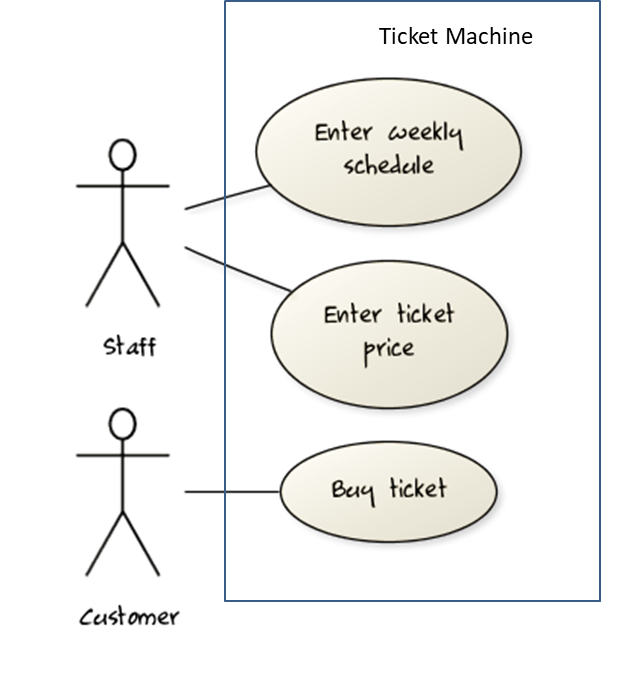
Requirements → Specifying Requirements → Use Cases →
Use Case: A description of a set of sequences of actions, including variants, that a system performs to yield an observable result of value to an
Actor: An actor (in a use case) is a role played by a user. An actor can be a human or another system. Actors are not part of the system; they reside outside the system.
A use case describes an interaction between the user and the system for a specific functionality of the system.
- System:
ATM - Actor: Customer
- Use Case: Check account balance
- User inserts an ATM card
- ATM prompts for PIN
- User enters PIN
- ATM prompts for withdrawal amount
- User enters the amount
- ATM ejects the ATM card and issues cash
- User collects the card and the cash.
- System: A Learning Management System (LMS)
- Actor: Student
- Use Case: Upload file
- Student requests to upload file
- LMS requests for the file location
- Student specifies the file location
- LMS uploads the file
Unified Modeling Language (UML) is a graphical notation to describe various aspects of a software system. UML is the brainchild of three software modeling specialists James Rumbaugh, Grady Booch and Ivar Jacobson (also known as the Three Amigos). Each of them has developed their own notation for modeling software systems before joining force to create a unified modeling language (hence, the term ‘Unified’ in UML). UML is currently the de facto modeling notation used in the software industry.
Use cases capture the functional requirements of a system.
Requirements → Requirements →
There are two kinds of requirements:
- Functional requirements specify what the system should do.
- Non-functional requirements specify the constraints under which system is developed and operated.
Some examples of non-functional requirement categories:
- Data requirements e.g. size,
volatility ,persistency etc., - Environment requirements e.g. technical environment in which system would operate or need to be compatible with.
- Accessibility, Capacity, Compliance with regulations, Documentation, Disaster recovery, Efficiency, Extensibility, Fault tolerance, Interoperability, Maintainability, Privacy, Portability, Quality, Reliability, Response time, Robustness, Scalability, Security, Stability, Testability, and more ...
- Business/domain rules: e.g. the size of the minefield cannot be smaller than five.
- Constraints: e.g. the system should be backward compatible with data produced by earlier versions of the system; system testers are available only during the last month of the project; the total project cost should not exceed $1.5 million.
- Technical requirements: e.g. the system should work on both 32-bit and 64-bit environments.
- Performance requirements: e.g. the system should respond within two seconds.
- Quality requirements: e.g. the system should be usable by a novice who has never carried out an online purchase.
- Process requirements: e.g. the project is expected to adhere to a schedule that delivers a feature set every one month.
- Notes about project scope: e.g. the product is not required to handle the printing of reports.
- Any other noteworthy points: e.g. the game should not use images deemed offensive to those injured in real mine clearing activities.
We may have to spend an extra effort in digging NFRs out as early as possible because,
- NFRs are easier to miss e.g., stakeholders tend to think of functional requirements first
- sometimes NFRs are critical to the success of the software. E.g. A web application that is too slow or that has low security is unlikely to succeed even if it has all the right functionality.
Given below are some requirements of TEAMMATES (an online peer evaluation system for education). Which one of these are non-functional requirements?
- a. The response to any use action should become visible within 5 seconds.
- b. The application admin should be able to view a log of user activities.
- c. The source code should be open source.
- d. A course should be able to have up to 2000 students.
- e. As a student user, I can view details of my team members so that I can know who they are.
- f. The user interface should be intuitive enough for users who are not IT-savvy.
- g. The product is offered as a free online service.
(a)(c)(d)(f)(g)
Explanation: (b) are (e) are functions available for a specific user types. Therefore, they are functional requirements. (a), (c), (d), (f) and (g) are either constraints on functionality or constraints on how the project is done, both of which are considered non-functional requirements.
Requirements → Specifying Requirements → Glossary →
Glossary: A glossary serves to ensure that all stakeholders have a common understanding of the noteworthy terms, abbreviation, acronyms etc.
Here is a partial glossary from a variant of the Snakes and Ladders game:
- Conditional square: A square that specifies a specific face value which a player has to throw before his/her piece can leave the square.
- Normal square: a normal square does not have any conditions, snakes, or ladders in it.
Requirements → Gathering Requirements →
Studying existing products can unearth shortcomings of existing solutions that can be addressed by a new product. Product manuals and other forms of technical documentation of an existing system can be a good way to learn about how the existing solutions work.
When developing a game for a mobile device, a look at a similar PC game can give insight into the kind of features and interactions the mobile game can offer.
-
User Guide:
Draft a user guide in a convenient medium (e.g., a GoogleDoc) to describe what the product would be like when it is at v2.0.- We recommend that you follow the existing AB4 User Guide in terms of structure and format.
- As this is a very rough draft and the final version will be in a different format altogether (i.e., in asciidoc format), don't waste time in formatting, copy editing etc. It is fine as long as the tutor can get a rough idea of the features from this draft. You can also do just the 'Features' section and omit the other parts.
- Do try to come up with concrete command syntax for feature that you would implement (at least for those that you will implement by v1.4).
- Consider including some UI mock-ups too (they can be hand-drawn or created using a tool such as PowerPoint or Balsamiq).
💡 It is highly recommended that you divide documentation work (in the User Guide and the Developer Guide) among team members based on enhancements/features each person would be adding e.g., If you are the person planing to add a feature X, you should be the person to describe the feature X in the User Guide and in the Developer Guide. For features that are not planned to be implemented by v1.4, you can divide them based on who will be implementing them if the project were to continue until v2.0 (hypothetically).
Reason: In the final project evaluation your documentation skills will be graded based on sections of the User/Developer Guide you have written.
Suggested length: Follow the existing user guide and developer guides in terms of the level of details.
Submission
: Save your draft as a single pdf file, name it {Your Team ID}.pdf e.g., M11-3.pdf and upload to LumiNUS.
v1.0 Project Management
-
After the v2.0 is conceptualized, decide which features each member will do by v1.4. We realize that it will be hard for you to estimate the effort required for each feature as you are not familiar with the code base. Nevertheless, come up with a project plan as per your best estimate; this plan can be revised at later stages. It is better to start with some plan rather than no plan at all. If in doubt, choose to do less than more; we don't expect you to deliver a lot of big features.
-
Divide each of those features into three increments, to be released at v1.1, v1.2, v1.3 (v1.4 omitted deliberately as a buffer). Each increment should deliver a end-user visible enhancement.
-
Document the above two items somewhere e.g., in a Google doc/sheet. An example is given below:
* Jake Woo: Profile photo feature
  * v1.1: show a place holder for photo, showing a generic default image
  * v1.2: can specify photo location if it is in local hard disk,
          show photo from local hard disk
  * v1.3: auto-copy the photo to app folder, support using online photo
          as profile pic, stylize photo e.g., round frame
Submission : Include in the pdf file you upload to LumiNUS.
Suggested tutorial activities
Requirements analysis
- As a team, discuss user stores, use cases and non-functional requirements for your project.
- Present to your tutor and the other team some key user stories and use cases.
Practice GitHub PR workflow
- Follow instructions from your tutor to complete this exercise.
Policy on project work distribution
As most of the work is graded individually, it is OK to do less or more than equal share in your project team.
Related: [Admin: Project: Scope]
Policy on email response time
Normally, the prof will respond within 24 hours if it was an email sent to the prof or a forum post directed at the prof. If you don't get a response within that time, please feel free to remind the prof. It is likely that the prof did not notice your post or the email got stuck somewhere.
Similarly we expect you to check email regularly and respond to emails written to you personally (not mass email) promptly.
Not responding to a personal email is a major breach of professional etiquette (and general civility). Imagine how pissed off you would be if you met the prof along the corridor, said 'Hi prof, good morning' and the prof walked away without saying anything back. Not responding to a personal email is just as bad. Always take a few seconds to at least acknowledge such emails. It doesn't take long to type "Noted. Thanks" and hit 'send'.
The promptness of a reply is even more important when the email is requesting you for something that you cannot provide. Imagine you wrote to the prof requesting a reference letter and the prof did not respond at all because he/she did not want to give you one; You'll be quite frustrated because you wouldn't know whether to look for another prof or wait longer for a response. Saying 'No' is fine and in fact a necessary part of professional life; but saying nothing is not acceptable. If you didn't reply, the sender will not even know whether you received the email.
Why so much bean counting?
Sometimes, small things matter in big ways. e.g., all other things being equal, a job may be offered to the candidate who has the neater looking CV although both have the same qualifications. This may be unfair, but that's how the world works. Students forget this harsh reality when they are in the protected environment of the school and tend to get sloppy with their work habits. That is why we reward all positive behavior, even small ones (e.g., following precise submission instructions, arriving on time etc.).
But unlike the real world, we are forgiving. That is why you can still earn full 10 marks of the participation marks even if you miss a few things here and there.
Related article: This Is The Personality Trait That Most Often Predicts Success (this is why we reward things like punctuality).